
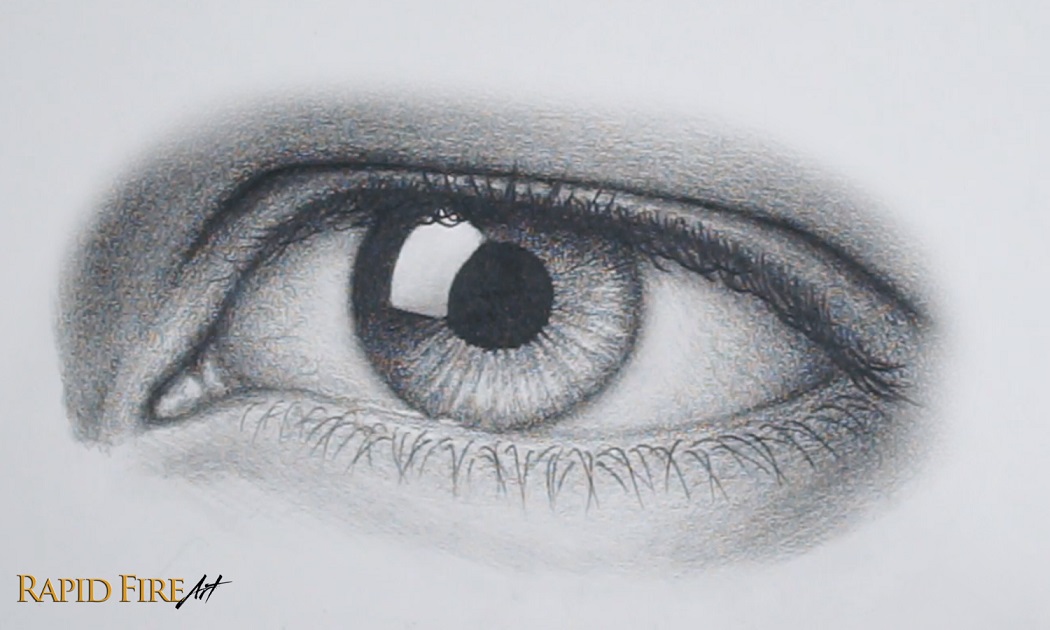
Hey, I’m Darlene and in this tutorial, I’ll show you a simple way to draw a realistic hooded male eye using basic, budget-friendly tools. I’m using a 2B pencil from the dollarstore, but an HB school pencil works fine too. You can blend with a tissue, and any eraser will do the job, though a kneaded eraser gives you more control.
Learn how to make a DIY kneaded eraser!
Alright, let’s get into it.
Step 1: Draw a Trapezoid
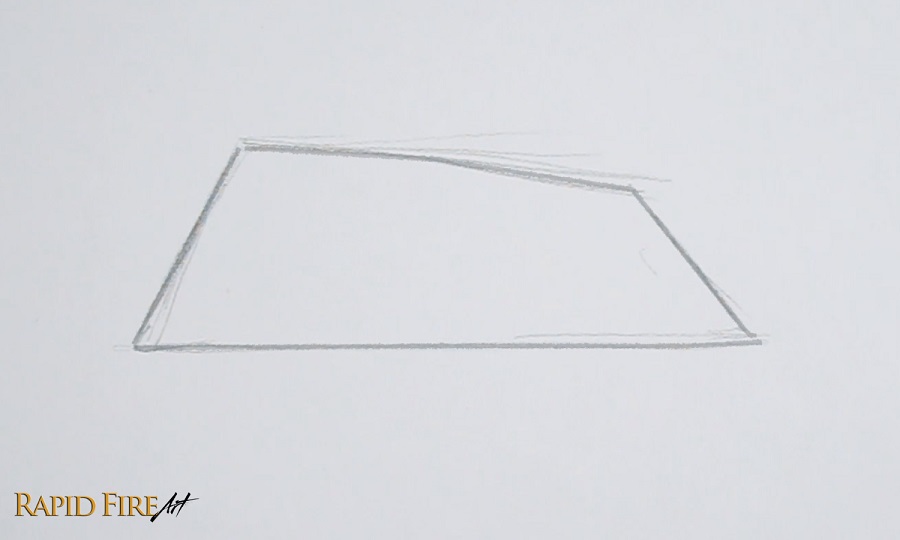
Begin by lightly drawing a simple trapezoid shape. This acts as a rough guideline you can use to draw the actual eyeshape on top of. My trapezoid is more narrow on the right side (tail end of the eye). You can tweak and morph the shape however you want to get a unique eye shape that appeals to you.
If you want a more masculine look, try making the trapezoid narrower since narrow eye shapes tend to read as more masculine, correlated with high levels of testosterone.
In case you want to closely replicate his eye, my trapezoid is roughly 10 by 3 centimeters.
Step 2: Draw the Eye Shape
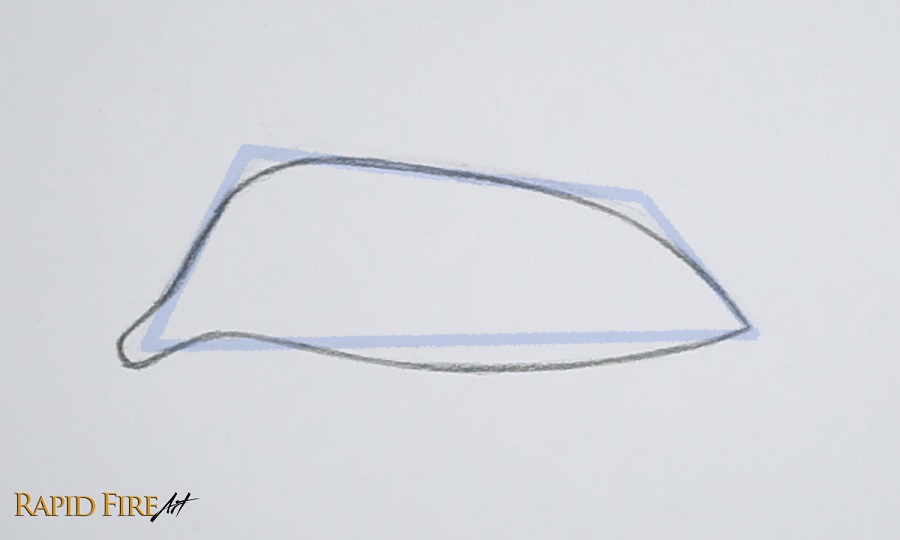
Now using the trapezoid as a rough guideline, draw the inner corner of the eye, shaping it like a rotated “U” or “V” shape.
From there, draw the lower eyelid as a gentle curve that dips slightly in the middle before rising back up to meet the opposite corner of your trapezoid. Then move on to the upper eyelid, rounding out the trapezoid edges so the eye starts to feel more natural.
Once you’re happy with your eye shape, erase the trapezoid.
Step 3: Draw the Eyelid Crease
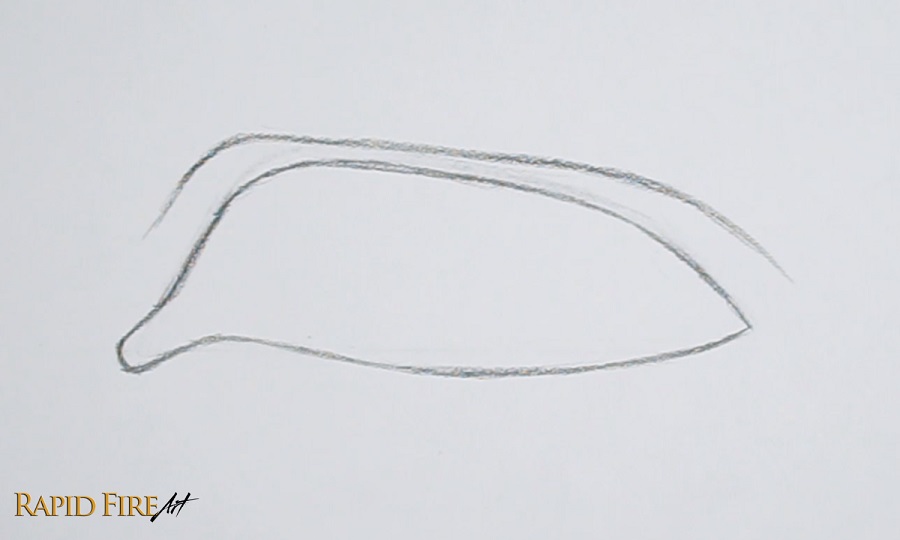
Above the eye, lightly sketch the eyelid crease by following the general curve of the top eyelid. To make the eyelid appear hooded, dip your pencil stroke lower, minimzing the space between the crease and eyelid outline.
Step 4: Draw the Iris
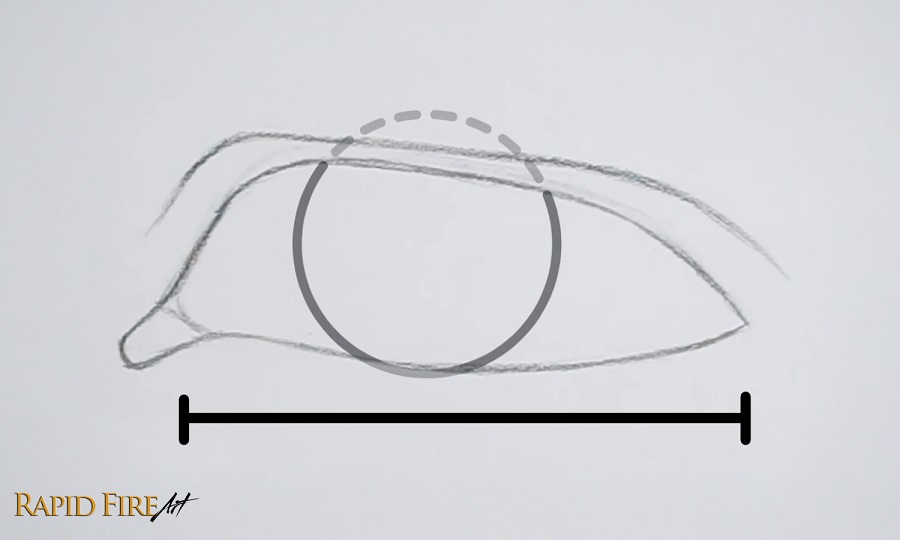
To draw the iris, first measure the width of the eyeball and divide that number by 2 to get the iris size. For a realistic-looking iris, avoid drawing 2 bracket shapes and instead draw a full circle.
Positioning of the iris is important. The bottom of the iris is usually more visible than the top. Also having the iris be slightly covered by the upper eyelid helps create a natural, relaxed expression. Draw it lightly so you can adjust before committing to the final placement.
Over by the tearduct, draw a curve or two to divide the pink fleshy area from the eyeball.
Don’t erase the top part of your iris yet.
Step 5: Add the Pupil and Decide On Your Light Source
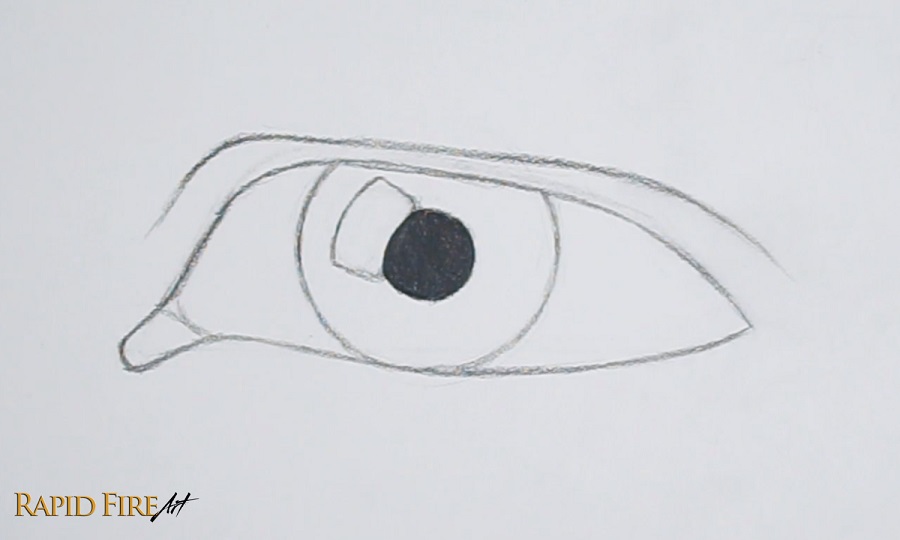
Once the iris is placed, draw the pupil right in the center.
Need help finding the center of the iris? Draw a cross through the iris, using the intersection of the two lines to determine the center.
The size of the pupil depends on how much light is entering the eye. It gets wider in the dark and smaller when it’s bright out, so the size is up to you and how much light you want in the scene.
Now decide where your light is coming from because this will control all your shading. My imaginary light source is shining down from the top left, but you can choose any direction. Based on that light source, add a highlight inside the eye. I like using a simple window reflection shape because it wraps nicely around the round form of the eyeball and helps push the realism.
Shade the pupil as dark as you can get it.
At this point, we can erase part of the iris circle that falls on the skin.
Step 6: Shade the Iris and Add Detail
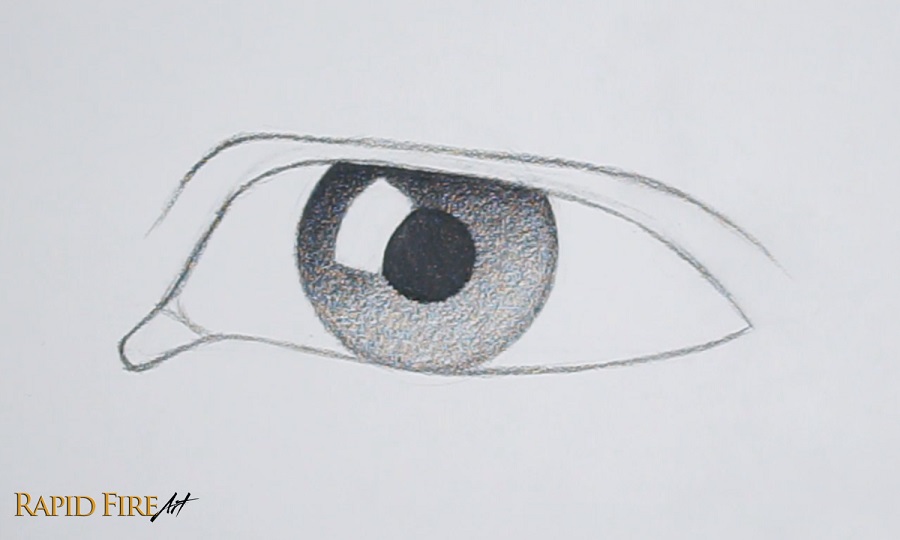
Now let’s shade the iris. Since my light source comes from the top left and the iris is actually like a concave bowl shape i’m gonna shade the top left side darker because it faces away from the light and then I’ll gradually shade lighter on the bottom right side where the iris curves back out, facing the light more directly.
To account for the cast shadow from the top eyelid, shade darker along the very top of your iris and fade out as you work your way down.
I recommend blending every layer or every few layers of graphite instead of leaving it until the very end. I did the latter to save some time with the lesson.
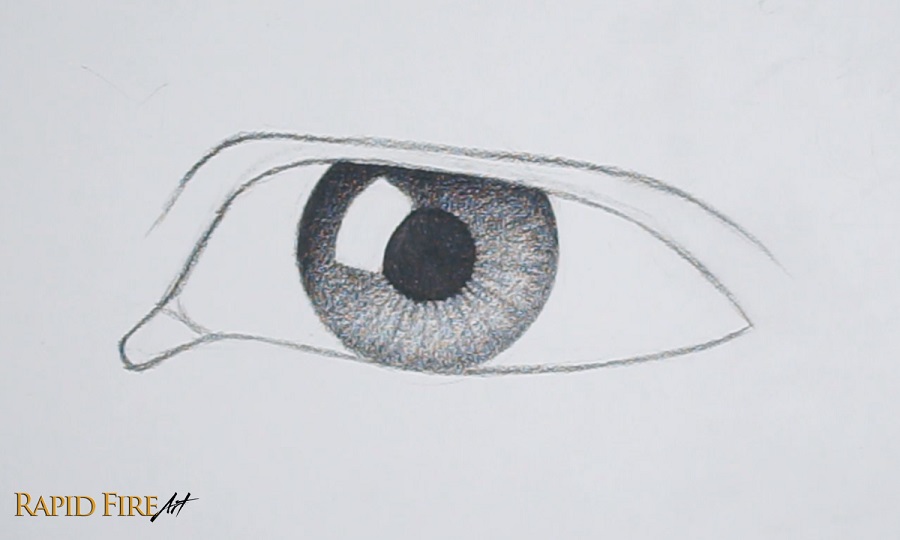
You can add some texture to the iris by drawing lines radiating from the center, fading them out near the edge of the iris. You can make them look natural by varying the thickness, spacing, length, and value of each stroke.
The key here is to avoid making everything too uniform. Real irises are slightly irregular.
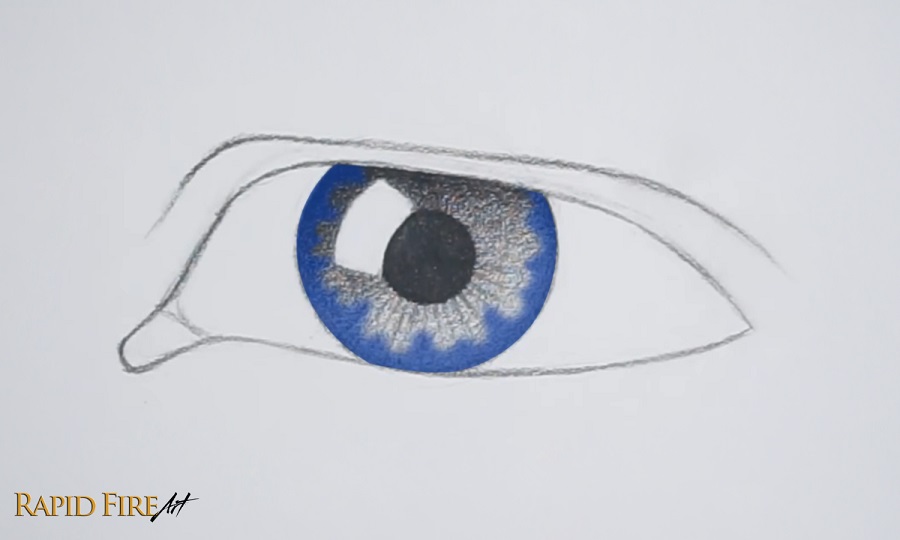
This is also where you can add subtle detailing around the rim of the iris if you want more realism and depth. Start your pencil strokes along the edge of the iris and flick inward to fade your strokes out.
Step 7: Shade the Eyeball and Inner Corner of the Eye
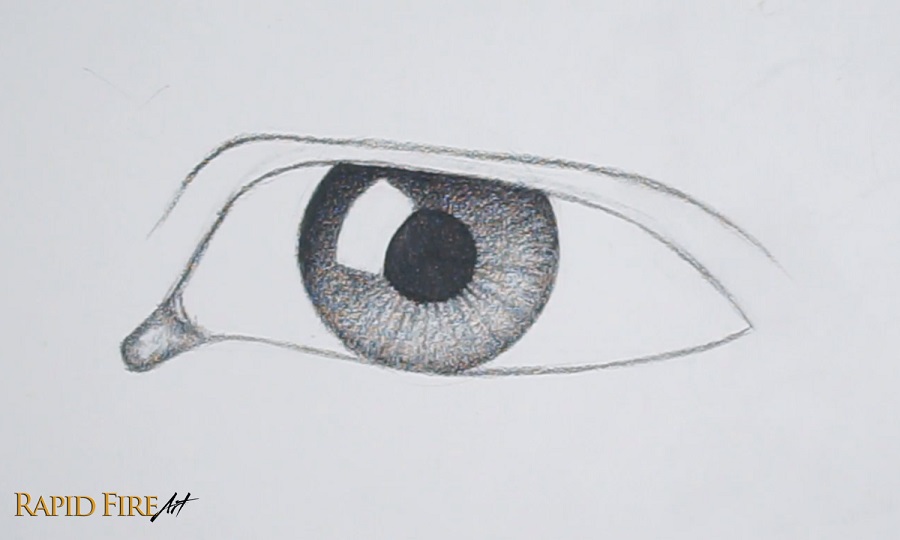
Shade lightly inside the inner corner of the eye. Then darken the edges to make it look convex. Use your eraser to create some highlights, making the surface look moist. You can use a kneaded eraser with a light dabbing or dragging motion.
Learn how to make a kneaded eraser out of a regular solid eraser!
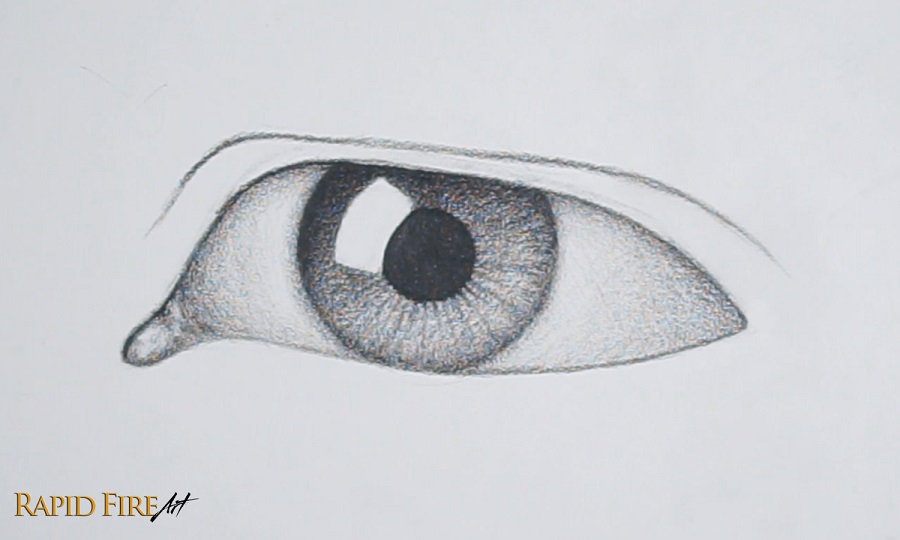
Shade the rest of the eyeball. We don’t want to leave it white so let’s start by shading a very light layer of graphite across the entire area and blend it.
Add some darker shading along the far left and right of the eyeball to communicate the eyeball’s round shape. Add a cast shadow along the top to account for the light being blocked by the top eyelid.
Shade slightly darker along the bottom of the eyeball to show that the surface curves away from the light.
Also shade around the iris to soften the hard edge.
If any of this shading looks too dark for you, I have a trick to easily lighten it – just blend it with a facial tissue, which will lift some of the graphite away in the process.
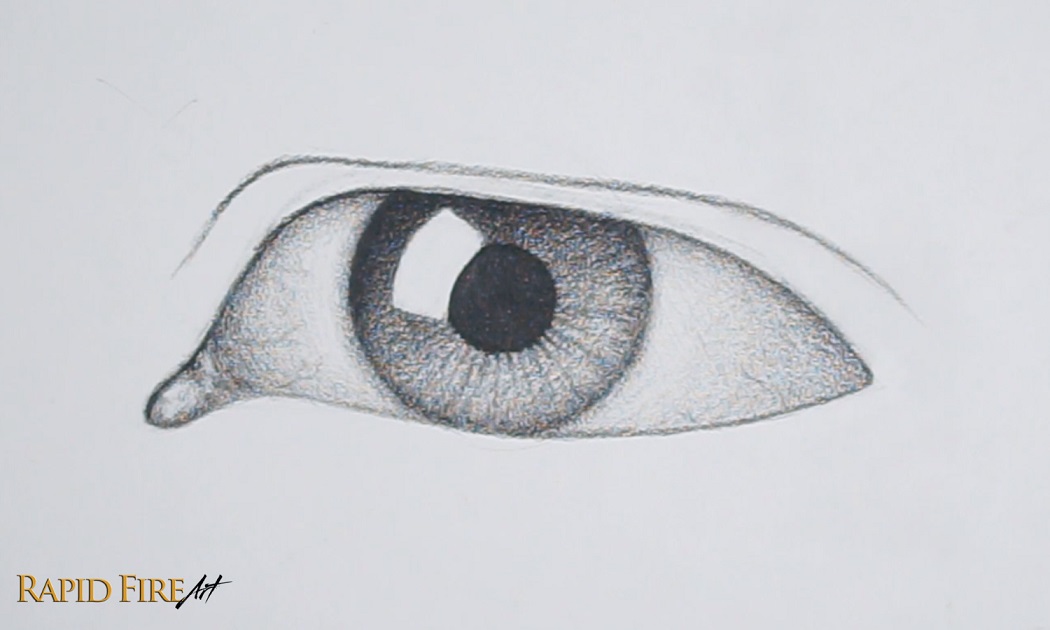
An optional detail you can include is some subtle blood vessels, which look similar to wiry tree branches. Try not to overdo these because they can easily make the eye look bloodshot.
Step 8: Shade the Skin
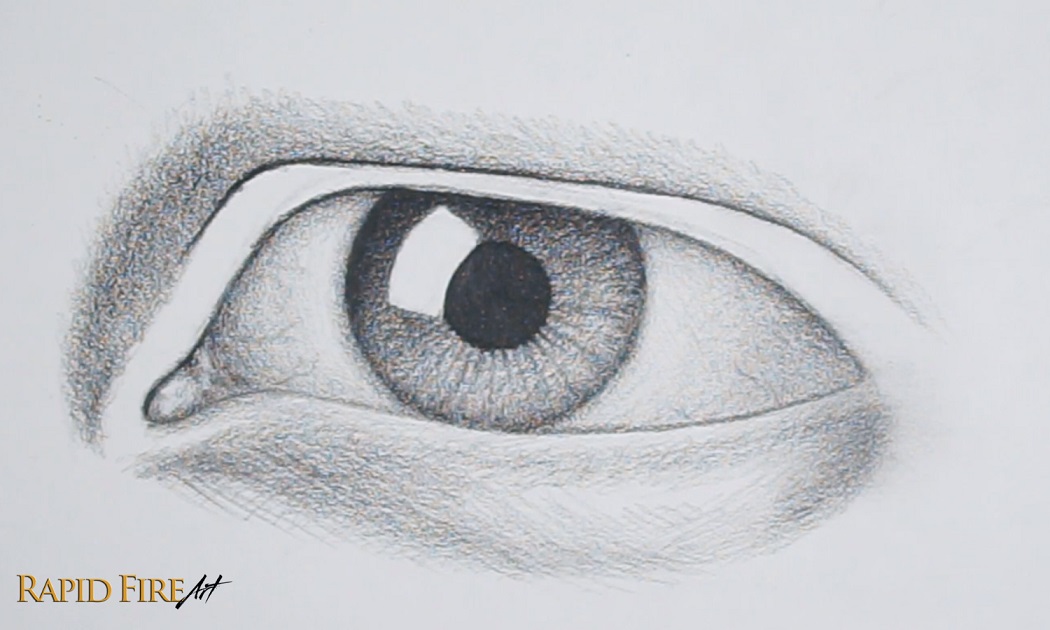
With your light direction in mind, shade the skin surrounding the eye.
I’m going to start with the bottom lid. There’s a small ledge that will be visible along the bottom eyelid from this angle and i’m going to use a circular shading technique to outline this ledge. Try to avoid drawing a hard straight line because it might look unnatural. Keep it nice and subtle.
Below this ledge, you can add an eye bag/pouch if you want. The darker you shade the underside, the puffier it will appear. Also, shading the lower eyelid skin too dark can result in a tired look.
Let’s move to the top eyelid now. If you want your drawing to have a very strong bone structure you may want to really bring out the nose bridge and/or brow bone. You can do that by shading the area beside the nose and below the brow especially dark to show just how much the bones protrude out of the face.
Click here to learn more about drawing masculine and feminine features.
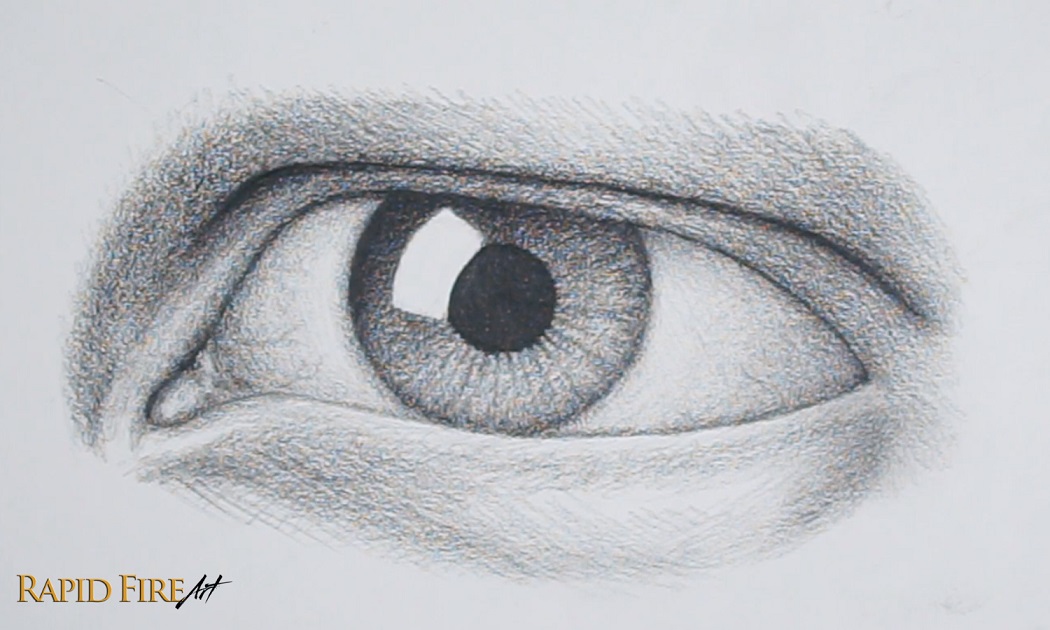
Shade very dark along the eyelid crease and lighten your strokes gradually as you work your way up toward the brow and down toward the eye so the skin looks as though it dips inward.
Shade along the very bottom of the top eyelid to show that the form curves away from the light.
Add a layer of darker graphite along the right side of the eye to make it look like it’s facing away from the light.
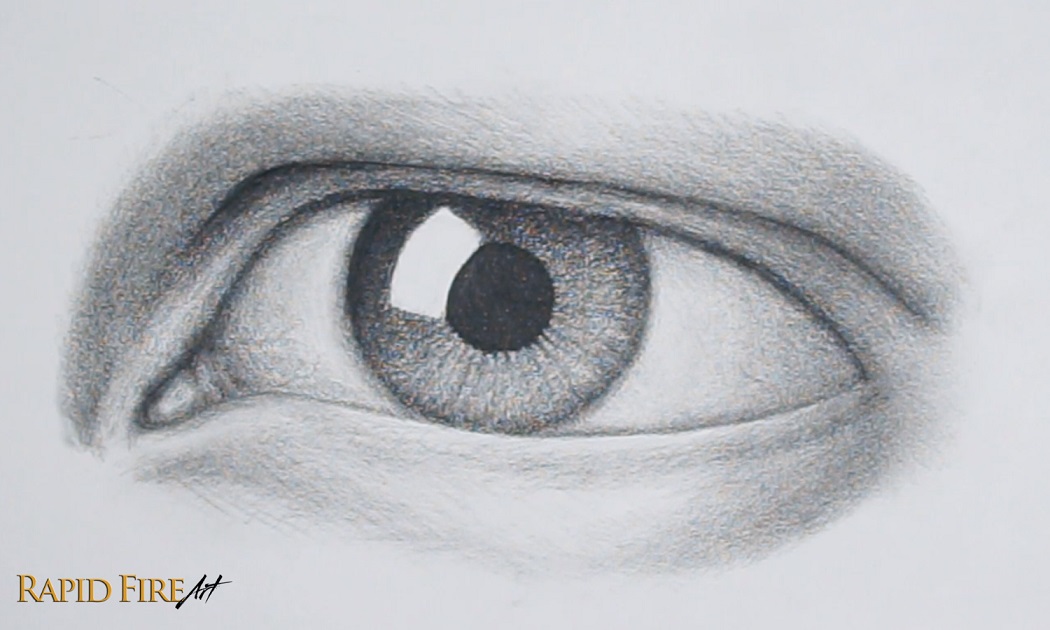
You don’t have to blend your drawing, but if you decide to, I would recommend doing so before the next step. We want to avoid blending after the eyelash details are drawn to avoid smudging those fine details.
I like to use a regular facial tissue wrapped around the pad of my finger to blend large areas, making sure to work from a light zone into a dark one to avoid smearing. I also use a new spot on the tissue each time. For tight spaces, I will either use the tip of my finger or a folded tissue using a special folding technique. Watch the video below to see my blending examples in action.
Step 9: Draw Eyelashes and Finish the Eye
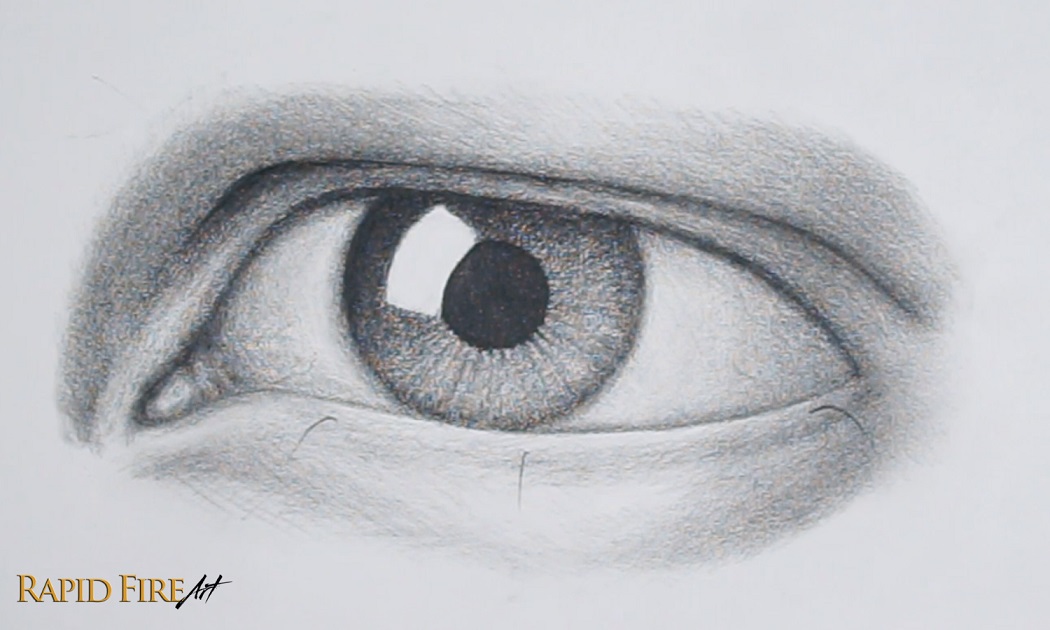
I like to start by drawing 3 lashes on each eyelid to map out the major lash directions. On the left side, the lashes will mostly point toward the left, in the center they’ll mostly point forward, and on the right side they’ll mostly point toward the right. I say mostly because some hairs naturally curve or point in completely different directions. If you have trouble drawing the lash shapes, think of them as the letter “J”. Narrow J’s for lashes facing toward us and gradually wider J’s as the lashes start turning toward the sides.
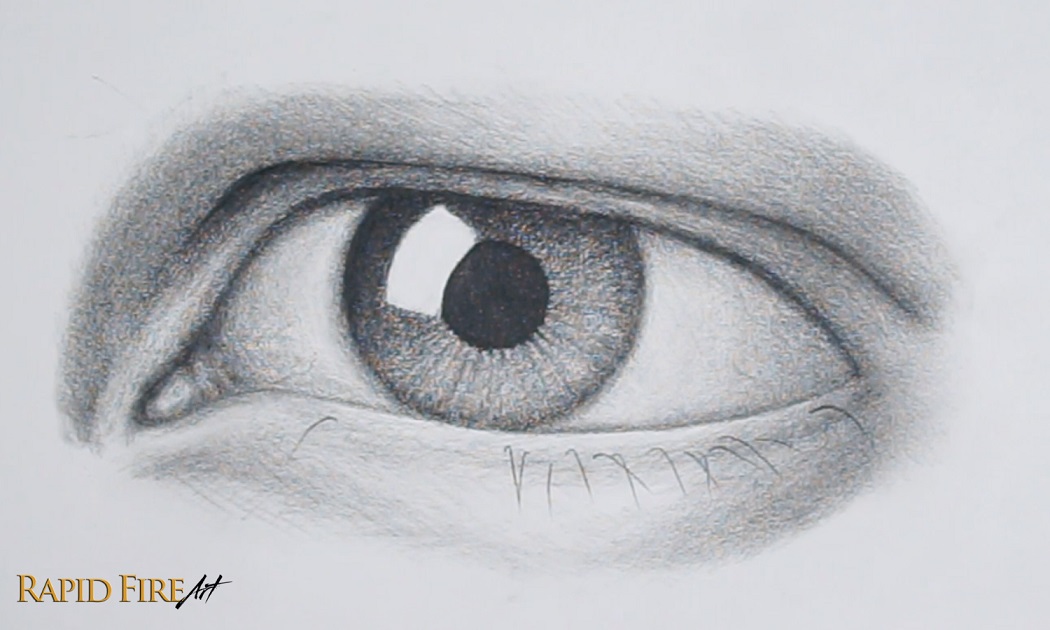
Once you have your first 3 lashes drawn, fill the spaces in between. There are several ways to make your lashes look natural, such as:
- Crossing them over each other
- Tapering lashes
- Varying thickness
- Staggering the roots
…and more! To learn more about drawing lashes in detail and to grab a free eyelash drawing wordsheet, visit this dedicated eyelash tutorial.
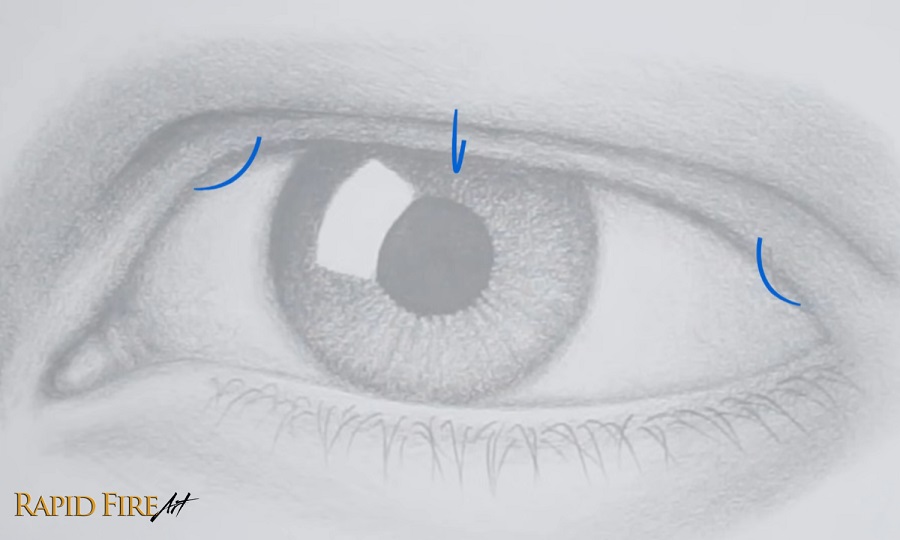
Let’s draw the upper lashes now. For a more masculine look, I usually angle them slightly downward instead of up so they don’t look as though they were crimped using an eyelash curling tool.
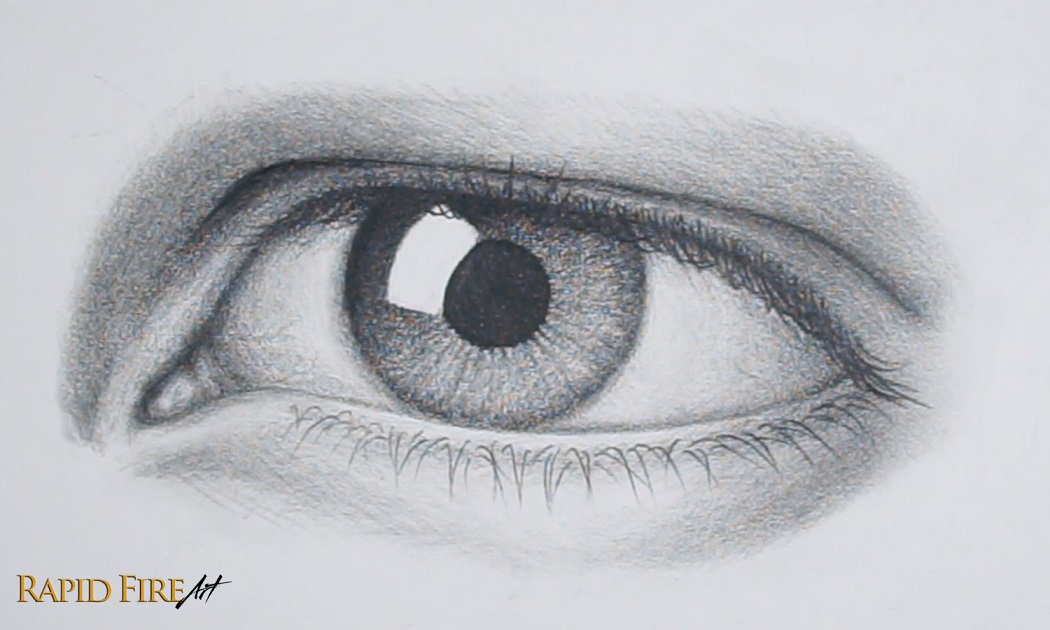
Once you’re done, let’s add a slight cast shadow directly below the lashes and we’re going to go along the root of each eyelash with subtle circular shading just to add some additional texture to the skin. Don’t forget to add some eyelash reflections in the highlight.
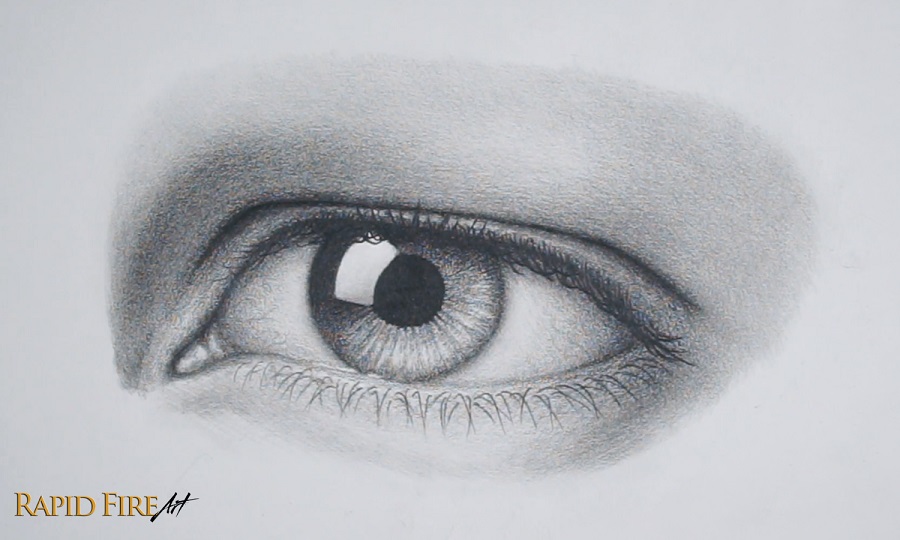
Once the lashes are drawn, go back in and adjust your shading, deepen the shadows, and brighten highlights if needed.
I wanted to increase the contrast to make the eye look less dull, so I:
- Darkened areas like the eyelid crease and iris to strengthen the form and push the depth.
- Brightened the light side of the iris using my kneaded eraser and a swiping motion, following the existing radial pattern.
- Added/brightened highlights such as in the inner corner of the eye and some thin lines where the eyeball meets the bottom eyelid to convey wetness.
I found the highlight too bold for my preference, so I added a slight gradient to the bottom by smudging the surrounding graphite into it to reduce that harsh white area. Another option would’ve been to break up the highlight by adding a reflection or silhouette of any object inside it, which helps it feel less like a flat white shape.
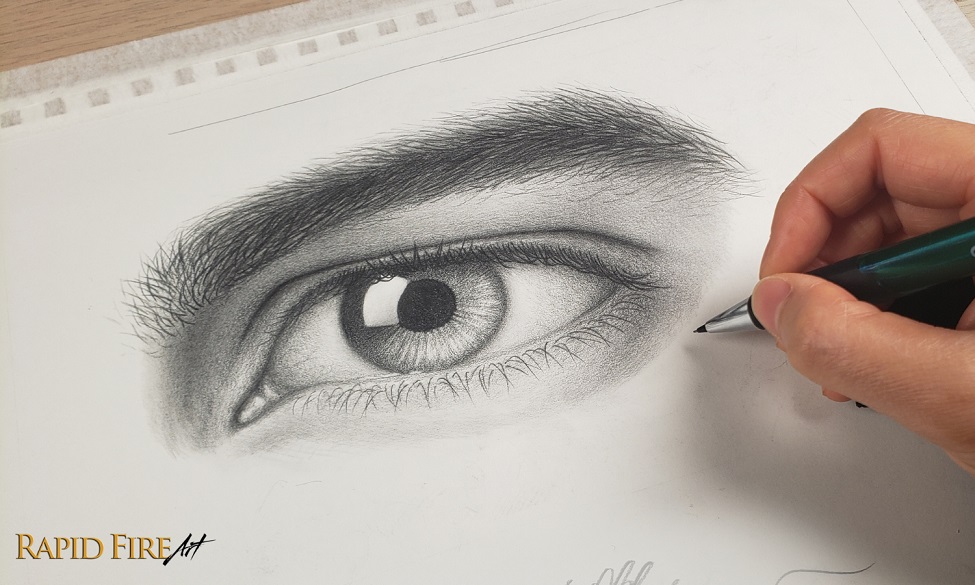
There’s a part two of this tutorial where I go into drawing the eyebrow. If you want to continue this eye into that stage, you can extend your shading upward above the brow to make space for it. Keep in mind that the area above the brow (forehead) is facing the light more directly, so will need to be shaded lighter.
Once you’re comfortable with this process, try changing the lighting or eye shape for more variety. To learn where the eye sits on the head and how it fits into facial construction, visit my Loomis face drawing tutorials.
What’s Next?

5 Common mistakes when drawing eyes
Fix the most common issues that make eyes look flat, uneven, or unrealistic.

Shading Fundamentals Guide
Learn how light works, how to shade smoothly, and practice pencil control with simple exercises.

Learn where to place eyes on the face
Use the Loomis method to construct the head from any angle so your features sit on a solid foundation.

Having trouble achieving symmetry?
Learn how to make your eyes match using simple alignment techniques.

Go back to front view basics
Practice drawing a pair of eyes from the front view to build accuracy and confidence.

How to Draw Eyebrows
Learn how to draw the eyebrow for this exact eye.

Darlene created RFA In 2013 with the goal of sharing simple yet detailed drawing tutorials with other artists on the world wide web. She is a self taught pencil portrait artist and Youtuber.


