
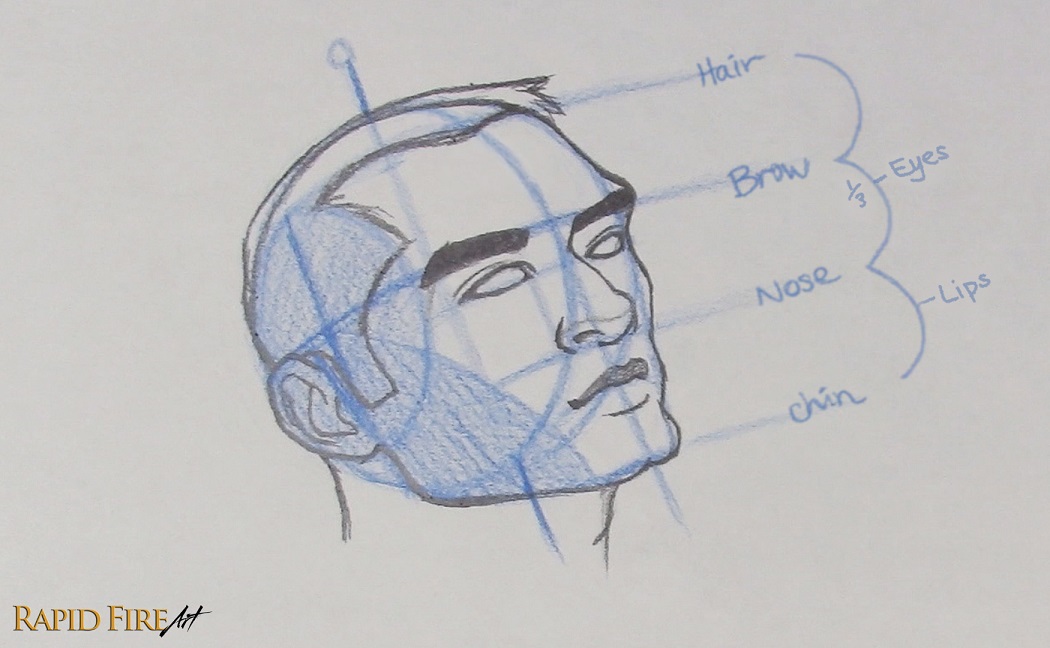
Hey, I’m Darlene and in this tutorial, I’ll walk you through Andrew Loomis’ method for drawing a face from the ¾ view with the head tilted upward.
It took me quite a while to fully understand and apply the Loomis method myself. If you’ve read his book, you’ll notice I’ve adapted certain parts and added my own explanations in areas where I struggled at first, aiming to make each step as clear as possible while you draw along.

This is the final part of a four-part series on drawing heads using the Loomis method:
Part 1: front view
Part 2: side view
Part 3: 3/4 view
You can follow this tutorial on its own, but it will make much more sense if you’ve gone through the series in order. Each part builds on the last, and seeing the head constructed from different angles makes more complex perspectives easier to understand and helps you draw heads more confidently from imagination over time.
Important Note: Any text marked with an asterisk “*” is intended for viewers following this series in order. If you’re viewing this tutorial on its own, some of these notes may not fully make sense without context from the previous tutorials.
*In this tutorial, the head is tilted upward in addition to being rotated into the ¾ view. Because of this, some construction steps and proportions will be slightly different compared to the previous tutorials. I’ll point these changes out as we go so you can understand how the Loomis method adapts to more complex angles.
At this angle, the upward tilt changes how the forms read in perspective. The feature lines appear more curved, while the underside of the nose, jaw, and chin becomes more visible. These shifts are what create the sense of the head tilting upward rather than simply facing sideways.
Drawing Tools
I’ll use a colored pencil for the construction lines so they’re easier to see, and a 4B graphite pencil for the final drawing for a cleaner contrast.
You can absolutely follow along with just a standard HB pencil if that’s what you have!
Building the Basic Head Structure (3/4 View Tilted Up)
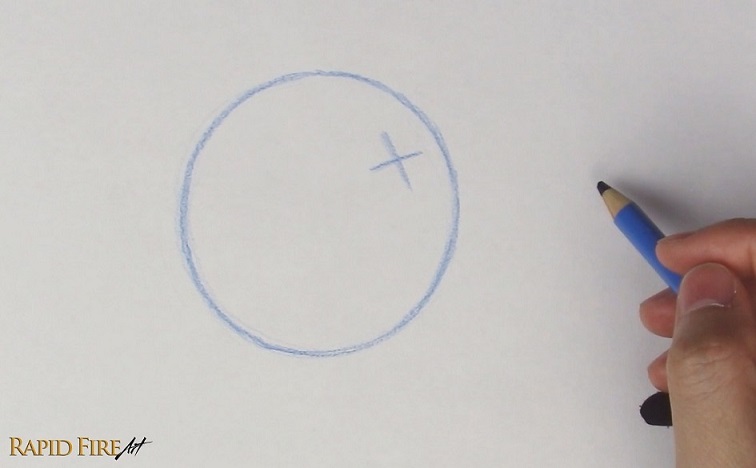
Begin by drawing a circle for the cranium. Then draw a cross to indicate the direction the head is facing, establishing the front of the face. Since we want the head to be facing the upper right, the cross should sit in the upper-right area of the sphere. The lines of the cross should be perpendicular to each other.
*You may be wondering why we’re not starting with the axis like the previous 3 tutorials in this series. For angles like this where both the middle line and brow line are rotated off-center, it will be easier to draw the cross before the axis. But please experiment with both ways to see which order works better for you.
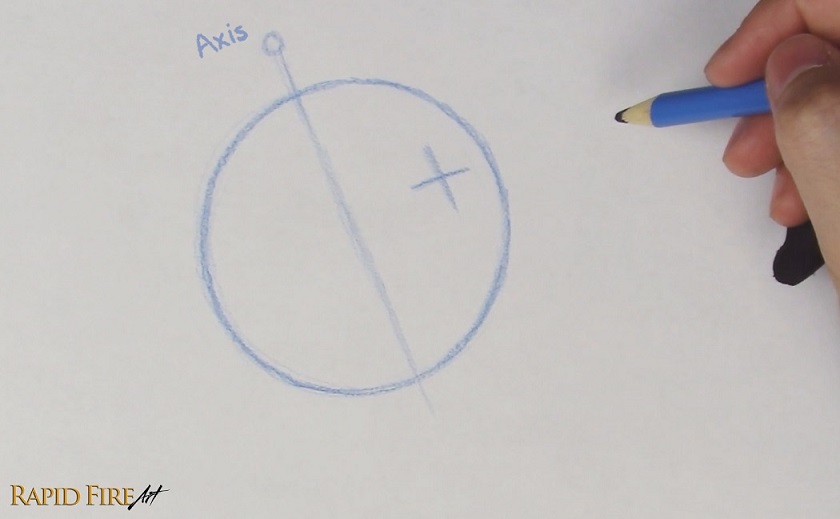
Now draw a long, straight line through your sphere called the Axis. Make sure it’s parallel to the vertical line from the cross.
The axis is tilted because the head angle is also tilted. You can think of this line as the axis on which our planet Earth rotates. Where the axis juts out the top and bottom of the sphere, we’ll call those the north and south poles.
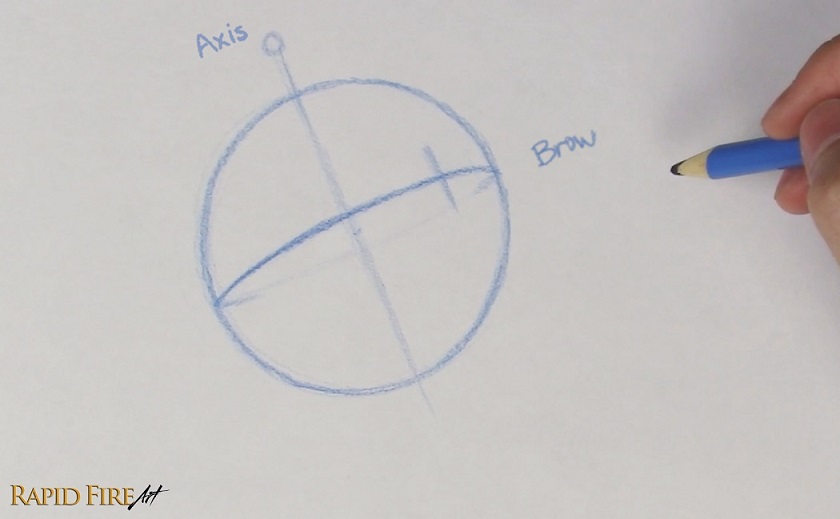
Now draw an ellipse that runs through the cross longditudinally. This is where the eyebrows will sit, so we’ll call it the Brow Line. Make sure it’s perpendicular to the Axis (if you draw a line through the longest part of the ellipse, that line should form a 90-degree angle with the Axis).
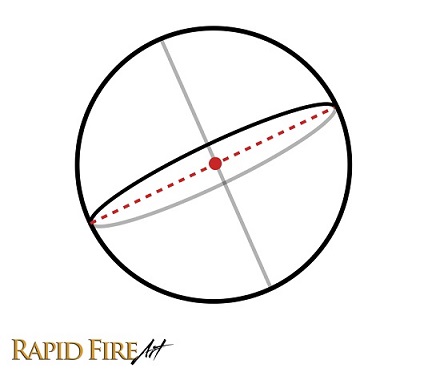
Tip: If you’re having trouble balancing the ellipse properly, first locate the center point of the sphere. The center of your ellipse should pass directly through that point. It also helps to draw the full ellipse, not just the visible side.
*It might feel weird to draw an angled ellipse after going through the last 3 tutorials because they were either perfectly vertical or horizontal. If this step is a struggle, rotate your sketchbook, so the axis is vertical instead of slanted. Then try drawing the ellipse again.
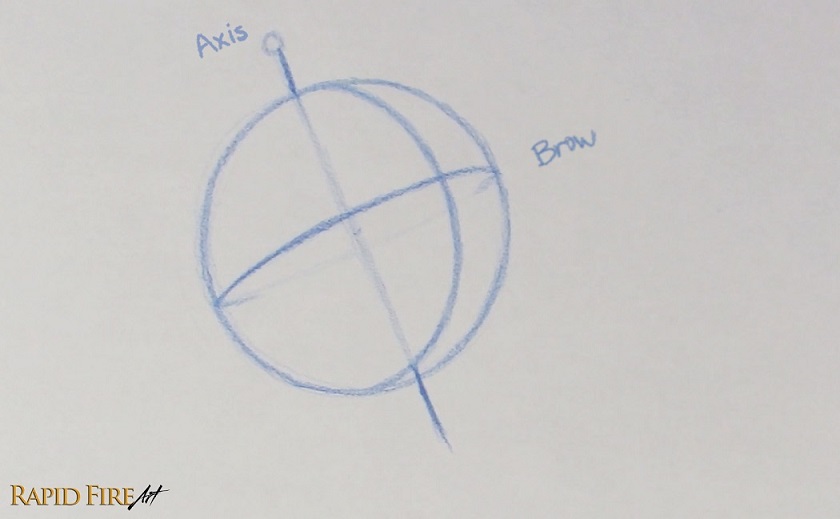
Now draw an a second ellipse that passes through the vertical line of the cross while also passing through the north and south poles (the top and bottom of the Axis). Make sure the ellipse tilts so it reveals the very bottom of the ball – Since the head is tilted upward so much, we can actually see the very bottom of the sphere where the Axis and Middle Line intersect. This southernmost point becomes important later when we start placing the facial features.
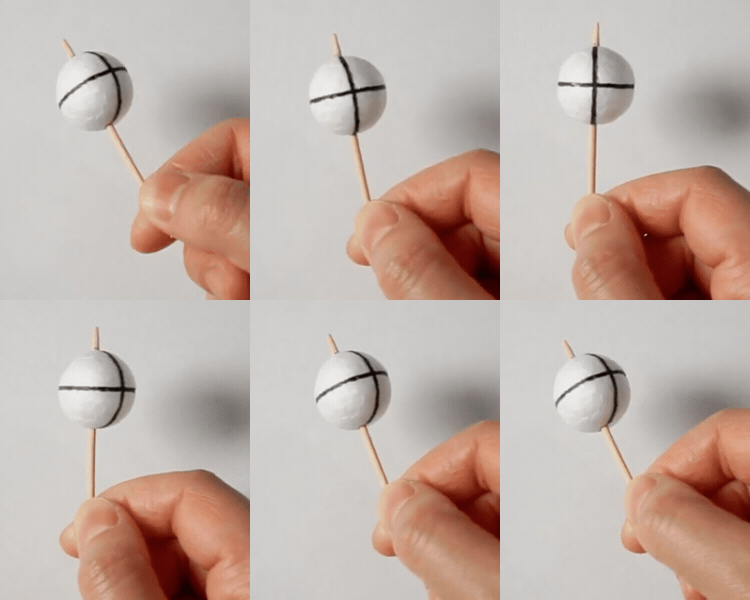
It’s very helpful to have a physical model you can rotate and study in your own hands, especially when drawing difficult head angles like this one. It gives you a better sense of how the feature lines curve around the form and how the head changes as it tilts in space.
If you want to make a simple drawing reference tool like the one I used for this tutorial, draw a vertical and horizontal line across any ball and pierce a stick through the north and south poles. A transparent ball works even better if you can find one, since it lets you see the full ellipses and better understand how they wrap around the form.
Notice how, as I rotate the model upward, the south pole shifts into view. This is exactly what happens when the head tilts up. We begin to see more of the underside of the sphere, which changes the placement and curvature of the facial features.
To make your own model, you’ll need:
– Toothpick
– Small ball (I used a styrofoam one, but you can also make one out of playdoh)
– Permanent marker
The ball acts as the cranium, and the toothpick represents the Axis the head rotates around. As the head rotates upward, this Axis becomes a key reference for keeping all facial features aligned in perspective. It helps you maintain consistent angles so the face doesn’t start to feel skewed as the construction process becomes more complex.
Alright, let’s continue with our head construction!
Draw the Side Plane for the 3/4 View
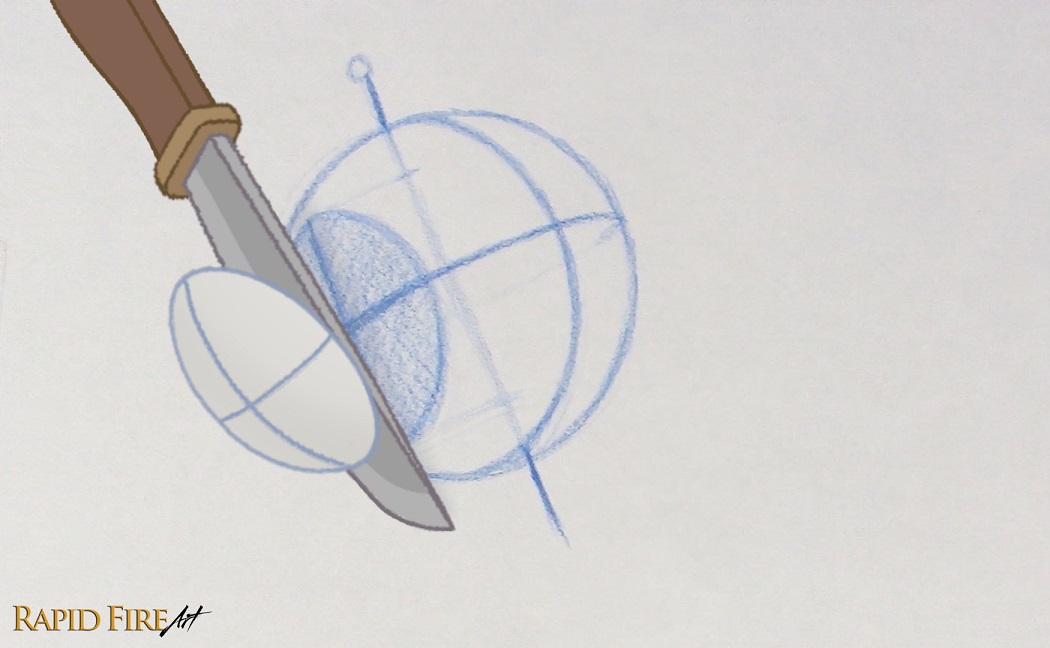
So far, we’ve drawn a sphere, but the human head isn’t perfectly round. The sides are much flatter, so we’ll need to slice 🔪 a section off the sphere to create the Side Plane (side of the head).
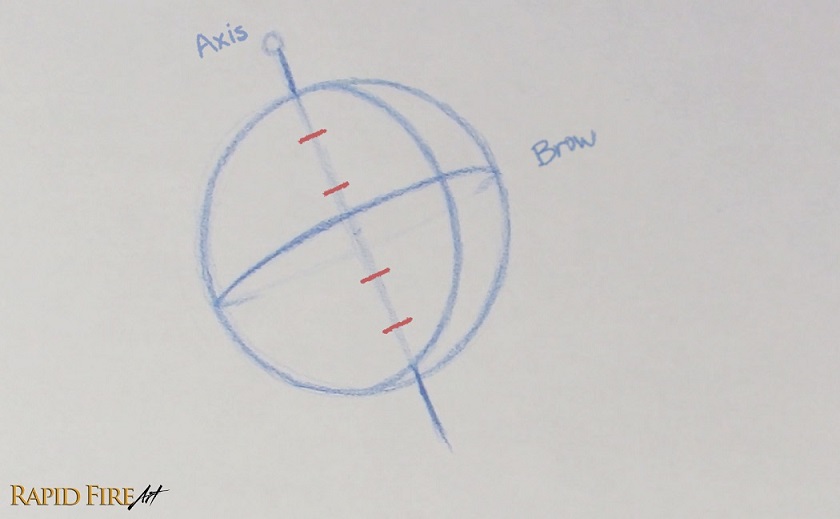
Since the head is rotated into the ¾ view, we only need to draw the visible Side Plane. To size it correctly, split the sphere into 6 equal spaces from top to bottom using small tick marks placed along the Axis.
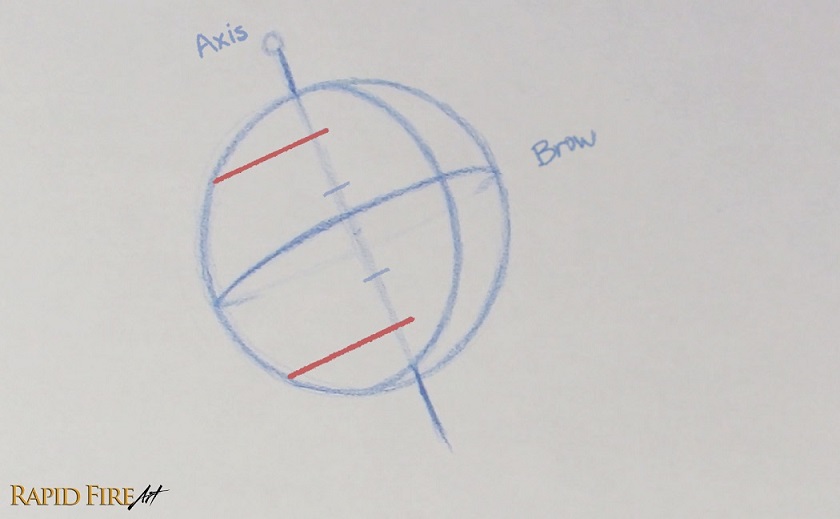
Locate the topmost and bottommost ticks, then extend them toward the edge of the sphere, making sure your lines are perpendicular to the Axis.
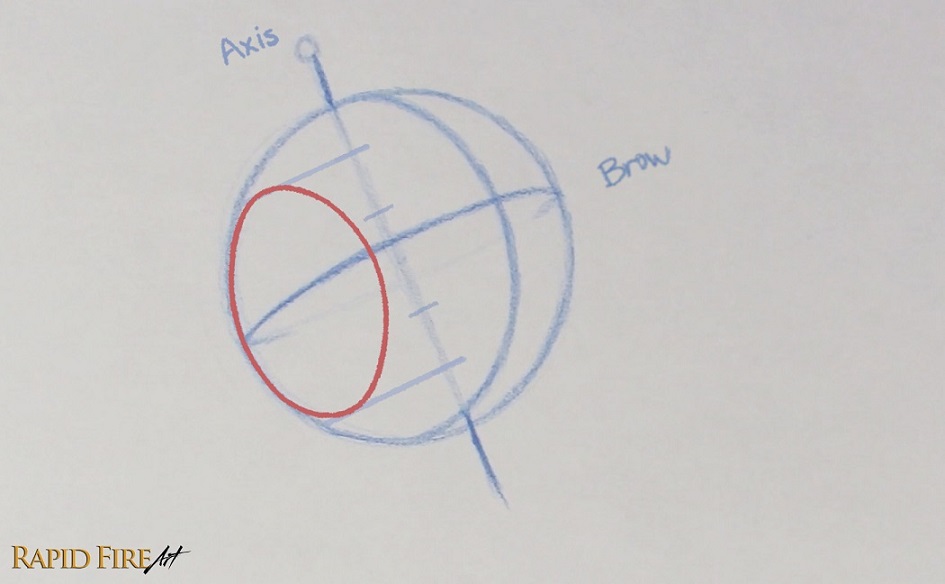
Using those two boundary lines as a guide, draw an ellipse that spans almost half the sphere’s width.
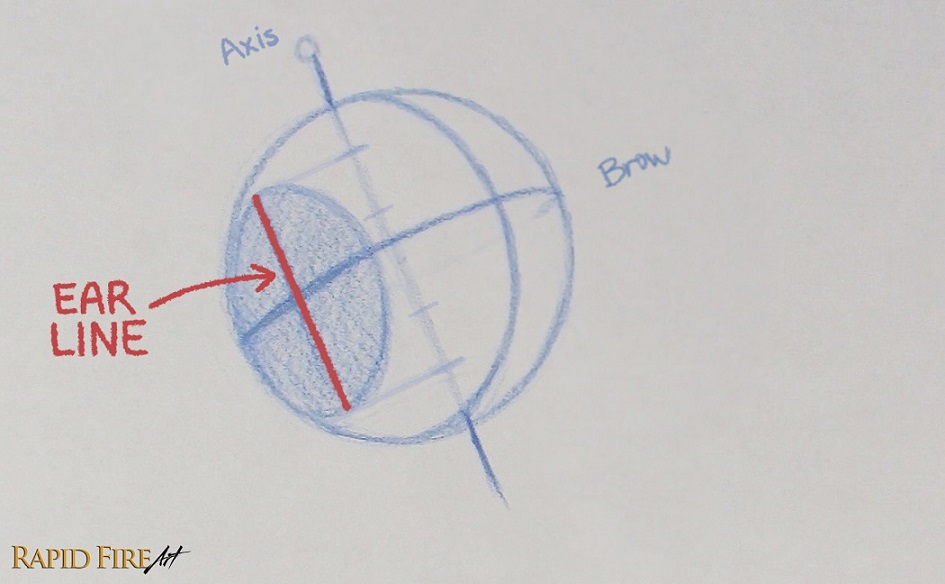
The ear will be drawn on the side plane. If we divide the area into 4 equal spaces, it will be easy to place the ear correctly. So let’s add a vertical line through the middle of the side plane and call it the Ear Line, making sure it stays parallel to the Axis.
You can apply some foreshortening by slightly tapering the Ear Line and Axis for this angle of the head.
Note: If you’re struggling to visualize the Side Plane at this angle, I recommend checking out the front and side view construction first, making this step easier to grasp.
Locate Facial Feature Placement
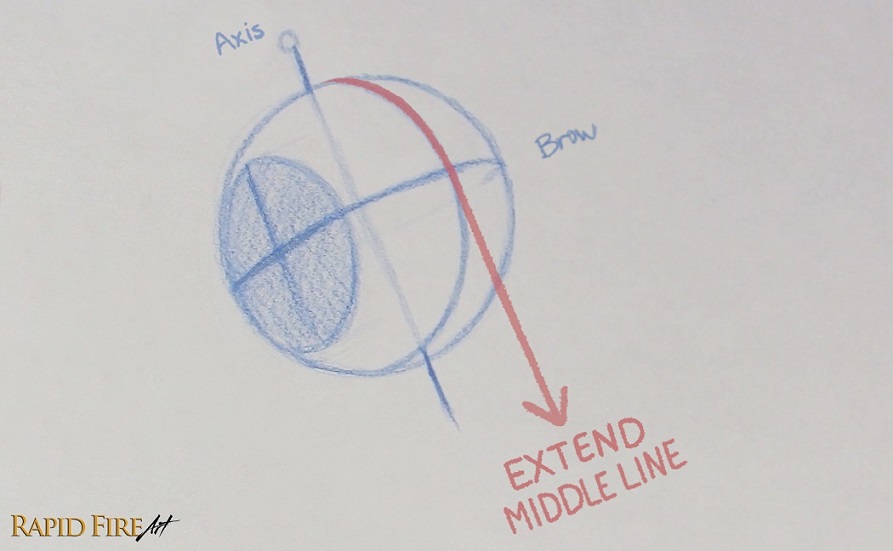
Now let’s map out where all the facial features will sit on the head! Before we can do this, we’ll need to extend the Middle Line so it falls off the face of the sphere. This is where we’ll be placing lines that mark where each facial feature sits. Keep the Middle Line parallel to the Axis or taper it very slightly to account for foreshortening.
Since we already have the Brow Line established, we just need to determine the remaining key guidelines: the Hair, Nose, Chin, Eye, and Lip Lines. These will help us divide the face into accurate proportions before we start drawing the features themselves.
*There are several ways to locate the remaining major feature lines.
- In the previous tutorials, we used the top and bottom of the Side Plane to estimate the Hair and Nose Lines. The Chin Line can then be placed at a similar distance.
- In a level head position, we can also find the Hair Line by taking the halfway point between the Brow Line and the north pole of the sphere. However, in this tutorial, the head is tilted upward so much that the north pole shifts to the far side of the sphere, making the Hairline more difficult to estimate accurately.
- So for this angle, I’m going to show you a different approach by starting with the Nose Line instead. For a quick, rough estimate, simply find the halfway point between the Brow Line and the south pole of the sphere to locate the Nose Line. Then use similar spacing to place the Hairline and Chin Line.
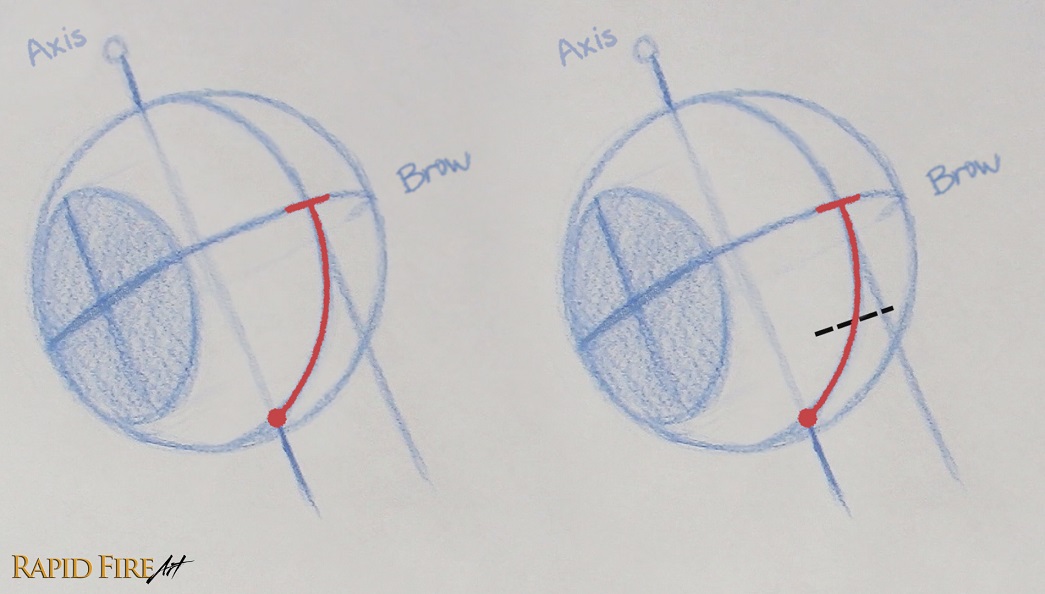
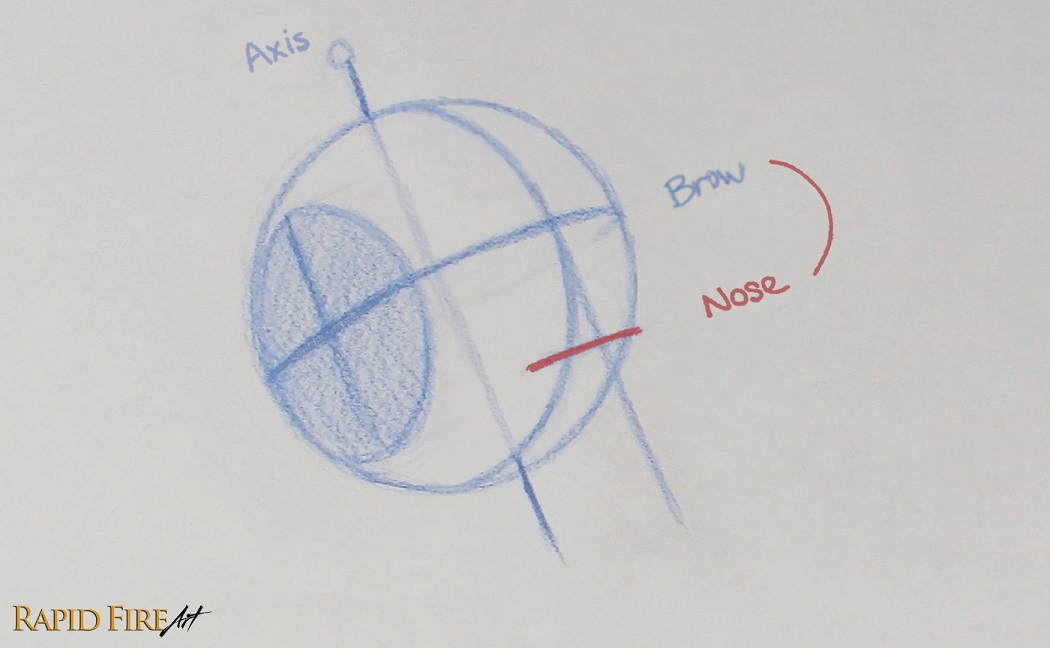
Since the head is tilted upward so much, we can use the space between the Brow Line and the southernmost point of the sphere to estimate the Nose Line. The midpoint between these two landmarks gives us the approximate location of the nose.
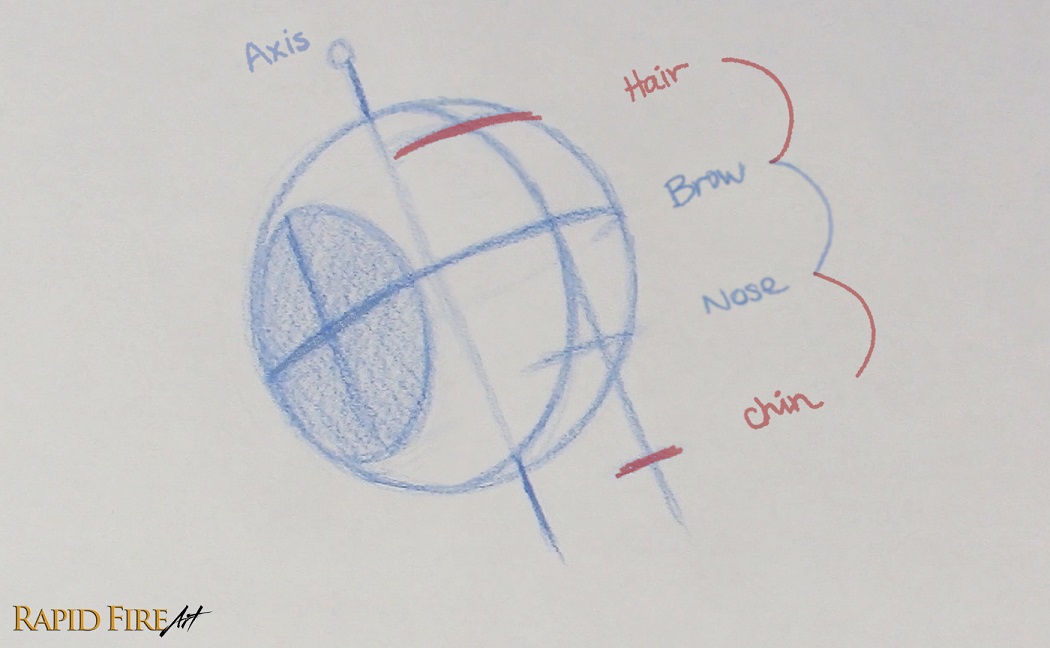
Now measure the distance between the brow and nose. Use that measurement to mark the position of the Hair Line and Chin Line. Make sure to keep the facial feature lines parallel to the Brow Line. Otherwise, the face can look wonky. You can apply some foreshortening, which is much more obvious in extreme angles.
Common Mistake: One of the most common mistakes at this angle is flattening the tilt by keeping the feature lines too straight. This removes the sense of perspective and makes the head feel like it’s facing forward instead of looking upward.
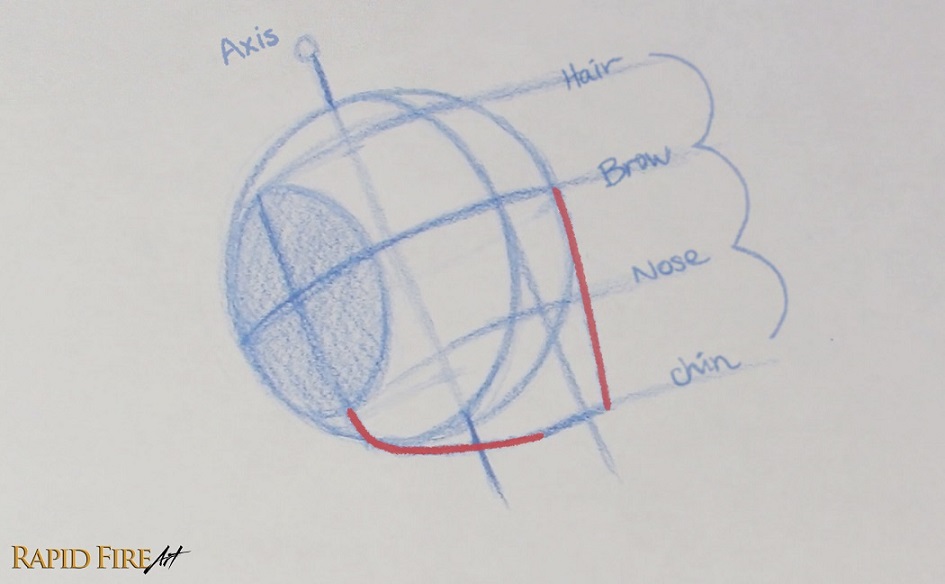
Now let’s add some outlines to make this look more like a human head! Draw a curved line all the way from the Brow Line to the Chin Line, creating the far edge of the face. Then from the bottom of the Ear Line to Chin Line, create the jaw. You can adjust the chin width based on your preference.
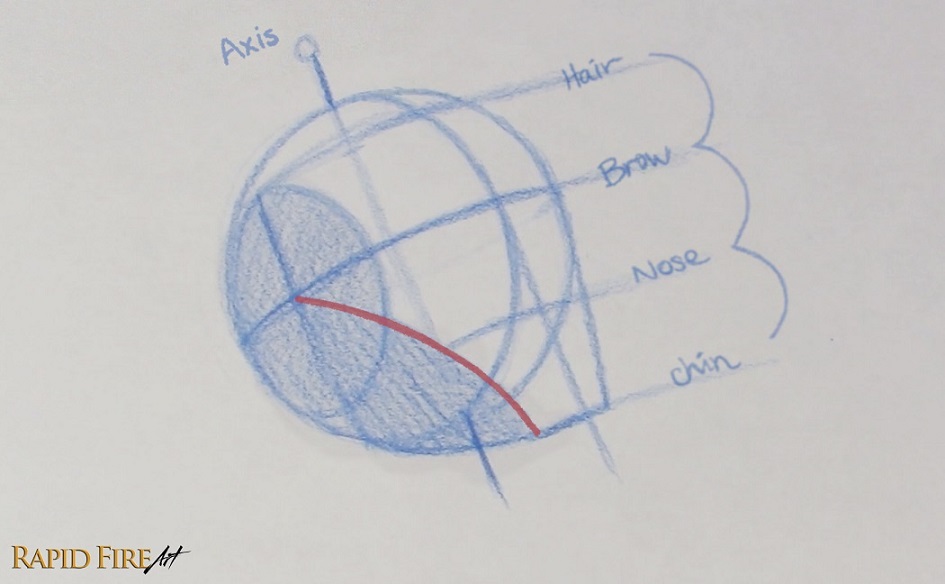
To simplify placement of the facial features, let’s divide the head into clearer sections. Draw a curved line from the chin toward the middle of the Side Plane, then lightly shade this new section. This helps separate the side of the head from the front, making it easier to focus on the facial features and how they wrap around the form.
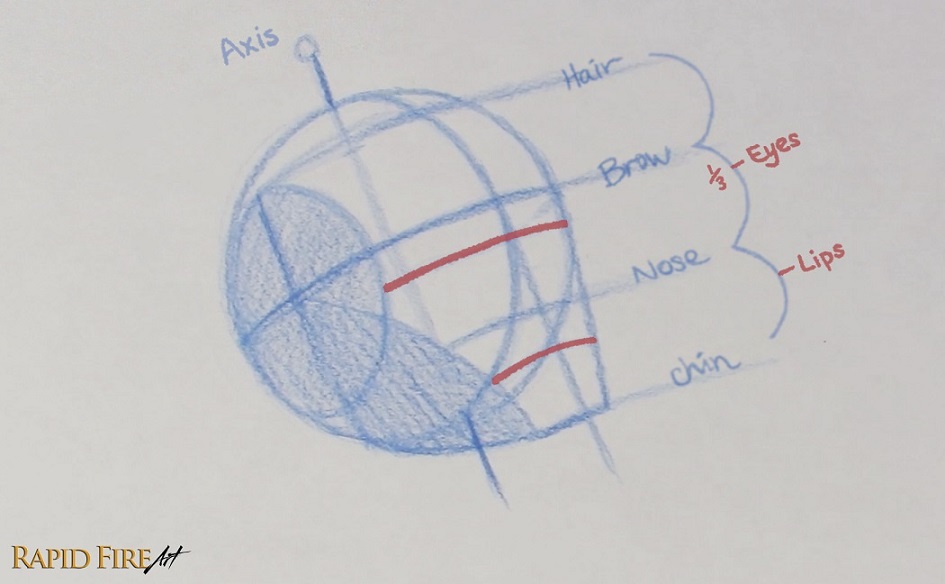
Let’s add 2 more facial feature lines: the eyes and lips! The Eye Line sits about ⅓ of the way down from the Brow Line to the Nose Line. For the lips, locate the space between the Nose and Chin Lines and place a tick slightly above the halfway point. This will give us the general placement for the lips. You’ll notice that my Lip Line is very curved. That’s because the mouth wraps around the curved surface of the teeth and jaw, and this curvature becomes much more noticeable when the head tilts upward.
How to Draw Facial Features from the 3/4 View (Looking Up)
Now that the structure is in place, we can start actually drawing the facial features. In the 3/4 view, nothing sits perfectly centered like it does in the front view – Each feature appears to shift slightly around the form and follows the curvature of the head. We’ll use our construction lines as a guide to make sure everything stays consistent in perspective as we start placing and drawing the features.
How to Place and Construct the Ear

I’m switching to a graphite pencil now so the final drawing stands out more clearly from the blue construction lines.
Let’s start with the ear. Draw it in the lower-left quadrant of the Side Plane between the Brow and Nose Lines. Angle it slightly backward using a slanted line. You can follow my numbered steps above or check out my more detailed ear drawing tutorial if you need additional guidance.
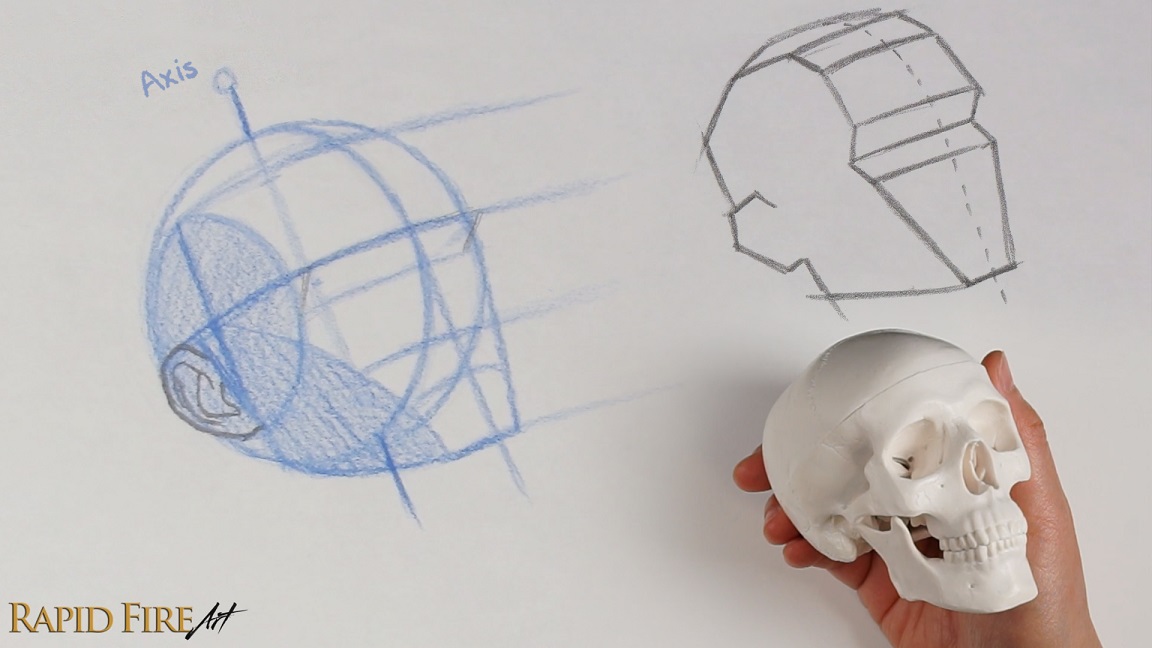
To make placing and drawing facial features easier, it helps to understand a couple of key references that work across all angles, not just a single view.
- The planar head simplifies the face into flat planes, making it easier to read and construct the features quickly and accurately.
- The human skull reveals the structure beneath the skin, fat, and muscle, helping you understand not just where features sit, but why certain bumps or ridges appear where they do and how to place them more accurately.
Over time, studying these forms helps you mentally overlay them onto your drawings, so you can better visualize the head’s structure in your mind’s eye instead of relying only on guidelines. With the planar head and skull examples above, you can probably already start to visualize where the features will sit, so let’s begin with one of the easiest ones – placing the eyebrows along the Brow Line.
How to Draw the Eyebrows and Nose
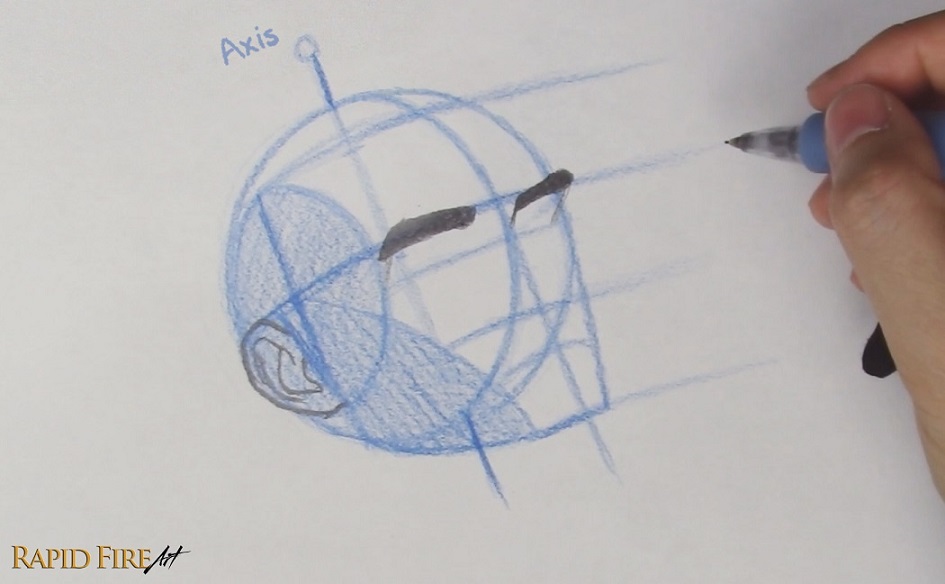
With the planar head and skull in your mind’s eye, draw the eyebrows along the brow line while leaving some space in between for the nose. End the left eyebrow where the Side Plane starts.
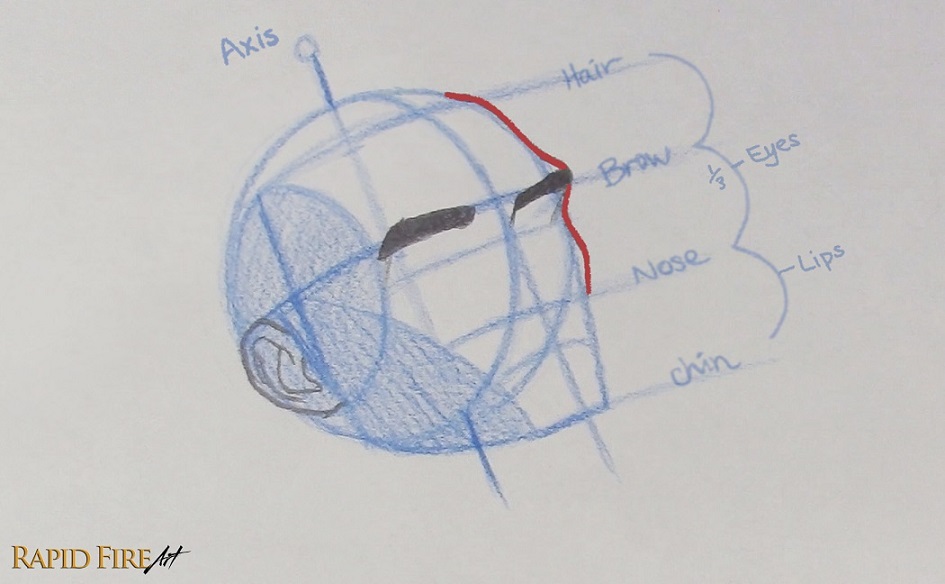
Use your construction lines as a loose guide while shaping the forehead and cheek area. Try to keep the underlying skull structure in mind as you draw. I’ve given him a more prominent brow ridge, and cheekbone.
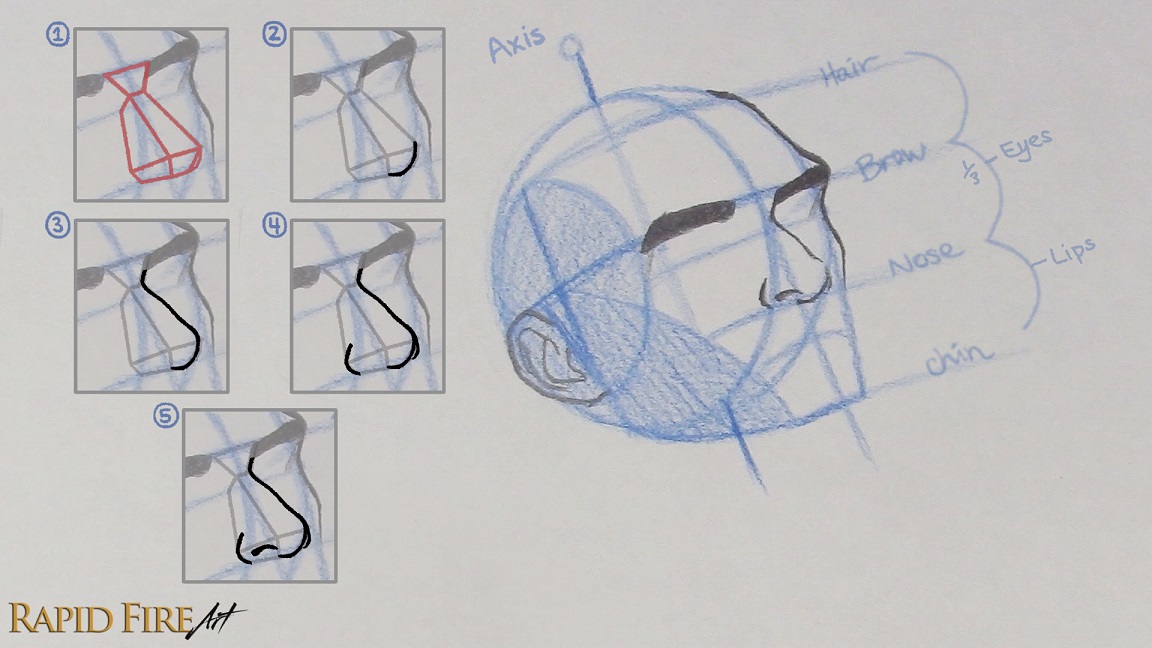
- The nose can be difficult to visualize from this angle, so it helps to first draw a simple planar/blocky version (shown in red). Even though the nose appears shifted in perspective, try to keep it balanced along the Middle Line so it feels properly anchored to the center of the face as it wraps around the form.
- Once the planar nose is in place, use it as a guide to build the actual nose. Start at the point where the Middle Line and Nose Line meet and draw toward the tip. Because the head is tilted upward, the underside of the nose becomes more visible and the tip sits slightly higher than in the previous tutorials.
- From here, draw the bridge of the nose up toward the brow, creating a subtle bump rather than making it perfectly straight.
- Then wrap your strokes around the sides of the planar nose to form the nose wings.
- Finally, add the visible nostril between the wing and tip of the nose. At this angle, the far nostril may barely be visible or even disappear completely from view.
If you want more help drawing noses from different angles, it really helps to study a physical model. You can make a simple one using playdoh by forming a wedge shape and attaching two spheres on the sides. Even a rough model makes it much easier to understand how the nose rotates in perspective.
Or visit this ¾ nose tutorial to see more examples.
How to Place and Draw Eyes in the 3/4 View
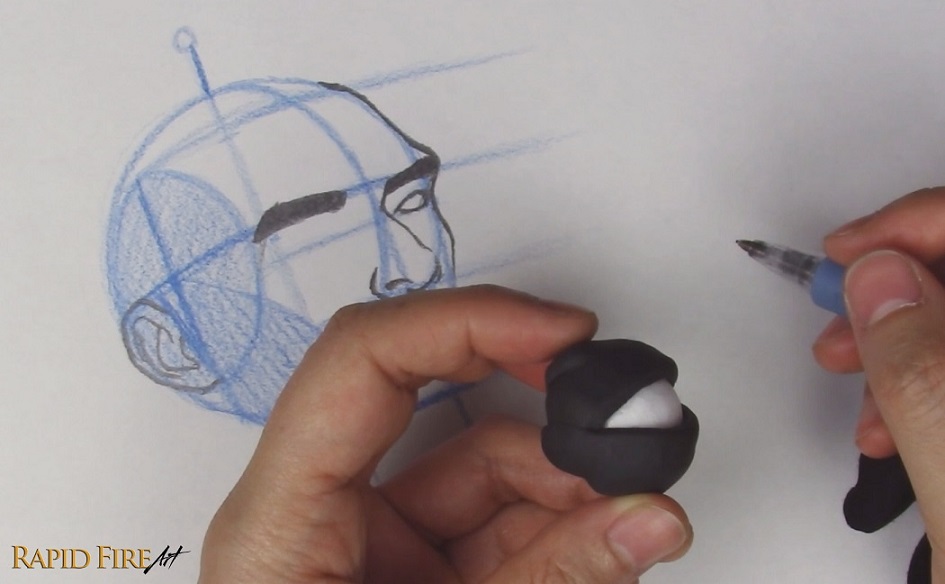
Draw the eyes along the Eye Line to help keep them aligned properly on the face.
The far eye should fit into the narrow space between the nose and the edge of the face, and may be partially hidden depending on nose bridge height and eye spacing.
If you’re having trouble visualizing the eyes from different perspectives, it really helps to make a crude DIY eye model like the one pictured above. As the eye rotates around the form of the head, its shape changes quite a bit. At this angle, the far eye ends up looking more narrow and triangular.
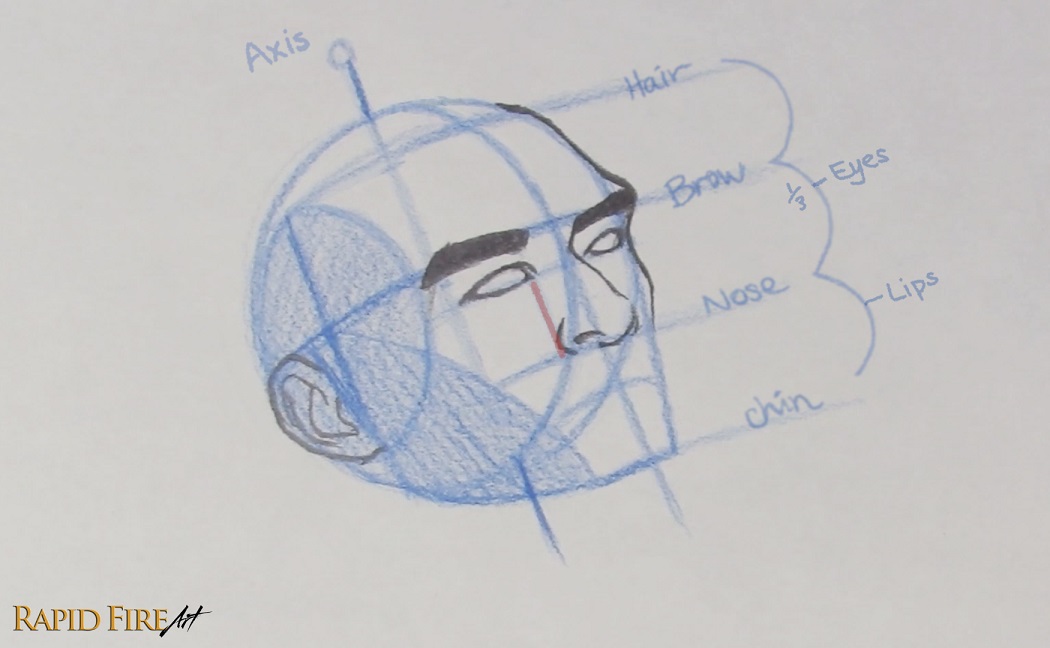
To place the near eye, draw a line (parallel to the Axis) from the outer edge of the nose wing up to the Eye Line. The point where these two lines intersect will give you a good starting point for the inner corner of the eye. This helps keep the eye from drifting too far toward the side of the face or sitting too close to the nose.
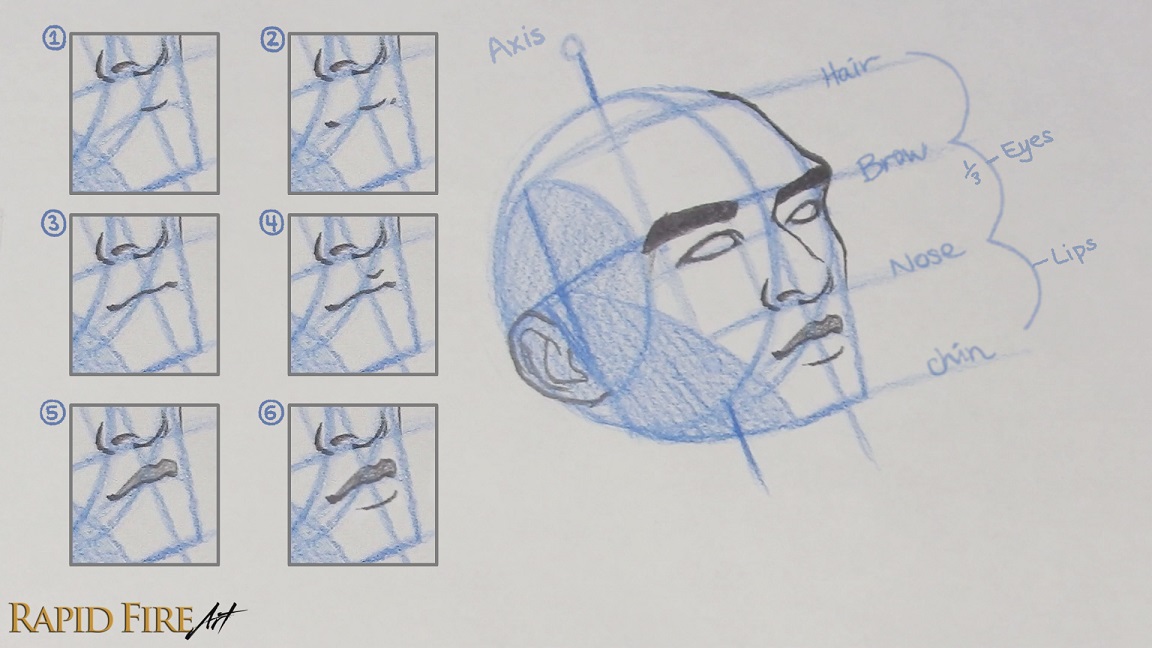
Draw his lips along the Lip Line we created earlier. You can use the numbered steps above for guidance.
- Let’s start by drawing the parting line between the lips. Where the Middle Line and Lip Line intersect, draw a shallow “U” shape. Avoid centering it on the Middle Line otherwise the mouth will look flat or even sunken in.
- On either side, place a tick mark for the corners of the mouth. Not sure how wide to make the lips? I like to imagine vertical lines running down from the middle of each eye and use those as rough boundary lines to draw within.
- Now connect the corners of the mouth to the “U” shape using a soft wavy line. Mine looks like a very stretched out “W”.
- Above the “U”, draw a wide “V” shape for the cupid’s bow. Position it slightly farther forward than the “U” so the upper lip feels more rounded. You can adjust the thickness of the lip by moving the cupid’s bow higher or lower.
- Now connect the cupid’s bow to the corners of the mouth to complete the top lip.
- Draw the bottom lip using a curve that is positioned farther forward so the mouth feels more rounded instead of flat.
Draw the Head, Face, Jawline, and Neck
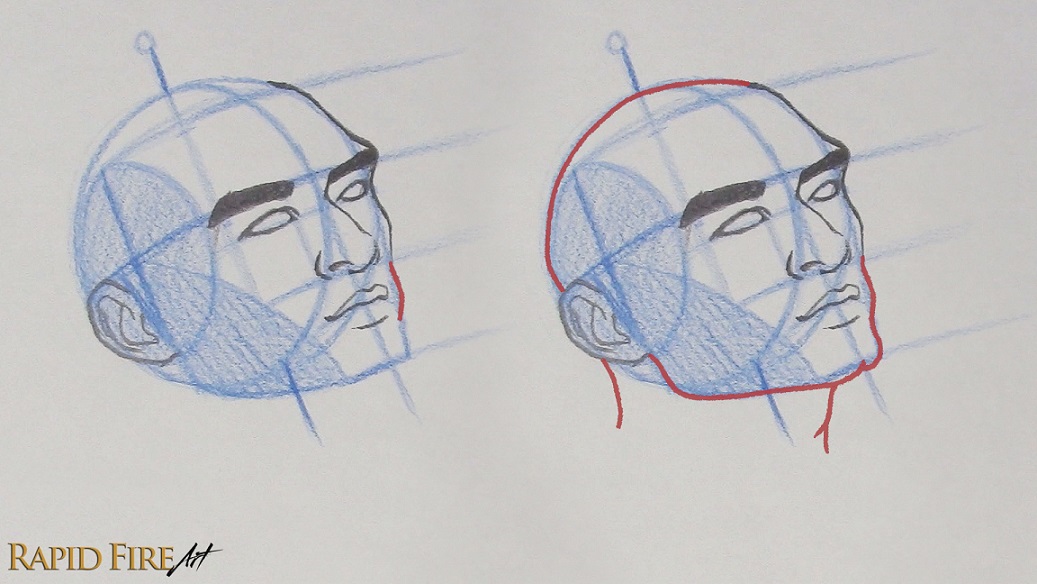
Now Let’s refine the rest of his head and create the neck.
Along the far side of his face, draw a convex curve next to the mouth. If this shape feels confusing, refer back to the skull image from earlier so you can better understand how the bones project outward from the face. I’m still roughly following my construction lines.
Outline his chin and jawline while softening the harsh edges that we used for the construction lines. I gave him a dimpled chin, but feel free to shape the chin however you like. If you decide to shade the head later, keep in mind that from this angle, the jawline may appear much more subtle
For the top and back of the head, avoid tracing the exact shape of the sphere since the skull isn’t perfectly round. You can flatten the lower back area of the head slightly while giving the upper portion of the head more of a dome shape. Again, the skull reference from earlier will help a lot with this step.
You might be wondering why we’re drawing the full head shape if we’re going to cover most of it with hair anyway. This is so we can understand the underlying shape of the skull and build the hair around it properly. Having the head structure in place makes it much easier to give the hair believable volume, direction, and flow so it looks more natural and realistic.
To draw the neck, continue the line down from the back of the head. For the front of the neck, start just beneath the chin and draw downward from there.
How to Draw Hair From the 3/4 Angle
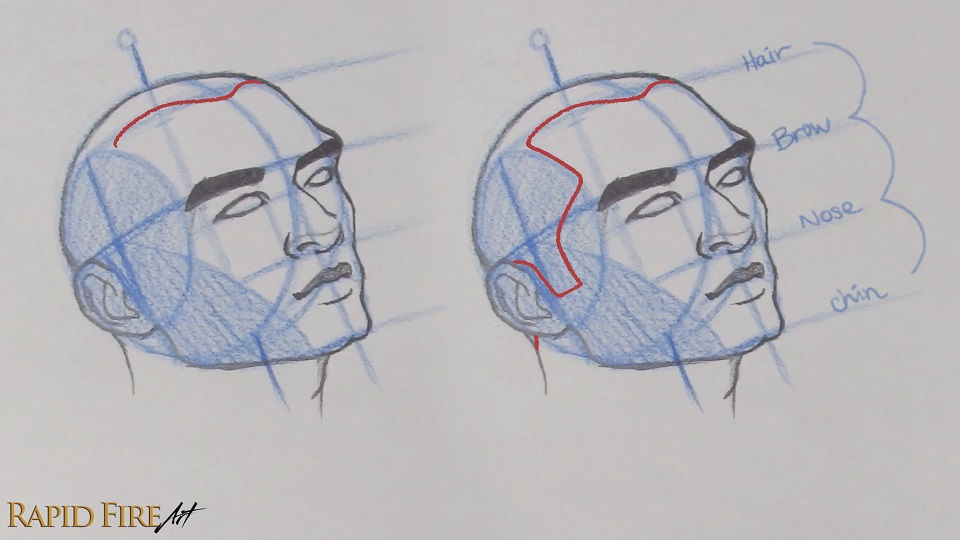
Now let’s draw the hair!
Before you start, decide how large or small you want the forehead to appear. You can use the Hair Line we mapped out earlier as a rough guide. Draw below it for a smaller forehead, on it for a more balanced one, or above it for a taller forehead or even a receding hairline, depending on how high you go.
I like to start near the Middle Line and work outward across the head. As the hair moves toward the Side Plane, curve your strokes downward toward the eyebrow area, then angle them toward the ear, forming the sideburn. Wrap your stroke around the top of the ear and continue it down along the nape of the neck if you want.
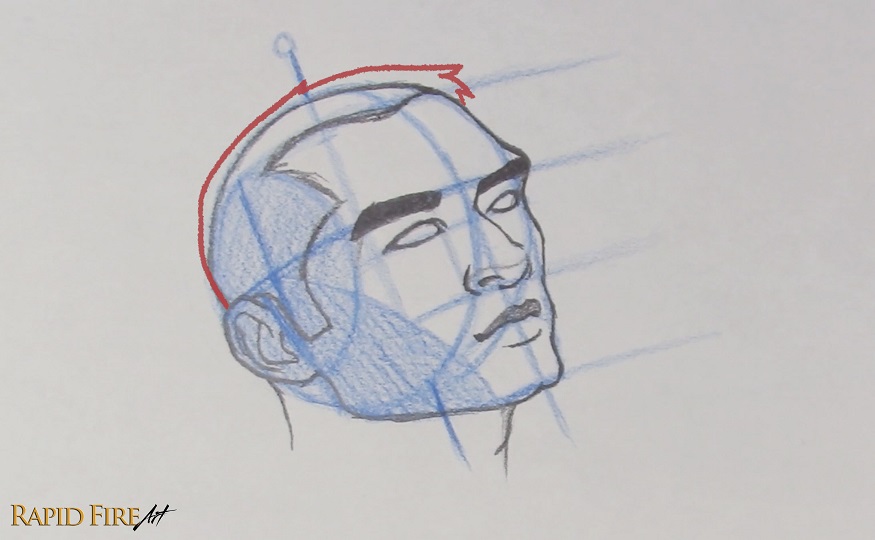
As you continue shaping the rest of the hair, try not to press it tightly against the skull unless you want a very flat hairstyle. Leaving more space between the hair and the head will create more volume. In my drawing, I added extra space near the top/front of the head to make his hair look fuller and longer in that area.
Final Adjustments
It’s always a good idea to keep checking your measurements and angles as you draw, but even then, small mistakes can slip through. Take a moment to go over your drawing and see if everything feels consistent and aligned.
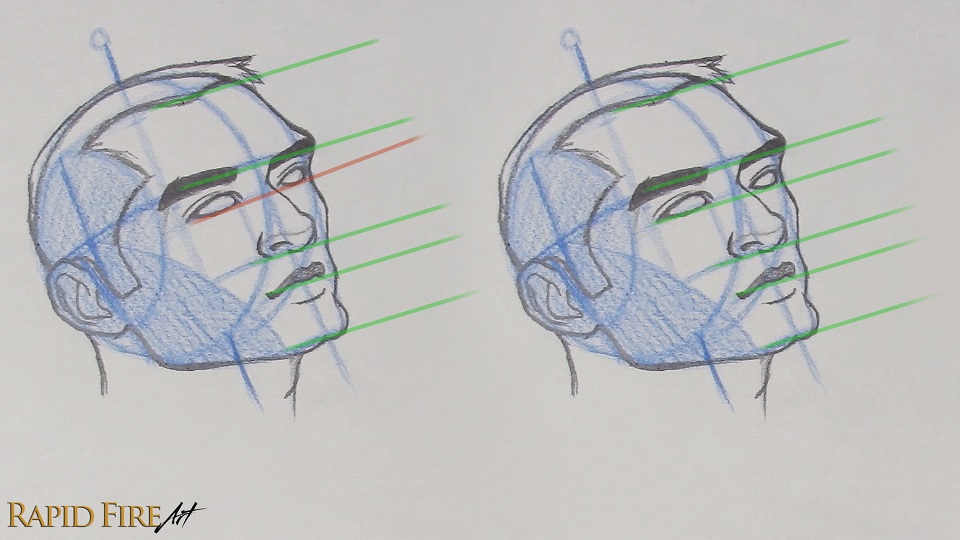
In my case, I noticed my eyes looked slightly off. They weren’t quite sitting level with the rest of the feature lines. It’s a small adjustment, but fixing it made a noticeable difference.
When I was first learning the Loomis method, I went through a lot of these heads, many versions, many mistakes, and I’m still learning. So don’t get discouraged if your first attempt doesn’t look how you expected. Give yourself some room to experiment and try again. Every pass usually reveals something new, whether it’s a mistake you didn’t notice, a small breakthrough, or a pattern you keep repeating without realizing it. Think of your first attempt more like a warm-up than a final result.
I hope you enjoyed following along with this tutorial, and the rest of the series if you’ve been going through it in order. If you want to keep building on this, I recommend moving on to the facial feature tutorials next, where I break down how to draw and shade eyes, nose, mouth, and other parts of the face in more detail.
Other Tutorials in this Series
Whether you’re starting here or continuing the series, practicing multiple angles will strengthen your understanding and help you draw faces more confidently from any perspective.
Try another angle below to reinforce what you’ve learned:


Add Facial Features in Detail

Now that you know where everything goes, take your drawings further by learning how to draw each feature step by step: Draw eyes, nose, lips, and ears in detail.

Darlene created RFA In 2013 with the goal of sharing simple yet detailed drawing tutorials with other artists on the world wide web. She is a self taught pencil portrait artist and Youtuber.


