

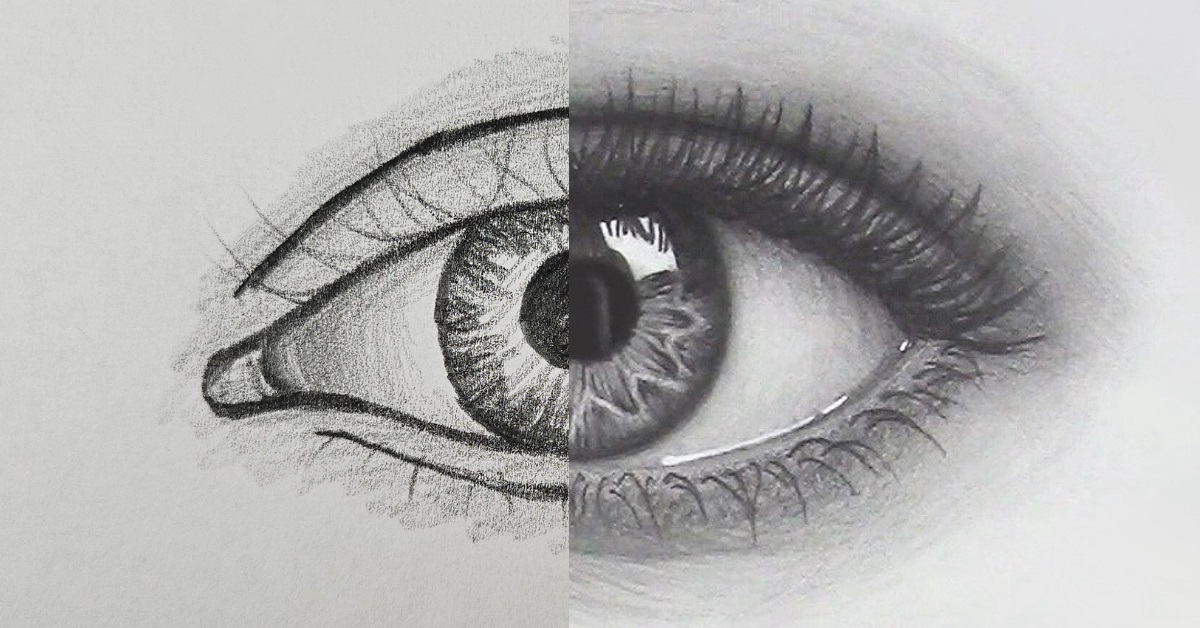
Hey, I’m Darlene, and in this tutorial, I’ll show you my unique method for drawing a hyper-realistic eye from scratch. Follow along with me as I take you through the step-by-step drawing process!
Tools I Used
You don’t need any special tools to draw an eye. A regular school pencil (HB pencil) and a regular solid eraser will work fine. Below are the tools I used:
- Mechanical pencil with HB lead for construction lines and 4B lead for shading (Wonder what all these letter and numbers mean? Learn about drawing pencils)
- Eraser (kneaded eraser for detail work and electric eraser for speed)
- Blending stump and tissue paper to blend
- Ruler
- White gel pen

How to Draw a Hyper-Realistic Eye Step-by-Step
Step 1: Draw a Circle

Start by drawing a faint circle using your HB pencil. It doesn’t need to be perfect. For steps 1-2, keep your pencil marks very light so they’ll be easy to erase later on. In case you’re wondering, my circle has a 7cm diameter.
Step 2: Determine the Eye Angle

Decide on the slope or angle of the eye. Use a ruler to draw a line through your circle, keeping it fairly close to the center.
Want to explore other slope degrees? Check out this eye tutorial to see 3 different examples.
Step 3: Form the Shape of Your Eye
Try to keep your pencil strokes light for this step in case you want to make changes to your eye shape.

Inner Corner: Draw a unique shape for the inner corner of your eye. Position it along the straight line, just outside of the circle.

Experiment with a “V” or “U” shape. See above for examples. You can also experiment with the angle, depth, or width to get wildly different-looking eyes.

Top and Bottom Eyelid: Now let’s draw the eyelids. Start with the top eyelid, extending the line you drew for the inner corner of the eye, arching it across the circle, and ending where the circle and the straight line intersect.
For the bottom lid draw a much shallower curve. You can use the straight line as a reference – the closer your eyelid is to the line, the shallower it is.
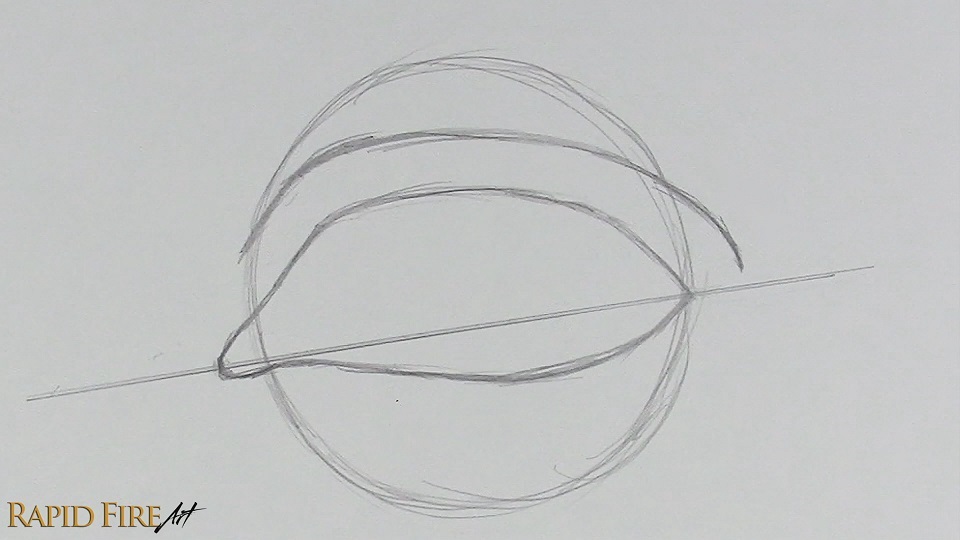
Upper Eyelid Crease: Draw a skin crease above your top eyelid while roughly mimicking its curvature. You can adjust its distance from the top eyelid based on your preference. Draw from left to right, starting at the circle’s edge and ending above the straight line.
Step 4: Erase Your Construction Lines

Once you’re happy with the eye shape, erase the circle and the straight line. I’m using an electric eraser to save time.

Divide the inner corner of the eye from the eyeball using a slightly curved line.
Step 5: Draw the Iris
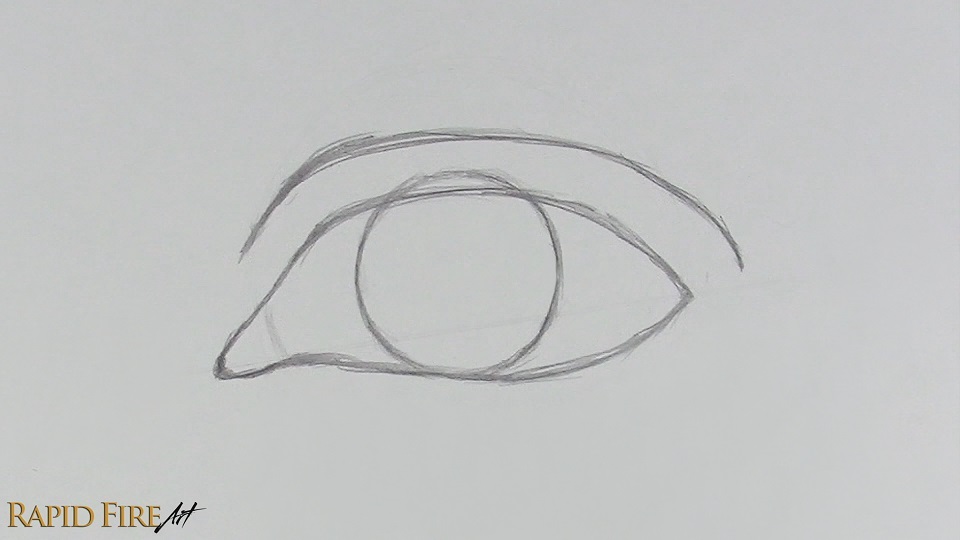
To make an iris, draw a circle about half the eye’s width. When drawing irises, it’s better to draw a FULL circle and then erase parts that extend beyond the visible part of the eyeball rather than simply drawing two bracket shapes. This method helps make sure your iris is as circular as possible.
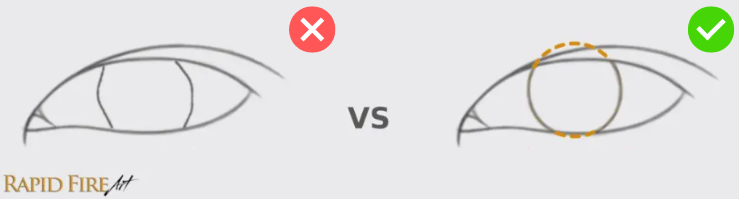
Here’s an example of drawing an iris using a full circle versus brackets. It’s very difficult to draw a realistic iris using brackets! This is an exaggerated example to get my point across 😛.
Step 6: Outline the Main Highlight

In the eye, draw a reflection of your imaginary light source. This will be one of the lightest areas in our entire drawing, called a highlight. The reflection can be from a window (eg: rectangle or square), a lightbulb (eg: circle), or any other shape you choose.
Make sure the shape is skewed to wrap around the curvature of the eyeball. For example, use curved lines instead of straight lines when drawing a square to help make the eyeball appear round.
You’ll notice that the bottom left corner of my reflection is missing – that’s because I’ve included an obstruction to the light source (explained below). This is optional, but I think it makes the eye look more realistic.

Imagine that the light source is from a rectangular window but with someone standing in front of it. Their body would block the light, altering the reflection in the eye we’re drawing. In the example above, a photographer’s head is obstructing the bottom left corner.
Draw your outline lightly so we won’t see an obvious outline after the iris is fully shaded in. Mine is dark so you can easily see it.
Step 7: Draw the Pupil

Pupil Placement: The pupil is the black circle in the very center of your eye. To draw it in the correct place, find the center of your iris, mark it with a tiny dot, and then draw your pupil around it.
If you have trouble finding the center of your iris, draw a cross through it – the intersection between the vertical and horizontal lines of your cross indicates the center of the iris. Adjust the pupil size based on your preference.

Extra Reflection: An optional detail is adding a reflection inside the pupil like the wavy shape I’ve outlined above.
Shade Pupil: Using a 4B pencil, shade the pupil as dark as you can. Shade the wavy reflection about 80-90% of the way so it’s only somewhat noticeable. Erase the part of your iris outline that extends beyond the visible part of the eyeball.
Step 8: Shade the Iris

Iris Border: Thicken and blend the border of your iris for a softer edge. You can blend using a tool such as a blending stump, tissue, or a cotton swab.

Body of the Iris: Add a solid, light layer of graphite in the rest of the iris while avoiding the highlight. To shade smoothly, keep your pencil strokes close together, minimizing gaps in your shading.

Cast Shadow: Remember when we gave our drawing an imaginary light source? Mine is shining down from the top right, causing the top eyelid to cast a shadow down onto the iris. Let’s shade along the very top of the iris to account for this shadow.

Darken: You can leave your iris as it is or darken it further like I did above. I’ve shaded mostly around the edge and gradually lightened my strokes near the pupil.
Step 9: Draw Iris Details
If you want to keep your iris simple, you can skip this step, but do have a look through it before you decide 😊.

Ribbon: Draw a wavy ribbon around the pupil. Try to make it look random.

Spokes: Within the ribboned area, draw some thin lines radiating outward from the center of the pupil, like bicycle spokes.

Darken Areas within the Ribbon: Thicken random spokes to help the iris look more complex. In areas where the ribbon juts out, shade darker to make these particular spots look deeper.

Outer Spokes: Add spokes along the outside of the ribbon. Keep some distance from the ribbon to give it a bit of thickness. I think these spokes look better if they’re squiggly instead of straight. Also, you can vary the line thickness and/or length to make the eye look more captivating. Try to keep your squiggles subtle and make them fade out as they approach the edge of the iris.

Darken: Once all your iris details are drawn, step back from your drawing to see if you’d like to darken the iris even further (I like to build my shading up in layers as I go along because it’s easier to add graphite to your work rather than erase areas that have been overshaded). I decided to darken the iris’s edge and the shadow cast by the top eyelid. I think the iris looks more striking with the increased contrast.
To blend all these tiny details, try using a pointy blending stump. Find out how to make your own blending stump!
Want to see another example of adding details to an iris? See step 5 from my Teary Eye tutorial.
Step 10: Shade Everything Else Inside the Eye

Inner Corner: Shade the inner corner of your eye, creating little bumps of different sizes. You can draw a bump by shading darker around the base of the bump and lighter at the highest point to make the surface look raised.

Eye whites: To make the eyeball look round, shade the far left and far right. The left side should be darkest because it faces the opposite direction from our imaginary light source. You’ll notice that my eye whites are fully shaded because even though it’s called “eye whites”, it’s not truly white. Keep your pencil strokes thick and close together for smooth shading. For more info on shading eyeballs, click here.

Top Eyelid Cast Shadow: Remember how the top eyelid casts a shadow onto the eyeball? Shade along the top of your eyeball to keep the lighting consistent.
Step 11: Shade the Skin

Before shading the skin around your eye, let’s add a few small details such as some extra creases above the inner corner of the eye and an outline around both the top and bottom eyelids to mark the eyelid ledge.

Top Eyelid: Shade the top eyelid, using pencil strokes that follow the shape of your eyelid. It’s okay if some of your strokes are darker or your shading isn’t very consistent here since these can come across as subtle wrinkles later on. If you want your shading to appear very smooth, eliminate gaps between your pencil strokes.

As you shade closer to the eyelid crease, darken your strokes gradually so that the crease comes across as folded skin instead of just a line drawn on the skin. To see an example of how to shade versus how not to shade a crease, as well as a cross-section view of the skin, visit this tutorial and navigate to tip #4.

Extend your shading above the crease and to either side of the eye. Just like before, darken your pencil strokes the closer you get to the crease so that the skin looks like it curves inward, away from the light source.

Bottom Eyelid: Shade the bottom eyelid leaving the eyelid ledge the lightest.

You can add a few subtle wrinkles under the eye using a sharpened pencil or the sharpest part of your mechanical pencil, drawing disconnected strokes while roughly following the eye’s contours. Around these wrinkles, you can shade using the cross-hatching technique to give the skin more texture, heightening the wrinkle effect.
Step 12: Blend Your Eye Drawing

Once done, use a blending tool of your choice to make your shading look more polished, reducing the amount of white gaps between strokes. I’m using a soft tissue wrapped around my finger, gently blending from light to dark areas to avoid streaks. With each swipe, check how dirty your tissue is and switch to a clean spot often to avoid blemishes.
Avoid smudging detailed areas of your work such as the iris because we want to keep those details looking nice and sharp!
If your drawing isn’t smooth enough after all that blending. use your pencil to lightly fill gaps and a kneaded eraser to remove blemishes by dabbing and lifting them away. Learn how to make a kneaded eraser. Then, blend again until you’re satisfied. It’s important to blend well now because, after the next step, it will be difficult to blend without smudging your eyelashes.
Step 13: Draw Eyelashes

First Three Top and Bottom Lashes: Using a sharpened pencil, draw three initial lashes spaced out across the top and bottom eyelid to act as guidelines for the rest of your lashes. Once you draw these, the rest will be easier to fill in.
Want more guidance on drawing eyelashes? Visit my in-depth eyelash tutorial where I explain how to draw eyelashes down to the individual lash and how/where to place them on the eye. You can also grab some FREE eyelash drawing worksheets while you’re there 😊.


Vary your stroke length and curvature to make the lashes look natural.

Fill in Bottom Lashes: Draw fewer eyelashes along the bottom eyelid and make them shorter and thinner, especially near the inner corner of the eye.

Eyelash Reflections: Within your highlight, draw some eyelash reflections. It’s easy to overcrowd them, so be careful here. Less is more!

Eyelash Base Details: Now we’re going to texturize the skin at the base of our eyelashes. Shade along the base of each eyelash using a squiggly, circular motion (circulism shading) to make the skin look bumpy. You’ll notice the change in skin texture most along the bottom eyelid, where the lashes are less dense.
Along the top of the eyeball, draw subtle shadows that are cast down by the eyelashes.
Step 14: Make Your Eye Drawing POP!
Let’s add some final touches! Take a few steps back from your drawing to see if you’d like to make any improvements. I’ve darkened some areas such as the pupil and iris for higher contrast and depth.
Next, add some highlights along areas of the eye you want to appear wet, such as the inner corner of the eye, and the bottommost visible part of your eyeball where tears would collect. You can make these highlights using a white gel pen or correction fluid. If you don’t have those items, you can make those highlights by removing graphite using a sharpened solid eraser or a pinched kneaded eraser with a dabbing or swiping motion. If your highlights aren’t standing out much, make sure they are the lightest values across your entire drawing.
Your eye should be coming together now, but small mistakes can still make a big difference in how realistic it looks.
Fix Common Eye Drawing Mistakes
Not sure what’s off? Learn how to spot and fix the most common eye drawing mistakes so your drawings look more realistic and polished: 5 common eye drawing mistakes and what to do instead.
Want to Improve Faster?
If you want to practice without starting over each time, I made a printable workbook based on this exact tutorial.
Practice with my Hyper Realistic Eye Companion Workbook

This 28-page workbook lets you print and practice on the exact same eye, so you can focus on the parts that challenge you most, like shading, iris details, and eyelashes. It includes guided exercises and worksheets based on common challenges from your feedback.
It’s designed to help you build confidence and improve faster with guided repetition.
👉 Get my workbook and start practicing.
Fix & Improve Your Eye Drawings

5 Common Eye Drawing Mistakes
Not sure what’s off? Learn how to spot and fix the most common eye drawing mistakes so your drawings look more realistic and polished.

Improve Your Shading & Contrast
Learn how to make your eye drawings (or any drawing) look deeper and more realistic.

Draw More Realistic Eyelashes
Avoid stiff unnatural eyelashes and learn to draw them with flow and variation. Plus practice using my FREE printable worksheets!
What’s Next?

Place Eyes Correctly on the Face
Learn exactly where the eyes go on a face so they look balanced and realistic, using the Loomis method.

Learn How to Draw a Pair of Eyes
Turn your single eye into a pair by using the same steps to draw the matching left eye.

Add Some Emotion!
Learn how to add tears, blood vessels and extra shine to the eyes, for a more emotional feel.
Want a more guided learning path? Check out this page!
Happy Drawing!
❤️ Darlene
Darlene created RFA In 2013 with the goal of sharing simple yet detailed drawing tutorials with other artists on the world wide web. She is a self taught pencil portrait artist and Youtuber.


Thank you,
Enjoyed the step by step explanation
That’s great to hear! Thanks for stopping by!
Really it’s GREAT KINDNESS
THANKS A LOT
🙏🙏🙏🙏🙏
Thank you for your readership!
It is well organized but somehow complicated
Thanks for this
WOW!
That was hard
Hi, i appreciate your splendid works of art, they are amazing!
But, i have one problem, i find it realy hard to follow up your teachings, because of my device, the pictures are quite small.
then i would like to learn how to draw a horizon or scene.
i would appreciate your reply. Thanks.
Thankyou so much i will try to do my best x
You are the best! This is the only website thats legit. I wish i could meet you and teach me yourself, besides, thanks and keep up the good work.