

Hey guys! In this lesson, I’m going to show you how to draw natural-looking eyelashes from scratch, along with some common mistakes I see many beginners make.
If you’ve ever felt like your lashes look too stiff, too uniform, or just “off” and you can’t figure out why, I hope this guide will help clear things up. We’ll cover natural eyelash direction and shape, how to draw better strokes, how to make eyelashes look more natural, and then apply everything in a full step-by-step eyelash drawing tutorial.
Tools I Used:
I’m using a mechanical pencil with 4B lead for dark, clean strokes, along with an H and HB Pencil for lash planning.
Canson Bristol Paper (This smooth paper helps keep strokes looking sharp instead of grainy)
Kneaded Eraser (To delicately adjust any lashes as needed)
You don’t need these exact tools. Just choose a pencil grade that stays sharp and can produce both light and dark values without getting too blunt too quickly.
Understanding Eyelash Direction and Shape
Before we even touch the pencil, it helps to understand what eyelashes are doing on the face, so we can draw them more accurately.
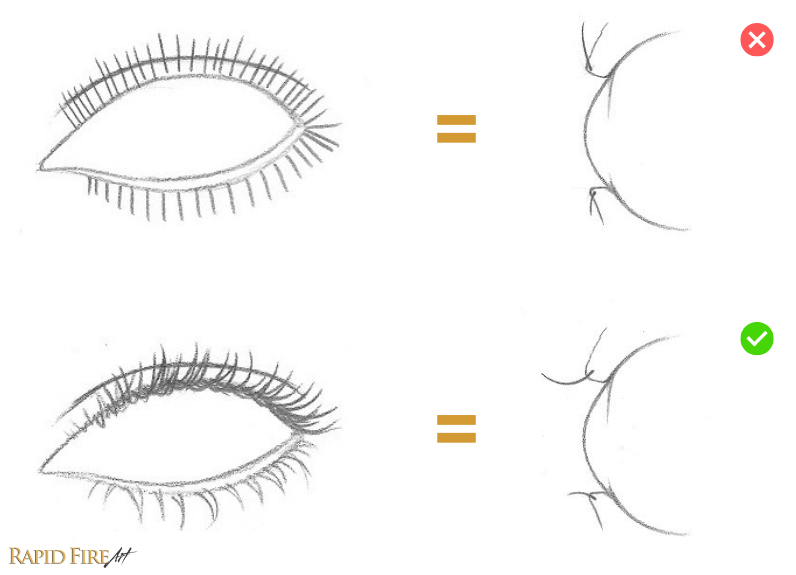
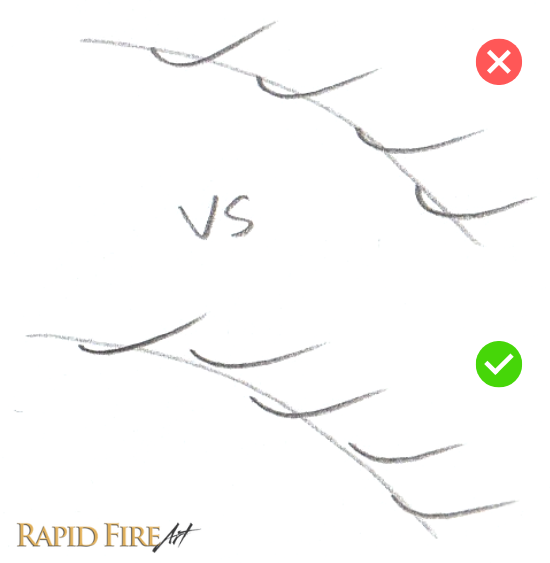
Eyelashes grow from the eyelid and angle toward the opening of the eye to help protect it from dust and debris. Because of this, they don’t stick straight out like perfect sunrays.
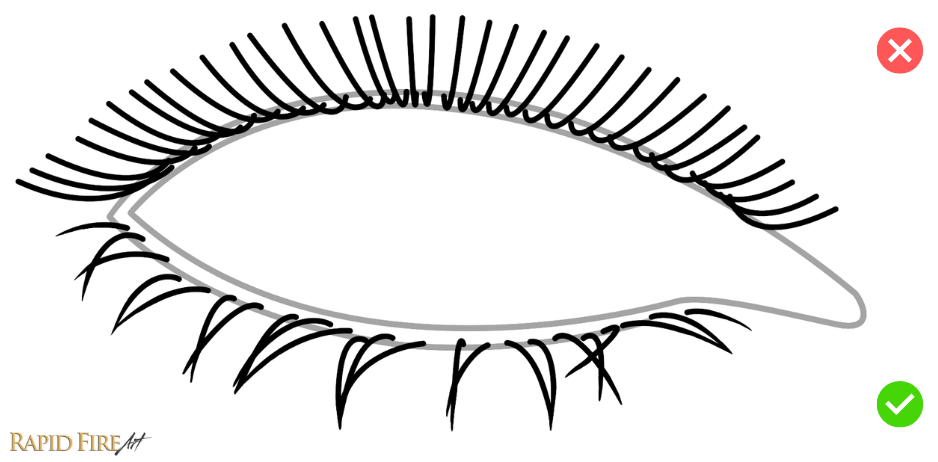
A common mistake I see is drawing lashes that shoot outward in evenly spaced, straight lines. If lashes actually grew like that, they wouldn’t be protecting the eye at all, and it ends up looking very unnatural in a drawing. (Refer to the example above comparing the “sunray” lashes vs a more natural growth direction and their corresponding side-views).
The eyelid also wraps around the eyeball, which means it sits on a curved surface rather than a flat one. This affects how eyelashes appear, depending on where they are along the lid.
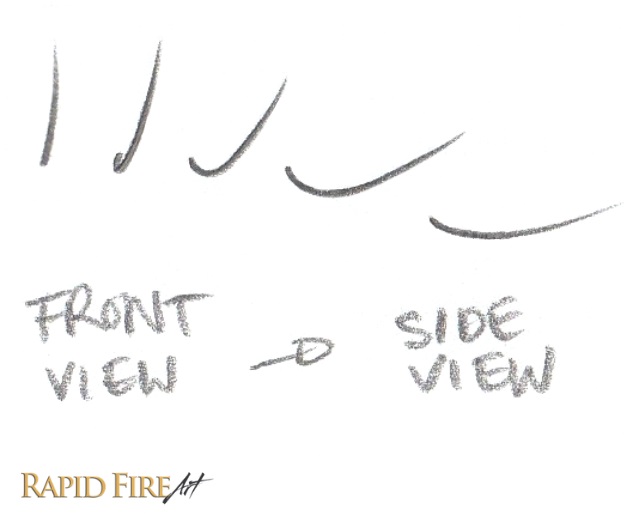
On a front-facing eye, lashes near the center tend to curve more toward you, while lashes toward the sides appear wider and more angled. So instead of thinking of every lash as the same shape, it helps to adjust them based on their position.
To simplify this, I like to think of eyelashes as “J” shapes. Lashes near the center of the eye look like narrower J’s, while lashes toward the sides stretch into wider ones. Practicing these variations (and everything in between) can make a big difference in how natural your lashes look.
If your eyelashes ever feel off, one of the first things to check is whether they’re following the curvature of the eyelid and pointing in a believable direction.
Improve Stroke Quality

Each eyelash should start thicker at the base and taper to a thin, sharp point. To achieve that effect, you want to begin your stroke with a bit of pressure, follow through with a smooth curve (take it slow), and then lift your pencil quickly at the end.
If the end of your stroke keeps coming out blunt, don’t worry too much about it. You can always go back in with the sharp edge of your pencil and add a pointed tip afterward. If the addition ends up too dark, just pinch your kneaded eraser into a fine point and lightly dab some graphite away.

Also, don’t feel like every eyelash needs to be drawn in a single perfect stroke. You can lightly sketch the shape first using an H pencil, then go over it with a darker pencil.
In my experience, drawing random, quick strokes won’t result in natural-looking lashes. It really helps to plan and draw each stroke carefully. One simple trick is to hover your pencil over the page and mimic the motion before touching pencil to paper. This makes it much easier to control the shape and angle you want.
Troubleshooting Stroke Quality
- If your eyelashes look like checkmarks, try slowing down at the beginning of your stroke, speeding up only near the end where you need to flick your pencil up to form the tip. If that doesn’t fix it, try locking your finger joints and using your wrist to move instead.
- Do your strokes look wobbly? You might be drawing them too slowly. Try gradually increasing your speed to see if that smoothes things out. It also helps to avoid resting your hand heavily on the page, using your elbow as your anchor instead.
- If your stroke shape looks good but the texture is grainy, it might be your tools. Softer pencils and textured paper can cause this. Switching to a slightly harder pencil (like 2B instead of 4B) or using smoother paper can help you get cleaner lines.
Tips for How to Draw Natural Eyelashes
One of the fastest ways to ruin realism is to make everything too uniform.
In real life, eyelashes are messy. They overlap, clump together, cross over each other, and sometimes even grow in slightly unexpected directions. That randomness is what makes them look natural. Let’s explore 5 different ways to make our lashes look more natural:
1. Vary the Length
Even though lashes near the inner corner of the eye are usually shorter, we still want variation in length across the entire eyelid. We want to keep things a little uneven, even within the same area, so it doesn’t look too uniform. For a finished drawing, you can easily go back in to adjust lash length by adding to a lash or lightly dabbing it with a kneaded eraser.
2. Group Lashes
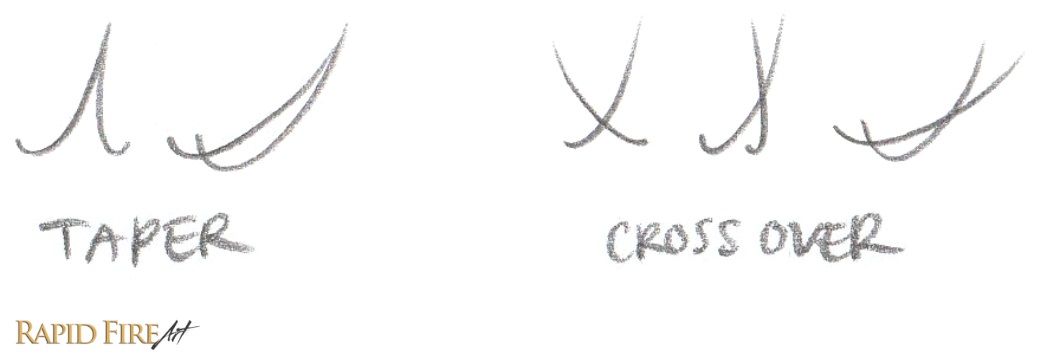
When every lash stands alone, the drawing can start to look like spider legs. Instead, let some lashes taper together or cross over each other in small groups of 2-4. This helps break up that stiff look and makes things look more interesting.
3. Vary The Curvature
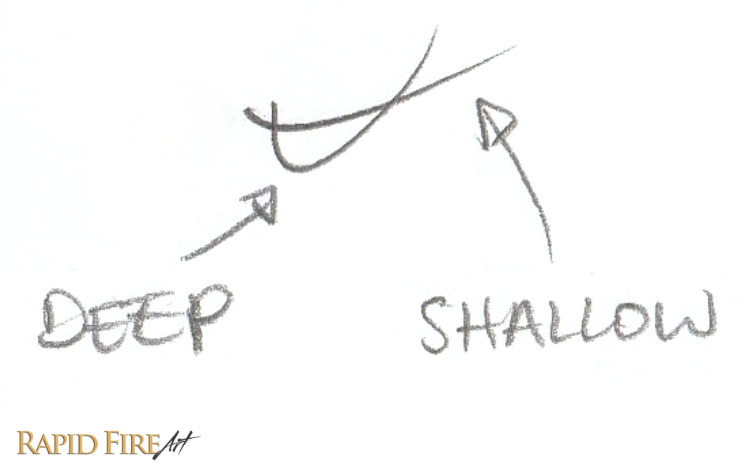
Curvature is another thing to play with, and it can be super fun! Some lashes can dip lower, others can be shallow. Mixing that up helps prevent patterns from forming.
4. Vary Line Thickness and Value
You’ll also want to vary the thickness and darkness of your lines. Make some lashes bold and prominent, while others light and barely noticeable, especially near the tear duct.
5. Stagger The Roots
Finally, avoid placing lashes in a perfectly even row along the eyelid. Staggering the roots, even slightly, makes everything feel more organic. If you want to fix a completed drawing, just elongate the beginning of some lashes to shift where they appear to grow from.
Want to practice on the same eye I’m using in the step-by-step tutorial? Grab my free printable worksheets below and experiment freely on the pre-drawn eyes.
How to Draw Eyelashes Step-by-Step Tutorial
Now let’s put everything together.
Before we begin, draw an eye and finish all your shading and blending before you add the lashes. Blending afterward will blur and smear all your hard work.

Step 1: Plan the hair direction (Draw Your First 3 Lashes)

Figure out what direction the eye is facing so you can apply the right amount of curvature to each eyelash.
For a front-facing eye, the middle lashes will face you more directly, so they’ll look like narrow “J” shapes, while the ones toward the sides will stretch into wider “J” shapes.
Using a sharp H pencil, lightly draw about 3 lashes on each lid. Once you’re happy with them, go over them with a darker pencil, like a 4B mechanical pencil, to define your main lashes. These will act as your guide as you start filling in the spaces between.
Keep in mind that lower lashes are usually shorter and thinner than the upper ones.
For the next few steps, we’re just going to build everything around these. This is where it starts to get fun 🙂
Step 2: Fill lashes section by section

I’m going to work from left to right, but you can start anywhere. It helps to work in small sections so things don’t feel overwhelming.
Quick tip: Place a clean sheet of paper under your hand so you don’t smear your drawing. We want to keep these lashes nice and sharp.
Use your H pencil again to draw light lashes that act as guidelines. These should be easy to erase if needed. Think of them as training wheels.
As you get more comfortable, you can skip the light sketch and go straight in with your darker pencil. One thing that helps is hovering your pencil over the page first and mimicking the motion before committing to the stroke. It’s a simple way to plan the shape and angle without making a mark.
As you add more lashes, focus on creating a natural transition between angles instead of forcing a perfect blend. Don’t be afraid to mix things up, like adding a few narrow J’s where wider ones would normally go.
Step 3: Add unique lashes

Now that your eyelashes are starting to build up, begin introducing more variation.
Add lashes that overlap, some that taper together, some with stronger curves, and others that are slightly longer or shorter. At this stage, it might look a bit sparse or even a little weird. That’s completely normal.
If you find yourself falling into a pattern and things start looking too uniform, try jumping back and forth between different areas of the eye instead of working in order. This small reset can help you break out of repetitive strokes.
Step 4: Spread lashes out (focus on the big picture)

If you’re having trouble moving along, it might be because there’s too much space between your initial anchor lashes from step 1. These huge gaps can feel difficult to fill, plus, staying in one section for too long can make you lose sight of the bigger picture. Try spreading your lashes out first, so you have more anchor points to guide you as you fill in the spaces.
These new lashes act like little bridges between your original anchors, helping you plan out the overall shape your eyelashes are forming. For me, I’m shaping my lashes to follow the natural curve of the upper eyelid crease. Once that bigger shape feels right, it becomes much easier to go back in and fill the smaller gaps without constantly shifting between detail and overall structure.
Step 5: Introduce a new layer

Eyelashes don’t just grow in a single, boring row. On the upper eyelid, I’m adding an additional layer of lashes beneath the ones I just drew. This adds depth and makes the drawing feel more natural.
Step 6: Continue Filling the Gaps

Having fun yet? I am 🙂
This part might look complicated, but all I’m really doing is adding more strokes beside existing lashes. You can add less if it feels too crowded.
You can keep the lash variations subtle, like I have, or push it more. It’s up to you. Add lighter lashes, darker ones, straighter ones, curvier ones, and let some cross over or taper together.
Once you’re done, take a step back and look at your drawing as a whole. You might notice some lashes you want to tweak to improve balance or guide the viewer’s focus
Step 7: Add some shading

If you’re happy with your lashes, it’s time to shade.
Although eyelashes are thin, they do cast shadows, and this step helps ground them so they don’t look like they’re just pasted onto the drawing.
I’ve shaded the area behind and below the upper lashes, and just below the lower lashes to help ground them. You can also add subtle circular shading around the base of the lashes to suggest a bumpy texture along the eyelid. If your eyelashes don’t look integrated into the drawing yet, this step usually makes a big difference!
Step 8: Final Details! Add some eyelash reflections
To finish things off, add some subtle eyelash reflections in the eye, and we’re all done!
Final Thoughts
If your eyelashes still don’t look quite right, that’s completely normal. This is one of those things that takes a bit of practice, especially getting used to the flicking motion and figuring out which lash combinations look good together.
Try focusing on improving one thing at a time, whether that’s your stroke quality or how you vary your lashes. You’ll improve much faster that way.
If you’re using my worksheets, don’t be afraid to fill a couple of pages with “bad” lashes first. The more reps you get in, the more natural it will start to feel. Don’t beat yourself up if it’s not clicking right away. You’ll get there!
If you found this tutorial helpful, let me know which part made the biggest difference or where things are still confusing. That kind of feedback really helps me improve future lessons. Thank you!
If you haven’t downloaded the worksheets yet, you can grab them here and use them to practice on the same eyes from this tutorial.
Darlene created RFA In 2013 with the goal of sharing simple yet detailed drawing tutorials with other artists on the world wide web. She is a self taught pencil portrait artist and Youtuber.


This solved a problem for me. Thank you from sunny England
i love you! you are the best. you explain everything so well. i am excited to get started. thank you so much.
Do you have any practice sheets for drawing eyelashes
This has been really helpful, thanks!
To bad Darlene hasn’t come back to YouTube, she is a wonderful teacher on YouTube. I would love to see her come back and teach there.
creamy eye hmmm
u r super good
Thank you sooo much. This really helped me a lot