

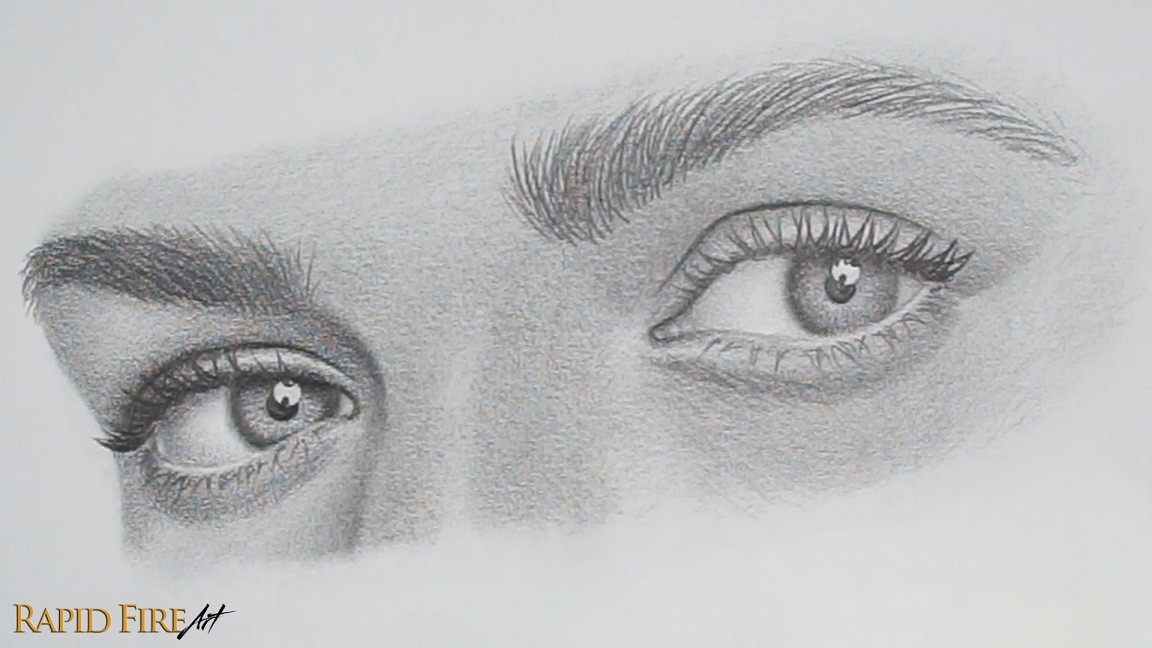
In this tutorial, I’ll show you how to draw eyes from the ¾ view with simple step-by-step instructions and how to avoid common mistakes to avoid, like uneven eye/eyebrow placement, incorrect perspective, and weak value contrast, so your eyes will look more realistic.
Materials Used for Drawing Realistic Eyes
For this tutorial, I’m using just two pencil grades. The HB is for construction, and the 2B is for shading and details. If you’re unsure what these pencil grades mean, you can learn more here.
- HB and 2B Pencil
- Blending Tissue
- Prismacolor Kneaded Eraser: Or learn how to make one using my DIY tutorial!
- SmudgeGuard Glove: To prevent smudging my work
- Printer Paper
Step-by-Step Eye Drawing Tutorial
A few notes before we start!
1. When I mention the “right eye,” I’m referring to the eye on the right side of the drawing, not the subject’s right eye.
2. This is a condensed version of my full video tutorial. Instead of watching a 1-hour lesson, you can follow along in 8 clear, scannable steps.
3. If you need more detail at any point, watch the short clips included or shoot me a question in the comment section. Let’s get started!
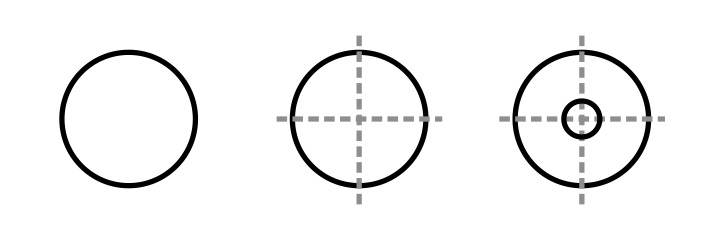
Step 1: Create Guidelines for Eye Placement
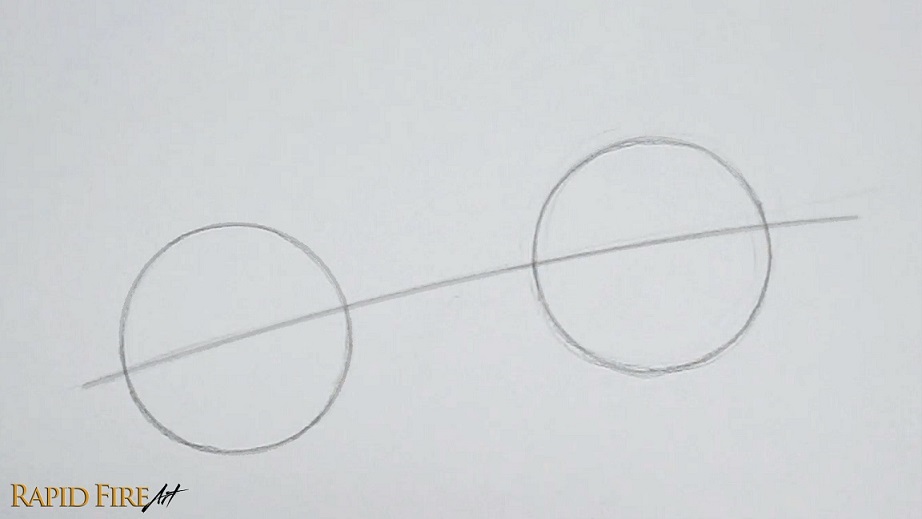
Using an HB pencil and light pressure:
- Draw a circle for each eyeball
- Space them slightly less than one circle apart
- Mine are ~4.5 cm in diameter if you want to match scale
Draw a faint curved line through the center of both circles. Curve it slightly downward – this helps keep both eyes aligned so they don’t look uneven.
Tip: If your eyes often look “off,” it’s usually because this guideline wasn’t used or wasn’t followed closely.
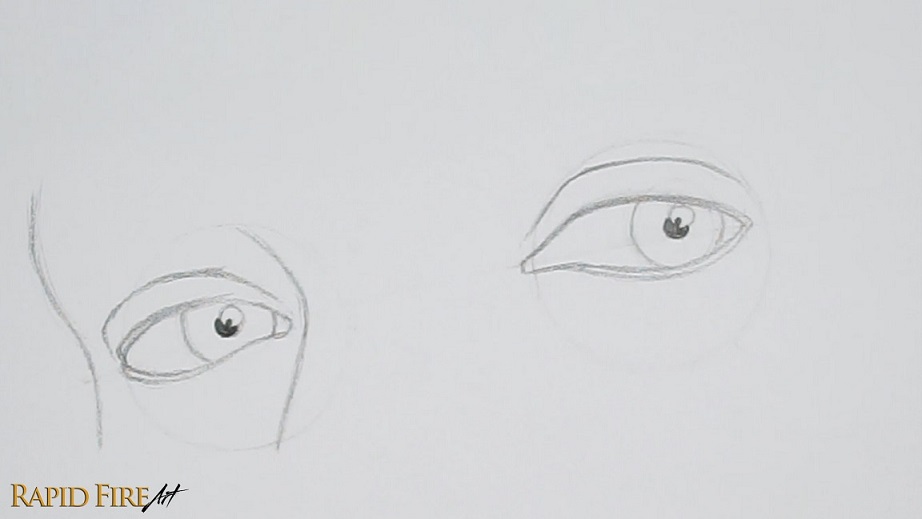
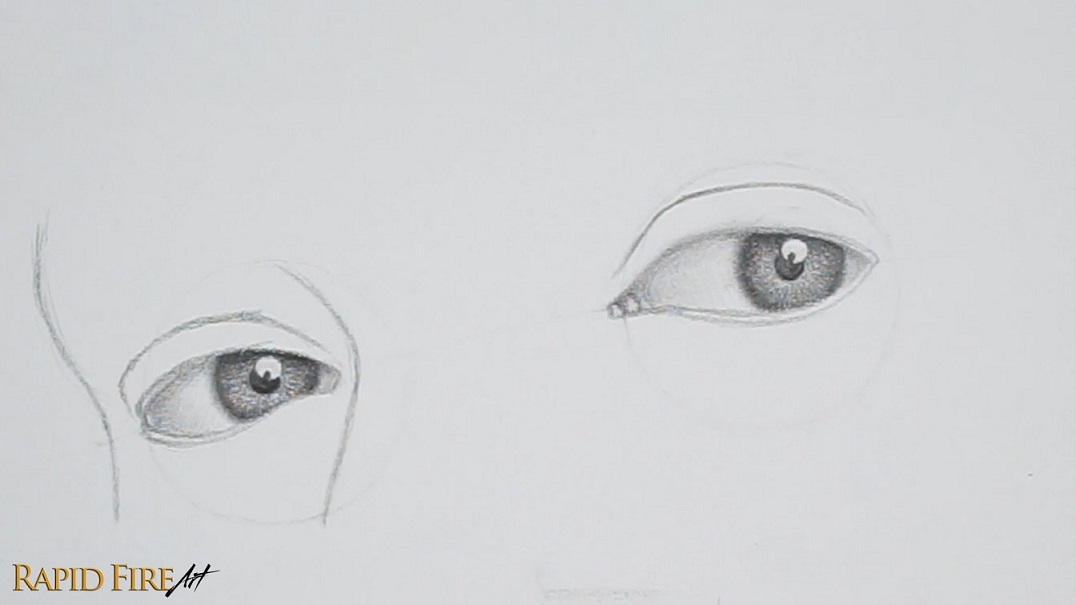
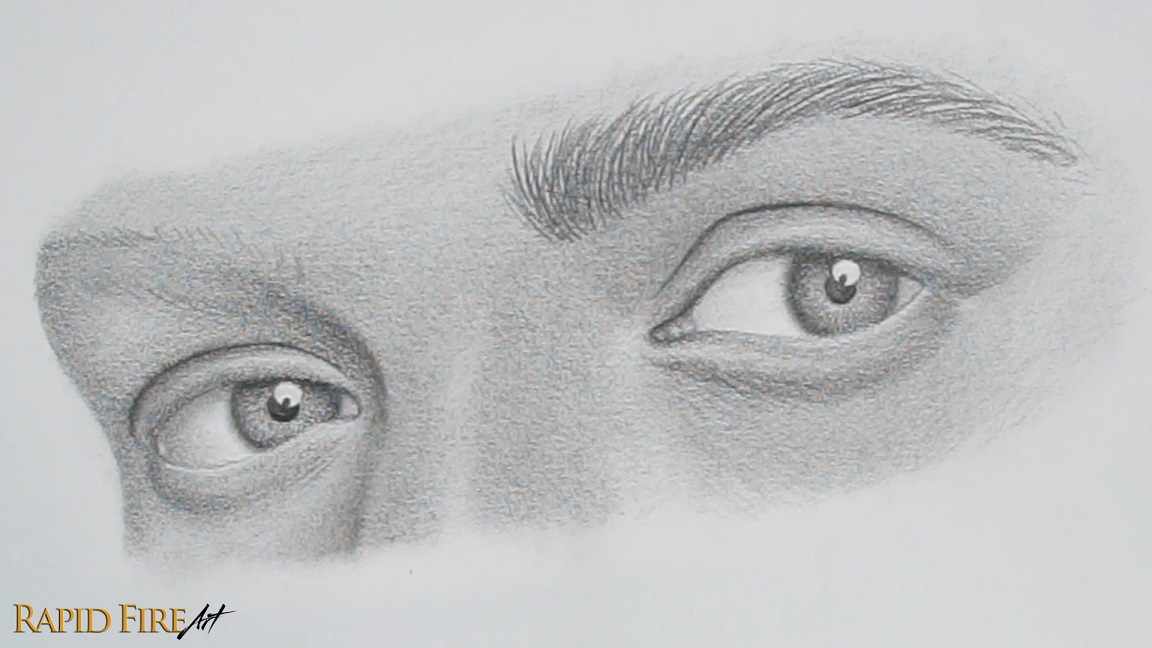
Step 2: Draw Eyes at the ¾ Angle
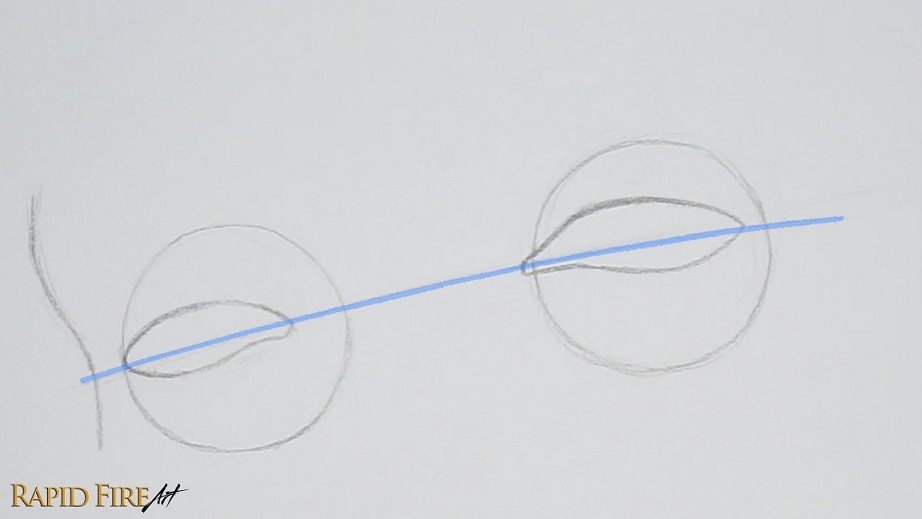
Eyeshape
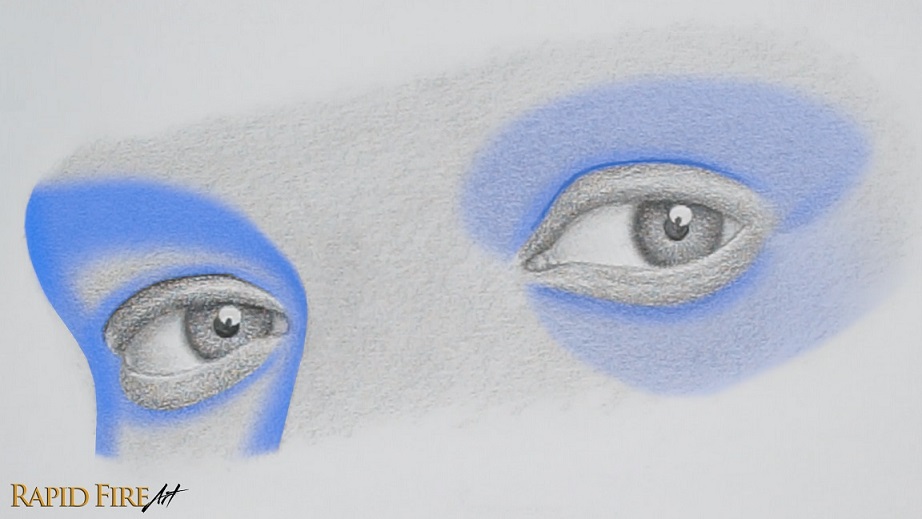
Lightly draw each eye, making sure they sit evenly along the guideline highlighted in blue. Notice how the blue line runs through the corners of the eyes?
In the ¾ view, the closer eye (right) appears almost full width against the eyeball circle, while the far eye (left) appears narrower because it wraps around the other side of eyeball
To show this, draw the left eye about ¾ the width of the eyeball.
Common Mistake #1: When drawing eyes in perspective (especially in a 3/4 view), avoid making both eyes the same width. This flattens the drawing and removes the sense of depth.
Next, draw the eyelid ledges. Starting with the right eye, draw an outline around the top and bottom lid, tapering your strokes as you get closer to the inner corner of the eye.
Do the same for the left eye, except extend your strokes beyond the boundary of the eyeball so it looks like the eyelid skin is wrapping around a spherical eyeball. The image above shows an exaggerated example.
Then draw an eyelid crease above each eye. At the outer edge of the left eye, angle your stroke down to form the edge of the eyelid.
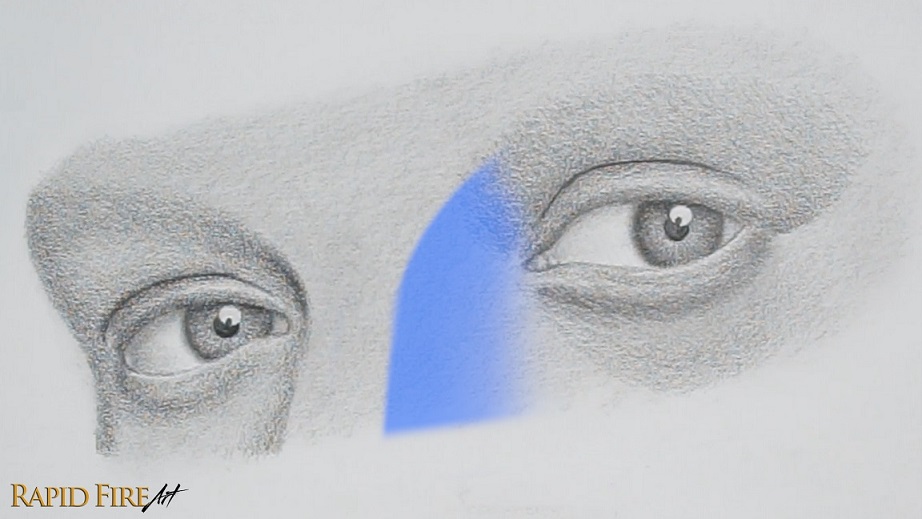
To draw the edge of the face, give yourself a little distance from the eye and draw a slight “S” shape that runs perpendicular to the guideline that runs through both eyes. Curve the top part of your “S” out as much as you’d like, shaping the brow bone to your desire.
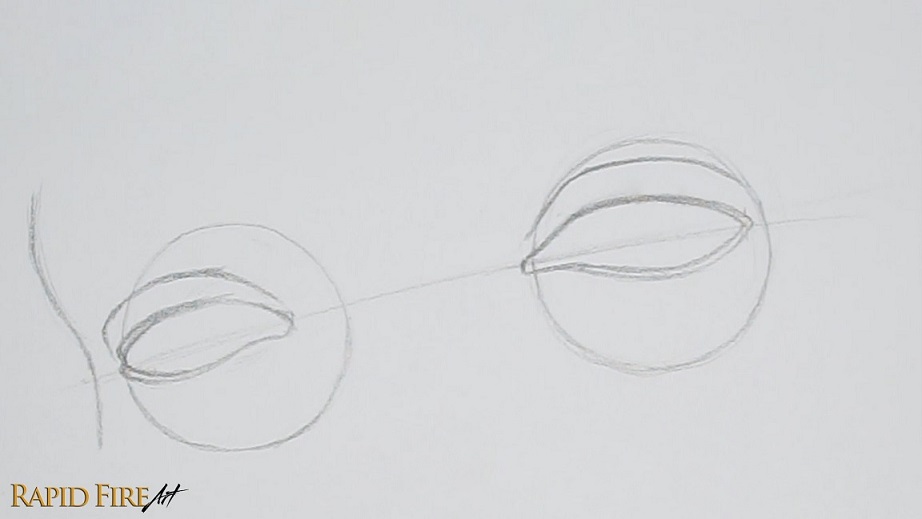
Draw the Irises, Pupils, and Nose

Iris
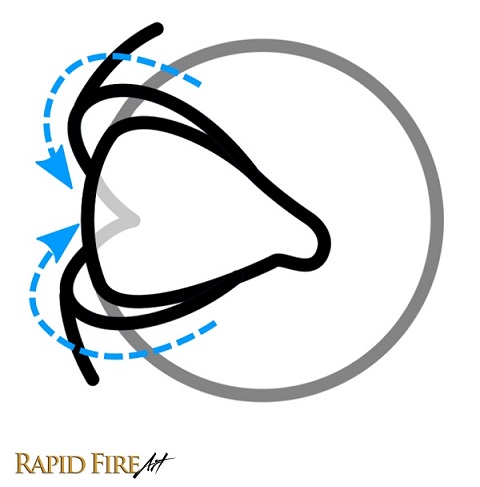
To draw a realistic-looking iris, draw a full circle about half the eyeball’s size. Position it to the far right so it appears as though the eye is looking at us directly. Make sure the bottom half of the iris is more visible than the top.
Common mistake #2: Avoid drawing 2 bracket-shaped irises because they’re harder to size and look less realistic.
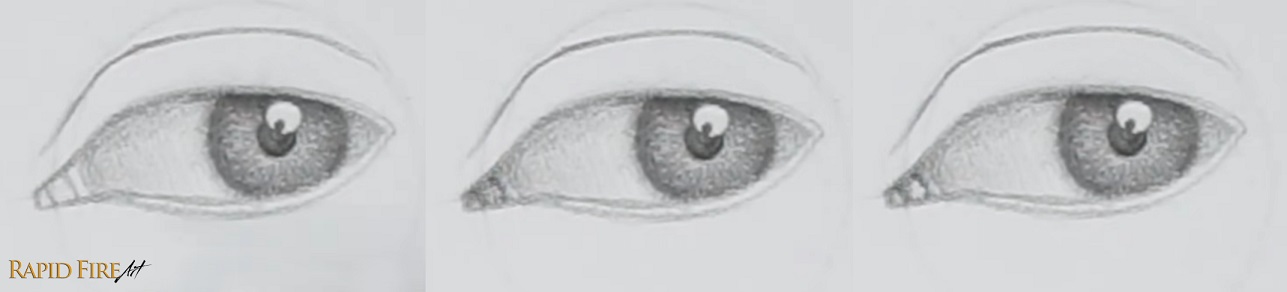
Pupil
Locate the center of each iris by drawing a vertical and horizontal line through the middle. Where the two lines meet, draw your pupil. Draw your pupil size based on how brightly you want the subject to be lit (Small pupil = brightly lit, Big pupil = dimly lit). You can now erase parts of the iris that fall outside the eye opening.
Highlight
Draw another circle in your eye for the highlight. This is a reflection from a light source. Overlap it with the pupil so we can create some high contrast in the eyes, which makes the drawing look more interesting. I’ve placed the highlight in the top right side of the iris to indicate that the light in this scene is coming from the top right.
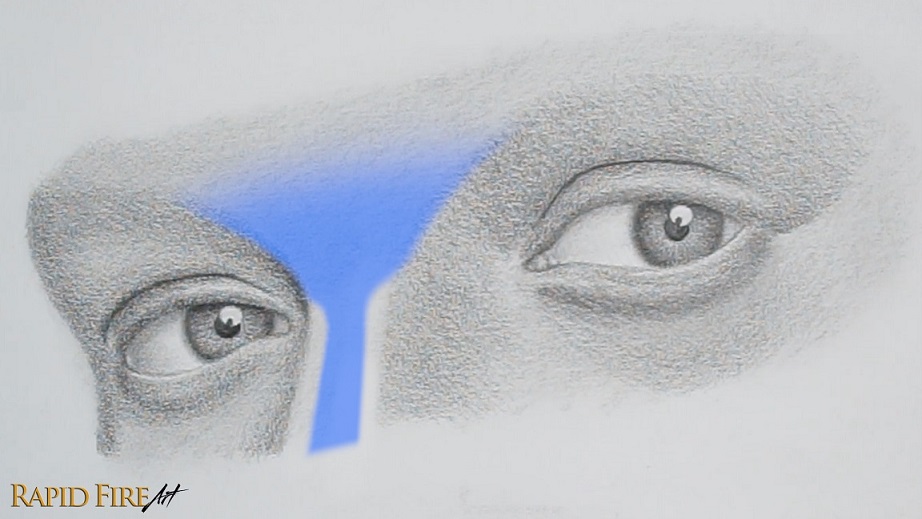
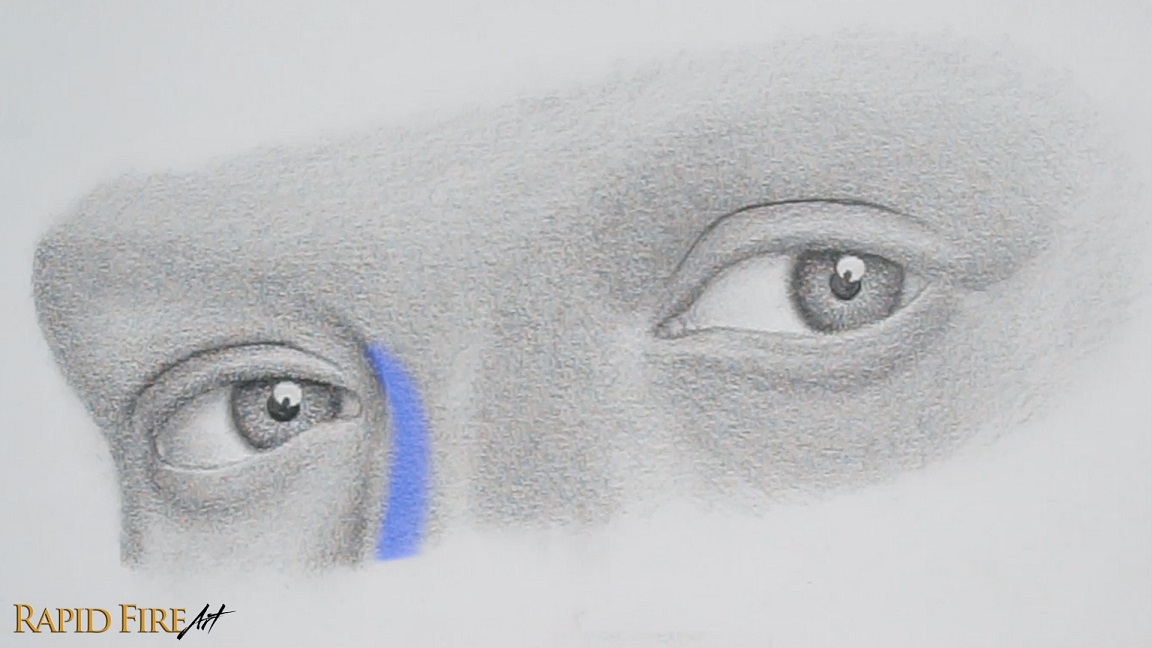
Nose (Bridge Only)
Start near the inner corner of the left eye and sketch a wide “V” shape to form the nose bridge.
Once you’re happy with how your eyes look, erase the guidelines from step 1. Make sure your remaining lines are faint, so they will blend in naturally as we shade.
Common Mistake #3: Dark outlines can flatten your drawing and make it look cartoony.
Step 3: Shade Inside the Iris
I’m switching to a 2B pencil to shade. It’s slightly softer than the HB, which allows me to blend my drawing more easily and shade slightly darker without having to use much pressure. Using an HB pencil with a lot of pressure to shade can flatten the texture of your paper, making it shiny instead of dark.
Shade the Pupils
Shade each pupil as dark as possible with a sharp pencil tip to keep edges crisp.
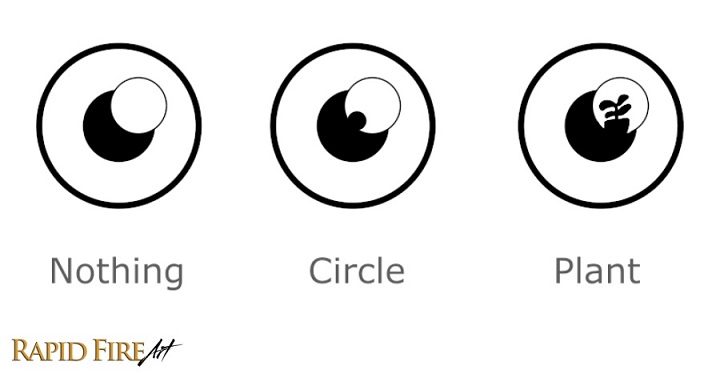
I‘ve added an optional obstruction to the highlight in the bottom left to make the drawing look a little more complex. I chose a circular obstruction, but you can choose any shape you want, such as a leafy houseplant.
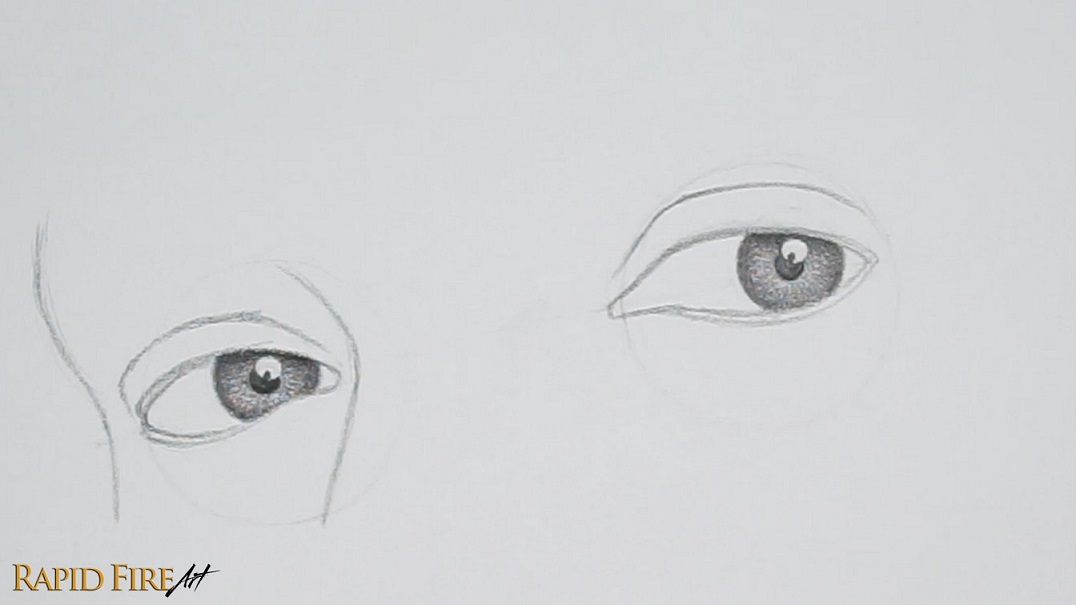
Shade the Iris
Lay down a medium value across the entire iris without crossing into the highlight. Then darken the edges, fading toward the pupil.
Since the main light source for my subject comes from above, the top eyelid will cast a shadow upon the top of the iris. Shade this cast shadow darkest at the top and fade downward.
To see the iris shaded in more broken-down steps, watch the video clip below:
Step 4: Shade the Eyeball (Make It Round)
Shade the rest of the eyeball using extremely light pressure to lay down a solid base layer. Don’t leave anything white. The lightest areas in the eye should be the highlights.
To give the eyeball a three-dimensional appearance, we need to darken areas turning away from the imaginary light. This means gradually shading the left side of each eyeball to create a smooth transition from light to shadow.
For the left eye, leave a very thin sliver of lighter value along the far left edge to account for ambient light
Add a cast shadow along the top, and right side of each eyeball where it touches the eyelid.
Soften the edge of each iris using light shading or blur it using a blending tool (I used a folded tissue. Video example at the end of step 5).
Tip: If your shading is heavy-handed, consider switching back to the HB for subtle shading.
For the inner corner of the right eye, separate this space into sections using 2-3 lines. Shade them all in, leaving a highlight on the right side of each section. Blend to make these look like bumpy flesh.
Optional: Blend your shading, working from light to dark to avoid smudges. Make sure your shading is as smooth as you can get it. If you have any major gaps between your pencil strokes, they may still be visible after blending.
Tip: To blend more precisely using a flimsy tool such as a tissue, fold it in half twice, then create a point by folding it tightly along the edge.
Watch this clip to see how I blend both eyes using a tissue and how to fold it for precision blending.
Step 5: Shade the Surrounding Skin
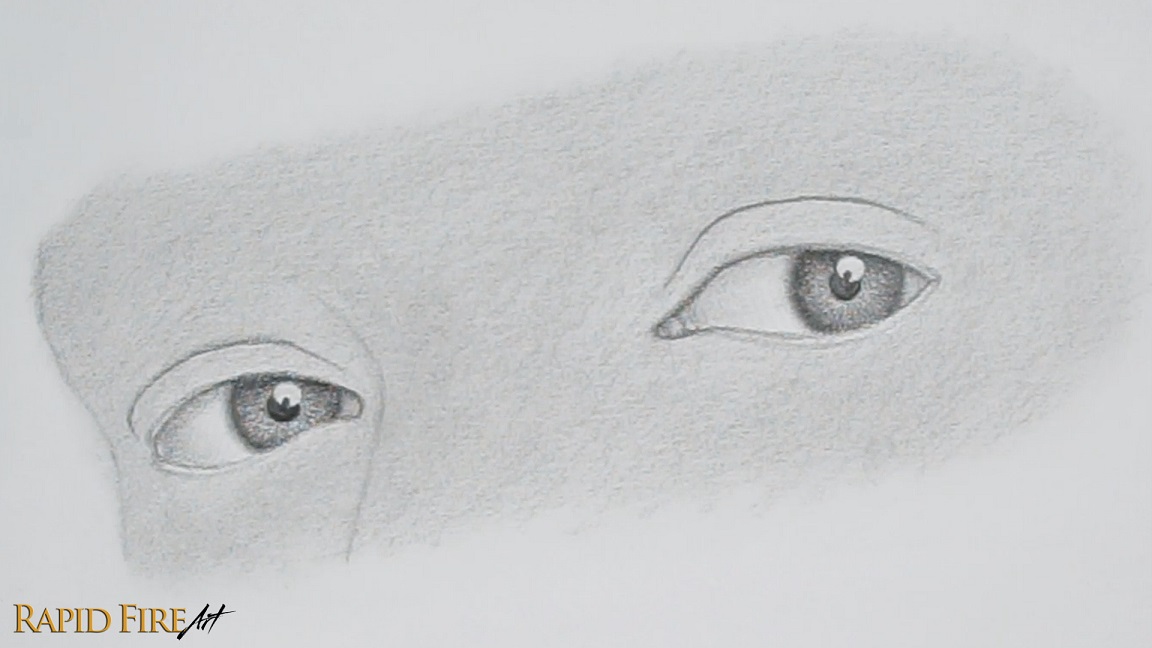
After you’re done, shade a light base layer across all the skin. Don’t worry about shadows yet.
Blend the skin lightly using a tissue wrapped around the padded part of your finger. Be careful not to smudge the iris details.
Now let’s give the skin some form by darkening areas that turn away from the light.
Shade the top and bottom section of each eyelid, leaving a strip of light along the middle. Make the transition from dark to light gradual. This creates a rounded form.
- After you shade along the eyelid crease, it should not look like a line anymore.
- If you don’t want the undereyes to look too puffy, lighten the shadow of each eye bag.

Shade the highlighted areas above to make each eyelid feel like it’s wrapping around the eyeball. Create gradual value transitions.
- Keep the shadow on the left eyelid slightly darker than the right.
- On the far left edge of the left eye, leave a thin strip of ambient light just like we did for the eyeball.

If you want to learn more about light and how to shade, visit my in-depth shading tutorial.
The rest of the face looks flat. Let’s darken some areas to give it more form.
Nose to Brow (Left Side)
Shade the left side of the nose. To give it more height, shade darker. If your shading here is too light, the nose may appear flat. Lighten your strokes gradually as you shade further away from the nose. Extend your shading from the nose bridge up above the eye in a big arch to give form to the brow bone.
Left Edge of the Face
Along the left edge of the face, darken your shading and lighten up gradually as you work your way to the right, where the form starts curving toward the light.
Right Brow
Lightly shade the area above the right eye to give the brow bone some form. Shade slightly lighter toward the right side.
Eyelid Creases and Undereyes
For both eyes, shade directly above the eyelid crease to curve the skin inward, shading darkest near the crease and lighter as you move away.
Shade lightly under each eye bag, leading into the cheekbones.
💡 Practice Tip:
If you’d like a printable version for offline use with all reference images in one place, you can grab the full PDF here (paid). It includes all* tutorials from my website. If you’ve already purchased the bundle, go to the download link in your email to find the newest added PDF :)
Shade the Rest of the Nose
Shade a little darker along the right side of the nose bridge, making sure to feather your strokes out as you work your way to the brow and undereye.
Along the highest point of the bridge, shade darker, feathering your strokes out along the brow/forehead. Leave a strip of light along the transition zone between the front plane of the nose and the side planes. This accounts for direct light coming from the right side and ambient light from the left side.
To make the bridge look more rounded instead of blocky, shade a dark strip along the left side to show that the form gradually curves away from the light.

If you want to see nose shading in action, watch the short clip below:
Blend
Before blending, check your drawing to make sure there are no major gaps between your pencil strokes. If you prefer not to blend, that’s totally fine.
To avoid smudges, blend from a light area into a darker one, and use a clean spot on your blending tool often (I’m using a fresh area of my tissue with each swipe).
After blending, your drawing may look a bit lighter. You can go back in and darken certain areas, or leave it as is if you like the softer look. Just go with what you think looks best.
I’m using a budget-friendly blending tool here, so this method isn’t the most optimal. If you want to blend without lightening your values as much, try using a very soft-bristled paintbrush instead.
Now that the skin is smooth, you can add subtle details like fine wrinkles under the eyes. Lightly draw a few fanned-out lines beneath the eye bags. Keep your pencil sharp and your strokes very subtle.
Step 6: How to Draw Eyebrows from the ¾ View
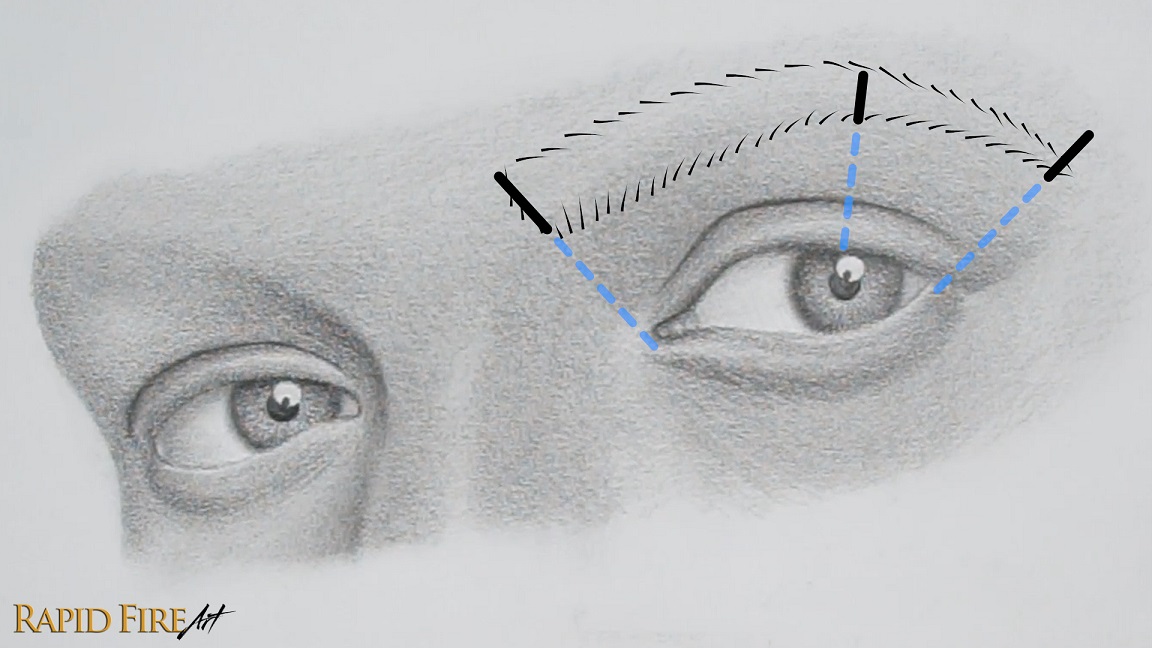
Eyebrow Positioning
Now let’s draw the eyebrows!
We first need to map out where they will go. Height-wise, place your eyebrows along the brow bone, a short distance above the eyes. If you want a better understanding of overall placement, check out my Loomis head tutorial where I break down how the features are positioned on the face.
Use light ticks to mark where the eyebrows begin, arch and end. I’m using the eye as a reference point for each tick:
- Beginning of eyebrow: at a slight angle to the inner corner of the eye (for the left eye, the beginning will be almost directly above the inner corner of the eye)
- Eyebrow arch: positioned close to the outer corner of the eye
- Eyebrow tail: at a slight angle to the outer corner of the eye (for the left eyebrow, the tail won’t be fully visible since it wraps around the far side of the face)
You can adjust these points depending on the eyebrow shape you want. For example, if you prefer a shorter tail, reduce the length.
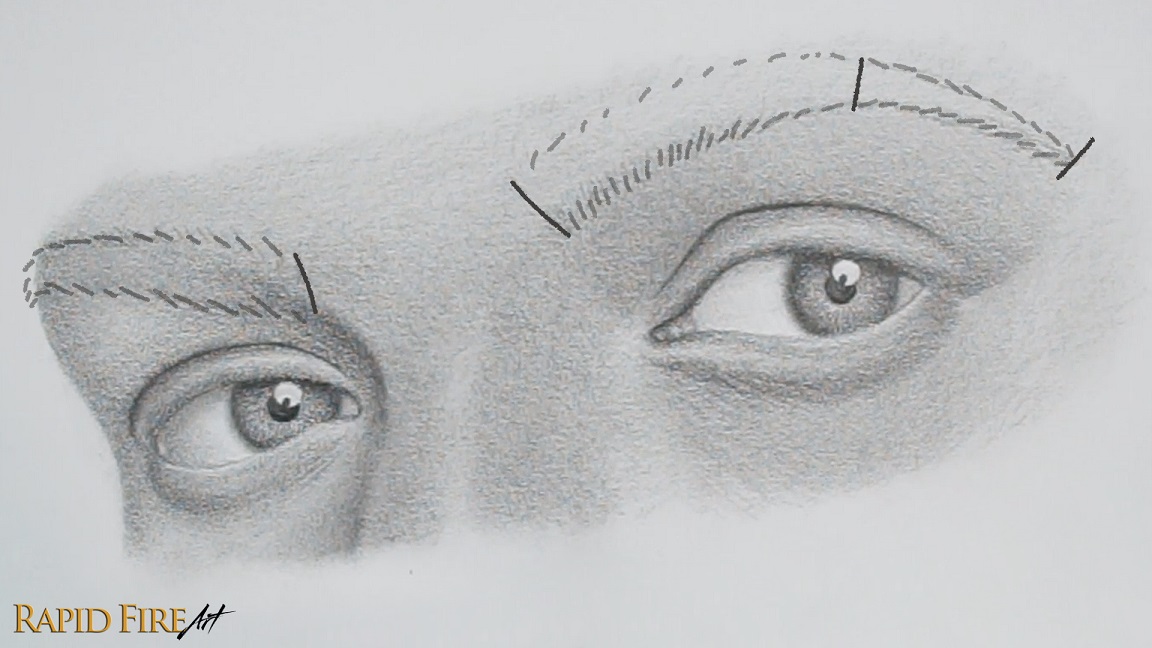
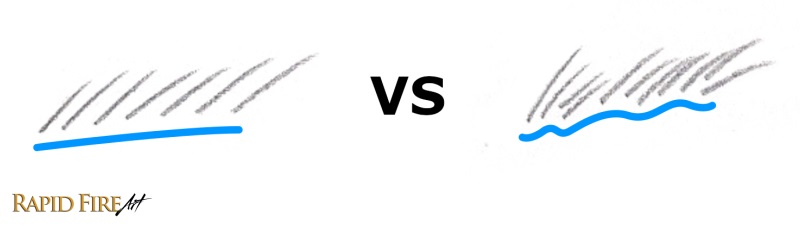
Now we have some guidelines to start planning the eyebrow shape. We can draw the entire eyebrow outline using little tick marks instead of a solid continuous line. This allows us to plan out the eyebrow shape without having an unnatural outline showing through in the end. The faint ticks will blend in as you draw the actual eyebrow. This is borrowed from my shadow-lining technique.
Keep your outline faint, so you can easily make adjustments if needed.
Tip: To draw matching eyebrows, once you’ve finished one eyebrow and are ready to place the second, hold your pencil up to your drawing and match the angle of the eyes. Lock your hand in place, then slide your pencil upward to align it with the base of the first eyebrow. The point where your pencil hovers above the other eye is where the base of the second eyebrow should sit. You can repeat this to figure out the arch height and even match thickness as well, helping both eyebrows stay aligned.
Watch the clip below for a clear visual example of how to draw symmetrical eyebrows:
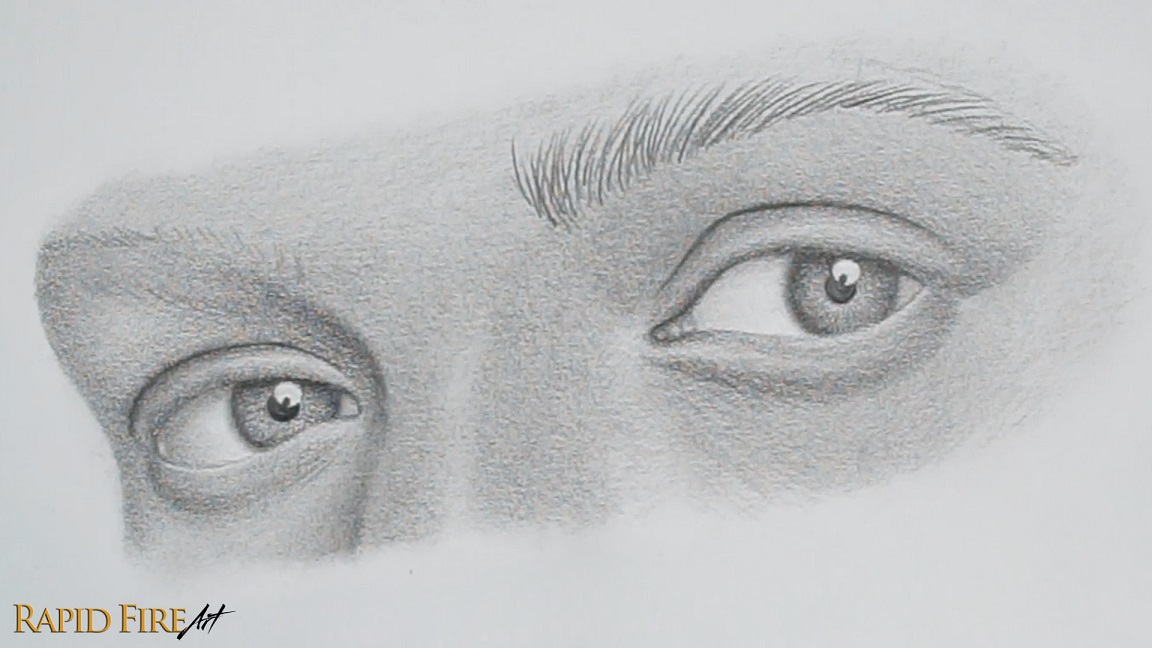
Practice Drawing Eyebrow Hair
Are you happy with your eyebrow outline and its position above the eye? If so, let’s sharpen our pencils and practice drawing the actual hair. Use a confident swift motion with a lift at the end to create hairlike strokes, making sure the end of each hair is tapered instead of blunt.
Eyebrow Hair Direction Overview

Let’s start filling the right eyebrow. Just so I don’t lose you, here’s a clear illustration of how the eyebrow will be filled in.
I start at the bottom portion of the eyebrow, drawing a row of hair starting from the beginning and then ending at the tail. My stroke angle transitions from vertical to horizontal as I work my way across the eyebrow. At the tail end of the eyebrow, they start pointing downward.
Strokes near the beginning of the eyebrow will be longer and thicker than ones at the tail end.
Then I move up a little, adding more rows of hair until I fill in most of the eyebrow outline. As I approach the upper boundary of the eyebrow, I curve/angle my strokes more toward the tail.
For the top section, my strokes are very light and are all angled downward.
Finally, add some random, faint stray hairs around the main body of the eyebrow if you want the unplucked look.
To make the eyebrow look more integrated with the face, shade it very lightly and give it a slight cast shadow along the bottom. Look between the two images above to see just how light this cast shadow is.
Tip: To make the hair look natural, stagger the roots so they don’t form a perfectly straight line and vary the angle of some hair.
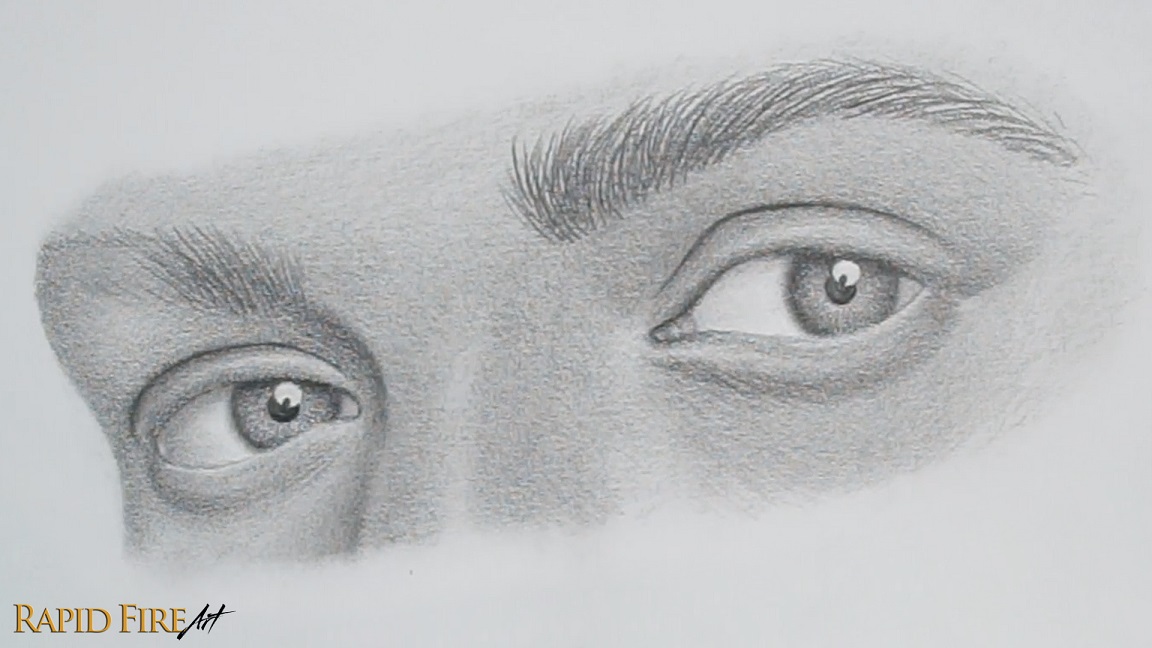
Left Eyebrow Hair
Do the same thing for the left eyebrow, except when you get to the edge of the face, point your strokes out beyond the edge of the face and angle them down. Add a few thin, light hairs further down so it looks like they’re peeking through from the other side.
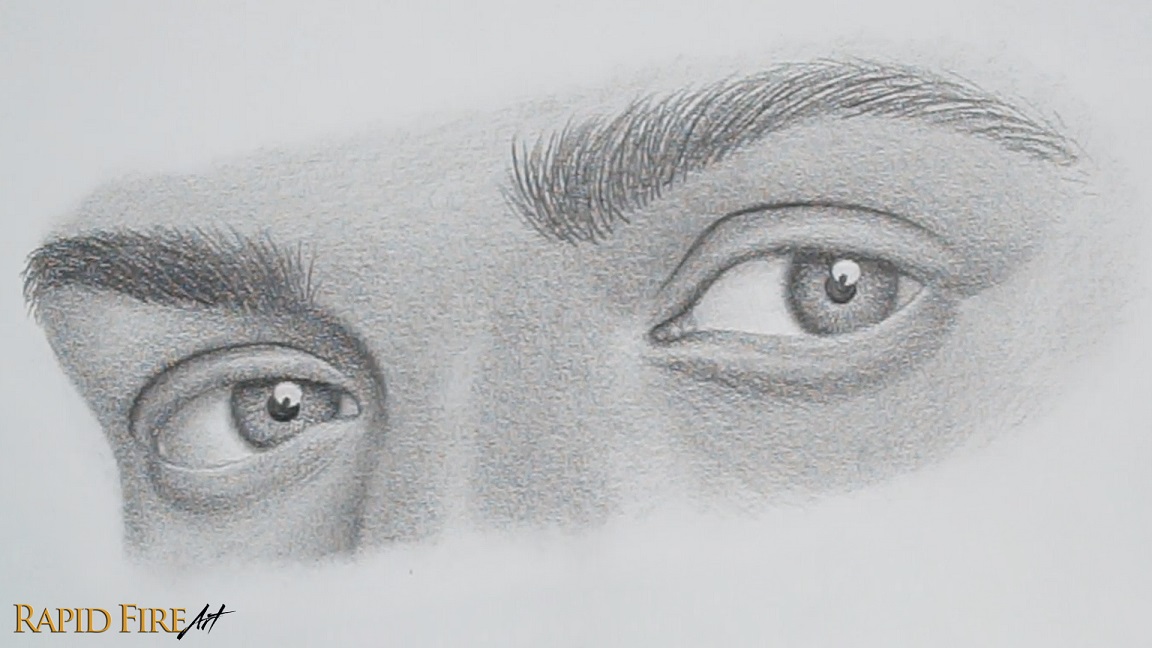
Step 7: How to Draw Eyelashes from the ¾ View
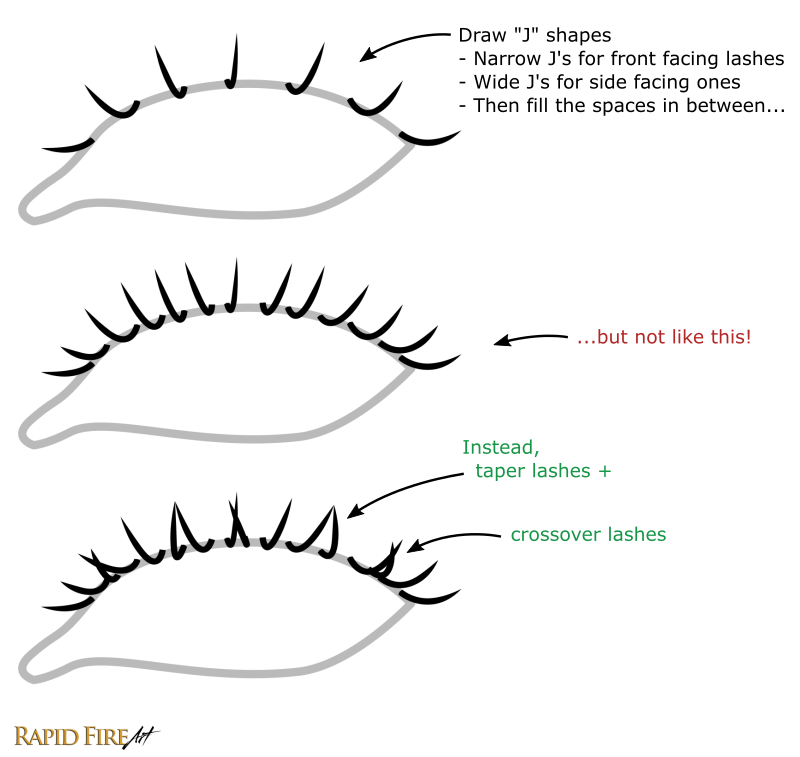
Let’s draw the eyelashes now. Here’s a quick and simple visual explanation on how to do it:
Start by drawing “J” shapes along the top eyelid. I started at the middle of the eyelid, drawing a very narrow “J”. As I worked my way to the right, my J’s became wider, making them appear as though they are side-facing. For the left side of the eyelid, I just mirrored the shapes.
Fill in more lashes between your initial set, but instead of drawing them like perfect little rays of sunshine, taper some lashes together or cross them over each other.
Once you finish the top lashes, flip your “J” shapes to draw them on the bottom eyelid.
For the left eye, draw your most narrow J’s near the inner corner of the eye since that part of the eyelid is most forward-facing.
For more detailed steps and tips on drawing eyelashes, please read my dedicated eyelash tutorial which includes FREE printable worksheets.
Once you’re satisfied with how your eyelashes look, shade around the base of each lash using the circulism shading technique to add subtle texture to the skin around the roots. You can also add very light cast shadows under the top lashes, as well as subtle reflections inside the highlight of your iris.
Step 8: Polish and Tweeak Your Realistic Eye Drawing

If you’re happy with how your eye looks now, you can stop here, or you can continue tweaking for a more polished result or increase the contrast for a more striking appearance.
For grainy shading, go over it with another layer of graphite and blend those areas specifically. If you’re hesitant to darken the drawing further, switch to a harder pencil like an HB. This helps reduce visible white dots without significantly changing your values.
With a bit of patience, you can also use a sharpened pencil tip to fill in larger white specks (these are just the texture “valleys” of the paper).
Also soften out any harsh value transitions such as the nose, if it appears blocky.
Increase Contrast
Take a few steps back from your drawing to see if your lighting is consistent across the entire face. In my case, the left edge of the face was too light, so I darkened it, which helped the form feel more angled and accurate. After that, the left eyebrow looked too light in comparison, so I darkened both eyebrows to balance them.
I then darkened select areas to make them more shapely or to draw more attention:
For form (shapeliness):
- Shadow on the left side of the nose bridge (to increase height)
- Eyelid creases (to deepen structure)
- Inner corner of the right eye (to add depth)
- Left side of the eyeballs (to enhance roundness)
You don’t need to blend every layer of newly added graphite as long as it looks smooth emough for you :)
To draw attention:
- Eyelids (increase contrast and help define the eye shape more clearly)
- Irises (increase contrast and pull focus to the eyes, making them feel more vivid)
Tip: When the entire drawing is light, it can appear unfinished or washed out. Increasing contrast not only improves form, but also helps guide the viewer’s eye due to stronger visual hierarchy and depth.
At this stage, I’m not adding anything new. Just reinforcing dark areas and refining the balance between light and shadow to further push and pull elements of the face.
To bring back lost highlights, I used a kneaded eraser to lift graphite from the lightest areas. This is especially useful on the nose bridge and eyelids.
Add Highlights
You can make the eye appear wet by placing highlights in strategic spots. Erase inside the inner corner of the right eye to make the area look reflective. Adding a small highlight along the bottom of the eye where the eyeball touches the eyelid can make it look watery. Clean up the highlight in your iris from step 2 if it has become darker.
If you completed this eye drawing tutorial, attach it as a comment on this Facebook post with the text “challenge completed” and I will feature it below with your name and a link to your social media page. By posting your drawing with this text, you give me permission to feature it on my website with credit to you.
Fix Your ¾ Eye Drawing
If your drawing looks off, check these:
- One eye too high: Make sure your eyes are balanced on the guideline from step 1.
- Spacing too wide: Draw your eyeball circles closer than 1 circle distance apart. From the ¾ view, the eyeballs will appear closer together than from the front view because they are sitting on the same plane and the angle compresses the spacing.
- Values too flat: Toggle between the images in step 7 and 8 to see how the introduction of darks and lights affect the form. If you want a deeper understanding of how to show different surface curvatures, check out my in-depth shading tutorial with simple diagrams and practice exercises. Focus on expanding your value range.
What’s Next?

5 Common mistakes when drawing eyes
Fix the most common issues that make eyes look flat, uneven, or unrealistic.

Shading Fundamentals Guide
Learn how light works, how to shade smoothly, and practice pencil control with simple exercises.

Learn where to place eyes on the face
Use the Loomis method to construct the head from any angle so your features sit on a solid foundation.

Having trouble achieving symmetry?
Learn how to make your eyes match using simple alignment techniques.

Go back to front view basics
Practice drawing a pair of eyes from the front view to build accuracy and confidence.
Darlene created RFA In 2013 with the goal of sharing simple yet detailed drawing tutorials with other artists on the world wide web. She is a self taught pencil portrait artist and Youtuber.


