Learn how to draw using RFA’s simple, easy to understand and detailed drawing tutorials. These step by step drawing lessons are designed for people of all ages and skill levels.
Don’t be discouraged if you get stuck! I offer FREE one on one support where I provide you with specific drawing techniques, tips and suggestions which are tailored to YOU :)
No more expensive online art classes or programs! Follow my simple drawing lessons, interact with me and let me help you draw better!
I’ve always found shading to be the quickest way to add realism and depth to my drawings, be it portraits, concept sketches or even a quick doodle.
In this tutorial, I want to share with you 4 simple shading techniques that can help you achieve realistic textures and effects that will enhance your drawings and bring them to the next level.
These techniques may look super simple, but that’s the beauty of it. Let’s see how they can be applied and how they can transform a drawing :)
Hatching
This is done by drawing lines that run in parallel or side-by-side. Since the lines are uniformly patterned, it works very well for shading things like wood grain, brushed metals and fingernails, just to name a few. A sharp pencil works great for conveying metallic textures, while a blunt pencil can help you achieve smoother strokes that will also be more easy to blend.
Be careful when using this shading technique on round objects. If the strokes are not blended together well enough, it can make a round drawing appear flat. Here’s an example:
The straight lines take away from the drawing, making the viewer perceive the object as flat, instead of 3D.
Cross Hatching
This is where you draw lines that cross right through each other. They can go in any direction.
It’s great for creating textures such as certain fabrics (predictable patterns) or even fine lines on the skin (random patterns).
Circulism
This shading technique consists of many overlapping circular shapes. I use it frequently to shade realistic skin. It works well for conveying soft or fuzzy surfaces. The more you overlap the circles, the smoother the texture.
The tricky part is trying to control pencil pressure so each circle is similar in value.
Contour Shading
This is where you create lines that follow the shape of the subject you’re trying to represent. Contour lines can go in any direction.
They’re great for shading things that already display lines running along the surface, no matter how subtle. For example apples, onions, and lips. In this example, the lines also double as lip wrinkles too.
For each shading technique, the more densely you shade, the smoother the shading will appear, and the harder you press down on your pencil, the darker your shading will appear, allowing you to achieve a sense of visual depth.
Combine Shading Techniques
All of these shading techniques can be used in combination wherever you see fit. I used all 4 to shade this wrinkly hand. The combination of these techniques helped me achieve various textures commonly seen in wrinkled skin.
Starting with just the outline of a hand, I applied circulism as a base layer to give it a consistent texture all throughout – A texture that resembles subtle fine lines on the skin.
Hatching and contouring were used to show stretched skin that wraps around/across the shape of the hand.
Hatching also works very well for shading nails, as mentioned earlier. Especially nails that have prominent stripey patterns.
Cross-hatching was used very minimally to create realistic wrinkle patterns around the knuckles where the skin is thick. I varied my pressure to make some lines darker than others just to make it look more random and realistic.
You don’t have to stick to these 4 shading techniques exclusively because there are many others you can use, or just make up your own to create the texture and look that you want for your drawing. Here are a few examples:
Practice Shading Techniques!
Here are some fun exercises you can do to practice. I’ve attached a free printout at the bottom of this article for you to use.
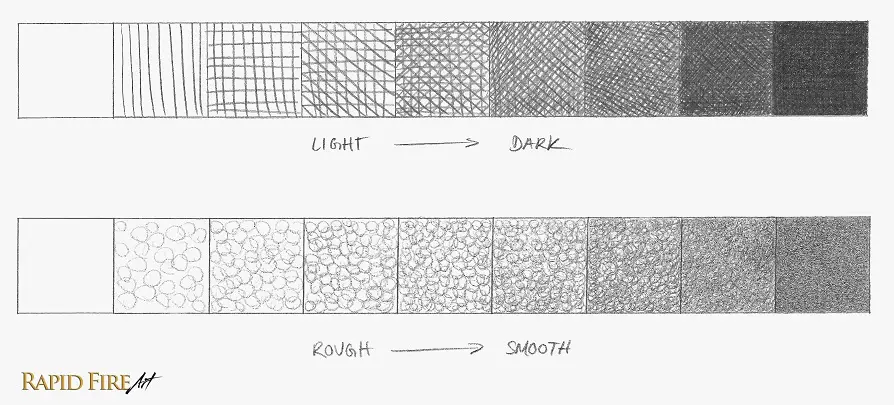
Exercise #1:
Draw a row of squares or rectangles and shade them from left to right using your shading technique of choice. Remember that the more pressure you apply, the darker your shading will be and the more densely you shade, the smoother it’ll be.
Exercise #2:
Sketch a variety of common objects and shade them in using shading techniques that best describe the texture.
For example, I want to shade the toy horse above so it looks wooden. The hatching technique looks similar to wood grain, especially the lines vary in darkness:
The burlap sack below is made of thickly weaved material. Cross-hatching would work for this one, but I wanna make the bag appear more 3D, so I’m using a combination of cross-hatching and contouring called cross-contouring. In shadow areas, I apply more pressure on the pencil, creating darker lines.
Teddy bears are usually soft and fuzzy. Do you remember which of the 4 shading techniques creates a soft and fuzzy texture?
If you guessed circulism, you’re right!
The more circles I draw, the softer the texture becomes…
To make your shading look even softer, use a blunt pencil and/or blend the shading out with a blending tool such as a tissue, for example. Feel free to experiment with a different shading technique to see how it changes the look and feel of your subject!
You can combine shading techniques or make up your very own:
Here are a few objects you can use for practice. For each one, sketch it out and choose one or several shading techniques that will best describe the texture. For example, the wooden toy could be a mixture of hatching, contouring, and dashes.
Click hereto download the image above (link will open in a new tab).
The texture that you choose to give each object is completely up to you. Stretch your creative muscles and have some fun with it! Feel free to shade outside of the lines or get rid of the outlines altogether.
You can practice with the shading techniques introduced in this tutorial, or create your very own :)
I hope you found this tutorial helpful. If you liked it, please share it and leave a comment down below! Let me know if you have any suggestions for future tutorials!
To view this tutorial in more depth, please watch the fully narrated video on Youtube!
Darlene created RFA In 2013 with the goal of sharing simple yet detailed drawing tutorials with other artists on the world wide web. She is a self taught pencil portrait artist and Youtuber.
One of the most distinctive features of southeast Asian eyes is that the eyelid crease is tapered instead of parallel with the top eyelid.
You can easily make any drawing of an eye go from, for example, Caucasian to southeast Asian by changing just a few aspects which we’ll dive into as we go along.
If you’ve already followed my other tutorials on drawing eyes, you can skip straight to step 4 because most steps are similar.
Step 1: Draw a Circle
Start by drawing a faint circle. This is the eyeball. It doesn’t have to be perfect because we’re going to completely erase it later.
Step 2: Pick an Angle
Eyes can slant in a variety of ways. Choose how slanted you want your eye to be and draw a line going through the circle at the angle you prefer.
Note: For this tutorial, the left side of my circle is going to be the inner side of the eye.
Step 3: Draw the Inner Corner of the Eye
You can use a wide variety of shapes for the inner corner of the eye. I drew a deep V shape, but you can also draw a U or a mix of the two, etc. It can be narrow, wide, shallow, deep, small or large.
Here are a few examples:
Step 4: Draw the Top Lid
While staying within the boundary of your circle, draw the top eyelid. It can take on a variety of shapes. A high arch will give you a large eye. I’m going for a medium sized one.
While you’re drawing it, picture the eyelid hugging the spherical eyeball.
When drawing caucasian eyes, I like to end my stroke at the intersection of the circle and straight line, but for an Asian eye, I like to extend my stroke just a little further:
I also like to do the same thing with the inner corner of the eye. It makes the skin look as though it’s in tension:
Step 5: Draw the Bottom Lid
Now let’s draw the bottom lid. Try to keep it close to the line we drew in step 2. The bottom lid should appear a lot less curved than the top one, but not completely flat/straight.
Step 6: Add a Crease
Here’s where we can make the eye look Asian or Caucasian. We’re going to draw a crease that runs above the top eyelid.
To make the eye appear Asian, taper your pencil stroke at the inner corner of the eye. The degree you taper it is up to you – In the example below, the eyelid crease is only visible at the very end.
For some southeast Asians, the crease may not be visible at all, and for others, it may even run parallel to the top eyelid instead of being tapered on one end.
Here’s an example of a parallel crease, which is common amongst people of Caucasian descent.
Step 7: Erase Outlines
Carefully erase all your construction lines: the circle and straight line.
Step 8: Add Some Details
Located at the inner corner of the eye is an area called the caruncula. It’s a soft pink bit of flesh that is separate from the eyeball. You can draw a curve or two right there to indicate the transition between the two forms. In the video at the end of this post, I’ll show you how to shade it.
To draw an iris of the right size, I like to measure the eyeball horizontally and divide the space into four. The iris will take up about 2/4’s of the eyeball. For example:
To draw a realistic looking iris, draw a full circle and then erase parts that fall outside of the eyeball. This step should be drawn lightly. Once you work out the position and size you want, darken the iris outline.
Step 9: Shade Your Eyes
To learn how to shade an eye and more, please refer to the video below.
Darlene created RFA In 2013 with the goal of sharing simple yet detailed drawing tutorials with other artists on the world wide web. She is a self taught pencil portrait artist and Youtuber.
In this tutorial, I’m gonna show you a few ways to give a flat drawing more depth.
Go grab a drawing that you wanna work on and try some or all of these tips to add an additional layer of depth or 3D-ness to it.
Let’s begin!
Tip #1: Apply Perspective
Perspective is used to give the illusion depth or distance on a 2D surface. So by applying it properly, you can push areas far away or pull them closer to you, which helps your drawing appear more 3D / pop out of the page.
If your drawing is a scene or a subject that recedes into the distance, remember that objects should look smaller and smaller as they move further away from the viewer. To draw a simple scene like this, you can use one-point linear perspective to find out the appropriate size to draw each object.
Just align the edges of your object to a single point in the distance, using a ruler.
Applying perspective properly sets a good foundation for your 3D drawings. For more content on perspective, visit lesson 6 of my beginners’ course.
Tip #2: Apply Blur
To heighten the illusion of perspective, just apply some blur to sections of your drawing.
For example, if you want the viewer to focus their attention on only one apple, let’s say… the second one from the left, you can blur all the others and remove some of their detail. Our eyes are drawn to fine details, so the fewer you add, the better.
Simply use a soft tissue to smudge the drawing until it becomes blurred.
The further an object is from the main focal point (the second apple), the more blurry it should be. This is very simple to do and it helps to heighten the illusion of depth. It makes far away objects look even further away than they were before. And objects that are close to you will look even closer.
If you want the viewer to focus their attention on the first apple instead, you can blur all the others, leaving only the first one looking sharp:
You have full control over what you want the audience to focus their attention on.
This technique is helpful for differentiating foreground and background objects from each other as well as imply distance.
Tip #3: Shade More
If your drawings usually have minimal shading and contain mostly white or whatever color your paper is (like the image above), it’s going to be very difficult to make it look 3D.
The first thing you can do is get more comfortable with shading the entire drawing, leaving only the brightest areas white or close to white — trying not to let too much of the bare paper show through. If you’re not sure how or where to shade, please click over to my shading tutorial before you continue with this one. It covers the topic of light, which is crucial for realism.
Tip #4: Use Gradients
A gradient is a gradual transition from light to dark or the other way around. It can be created by gradually pressing harder or softer as you shade.
Gradients exist because the further something is from the light or the more it turns away from it, the darker and darker it appears… generally speaking. So even objects with flat sides will display gradual changes in light intensity.
Here’s an example: for most beginners, drawing a deep crease or wrinkle might look like something like the image below — A set of lines on the surface of the skin.
The problem here is that it just looks like a line tattooed onto the skin’s surface.
Because the shading is a solid value, the skin looks completely flat. In order to curve the skin into a wrinkle, we’ll need to make it look as though it’s turning away from the light. This means, the skin should become darker and darker as it approaches the groove, making the transition from light to dark become gradual instead of abrupt.
This gradient forces our brain to perceive the wrinkle as a curved surface instead of a flat one.
So simply using lines to indicate wrinkles, folds or creases won’t do. Try to use gradients wherever possible to give all surfaces a more realistic sense of depth.
Don’t forget that the further a surface is from the light, the darker it will be. So even objects with flat sides will display gradual changes in light intensity:
Tip #5: Remove Obvious Outlines
Any outlines in your drawing can make it appear cartoony which takes away from any effort in making it appear 3D… because in real life, there are no outlines. So make sure they’re erased or try to blend them into their surroundings until they disappear.
Tip #6: Make Full Use of Your Pencils
Here’s an example of a flat drawing. Now, this may look familiar to you if you’re a very light-handed artist. The shading looks good but it still looks flat. And the reason is because it lacks value contrast.
Meaning, there isn’t that big of a difference between light and dark. Everything is just a light shade of grey.
Let me pull up a graphite value scale against the drawing to show you what I mean:
As you can see, my graphite pencil is capable of creating really dark values, but in the image above, only a small range is being used, which is kind of a big waste!
This makes the drawing look really flat.
To avoid this, apply a little more pressure while you’re shading or use the same amount of pressure that you’re used to but switch to a softer pencil than the one you’re currently using. That should give you a slightly darker value.
For example, if you’re using an HB pencil, switch to a softer one like a 2B or even 4B if you want.
When you shade with a softer pencil, your drawing should come out looking darker than it normally would. When you make this change, you’ll start to see your drawing take on a more 3D form.
So simply shading darker in general will create a more impactful drawing that’s much more interesting for your viewer to look at. As I increase the contrast, the drawing becomes clearly a few shades darker than the paper, which really helps to set the drawing apart from the background.
I like the overall level of shading that it has now. But it’s still not popping out of the page.
To add more depth, I’m gonna look for specific areas across the entire drawing where I can exaggerate or deepen the values without making it look unnatural. This requires some understanding of how light behaves. If you need a refresher, the shading tutorial is just a click away.
I’m gonna go for areas that are sort of hidden from direct light and reflections.
Darkening such areas can push parts of your drawing further into the background.
Here are a few examples.
Example #1:
Darkening crevices and nooks can push them further back. But you do wanna make sure it’s not over done. So work in layers, adding more graphite just a little bit at a time so you can save yourself from erasing later on.
Example #2:
Cast shadows, especially ones on dark surfaces are great areas to exaggerate.
You might have noticed a very subtle cast shadow along the part of the eyeball that’s directly below the top eyelid. I’m gonna exaggerate the darkest area along it which happens to be the iris.
There is a slight cast shadow here to begin with. Let’s see what happens if I add some darker graphite.
Now, the iris looks deeper, and even though I didn’t touch the top eyelid at all, it looks as though it’s been pulled towards us.
I know the changes between each image are very subtle. So if you wanna view it more clearly, please watch the video version of this tutorial: click here to watch it on Youtube.
Example #3:
If you’re drawing from your imagination, it really helps to understand some basic anatomy :)
For this example, I know I can shade the pupil much much darker because it’s actually a hole in the center of the iris that absorbs light. So it should appear very dark. It doesn’t look like a hole right now, but that will change as soon as I shade it some more:
Not every drawing needs to have such dark shades/values in it. Just do whatever is right for your specific drawing.
Looks like I’ve covered all the values in my scale…
You might have noticed that after adding all these dark shades of grey, the eyelashes and eyebrow look much lighter in comparison to the rest of the drawing, making the entire drawing look rather bland and uninteresting.
Dark values can create interest. guiding the eyes to look wherever you want them to. So to give the drawing more… of a balance, I’m going to darken the eyelashes and eyebrow as well:
That’s much better!
Now I’ve made full use of my graphite pencil by including all the shades it can possibly create. Of course you don’t have to use all the values in the scale, but it does make the drawing look a lot more interesting.
So… we’re done right? Not exactly!
We traveled far over to the right of the scale, but there’s still another value on the left, and that’s white!
If your drawing contains a lot of white areas already, this might not create much of an impact.
Okay, so here are a few areas that could use some brightening… these shiny, wet surfaces reflect a lot of light, so turning them white or close to white will make them pop, immediately:
Use an eraser to remove graphite in such areas. I like to use a kneadable eraser for high precision. For a very bright white, try correction fluid/white-out.
Use your dark and light values to continue to push and pull your drawing further. If your drawing doesn’t have any wet/shiny surfaces, just brighten your highlights further. When you do this, it helps to know where the light source is coming from so the patterns of light make sense and look as convincing as possible. Click here for the shading tutorial, if you need a refresher. In the image below, the ribbons in the eye, spokes, and eye whites have been lightened, among others.
Here’s a comparison between the drawing before and after.
Well, that’s it guys!
If you have any questions, leave them down below and if you have any before and after photos, I’d loooove to see them!!
Darlene created RFA In 2013 with the goal of sharing simple yet detailed drawing tutorials with other artists on the world wide web. She is a self taught pencil portrait artist and Youtuber.
When you add light and shadow to your line-drawings, you can make your subject come to life by creating the illusion of form and depth.
You can make a flat line drawing jump right off the page or push things far away into the distance!
In order to shade better, here are 3 things you’ll need to learn…
Pressure control
How to shade smoothly
Understand how light behaves
There are more, but let’s keep things simple! I’m going to walk you through all 3 topics and then we’ll shade something together, step by step!
Let’s begin!
Pressure Control
Realistic shading is done by creating a series of values/shades ranging from light to dark. The harder I press down on my pencil, the darker the strokes will be.
Portraits displaying a limited value range, can end up looking very flat. While portraits with a wider value range will pop:
To have good pressure control, practice shading from one end of your sketchbook to the other while pressing harder and harder until the values get darker gradually.
Another way to practice is to draw a long rectangle and divide it into several squares. Fill the squares from right to left, start with the darkest value you can possibly make and work your way towards the lightest.
It’s important to maintain a consistent pressure between each back and forth stroke or each individual stroke. This will take some practice and concentration to develop the muscle memory for. Here’s an example of what I mean:
If you’re interested in the tools I use and want to learn more about the different pencil types. Check this page out.
Some tools can make shading easier for you, but you absolutely DO NOT need any special pencils to get started. Because you can draw and shade realistically with pretty much anything that can make light to dark marks! Here, let me show you! I’m gonna draw using this random stick I found in my kitchen. Once it’s burnt, I can use it just like a regular pencil. And it’s erasable too!
My point, is that any old pencil will do. There is no reason why you can’t start shading today. Really, the most important thing is just to start!
How to Shade Smoothly
To shade smoothly, try to keep your pencil strokes close together. Eliminate major gaps between your strokes while maintaining good pressure control.
Now, it’s difficult to eliminate gaps if your pencil is sharp. So what you can do is wear the pencil down until the tip is dull or use the side of the lead to draw so your strokes come out thicker:
If you’re shading a large area and want to avoid dark stripes (the ones that form when your strokes overlap each other), avoid using the writing grip while pivoting at the wrist. When you pivot from the wrist, your stroke length is very limited:
Instead, try using an overhand grip and pivot from your elbow and shoulder to achieve much longer strokes:
This is very useful for shading large areas such as backgrounds. Just remember to keep your strokes close together, eliminating gaps that can make your drawing look scratchy.
Understand How Light Behaves
Have you ever tried shading something over and over without it looking even close to your subject? For most beginners, shading is probably a guessing game. That’s totally what is was for me! Until I learned a few basics about light.
Things just started making more sense!
Knowing where to correctly add light or shadow can make a really big difference in how realistic your artwork will come across.
I’m going to use a sphere to point out the different elements of light because the patterns are a lot easier to point out than a complex form such as… a nose for example.
Here we have a plain wooden ball, with a light source coming down from the top left.
We have two distinct sides, the light side which is facing the light source and the shadow side which is turned away from the light.
Here we have something called a core shadow which is a dark strip running along the boundary between the two sides.
The core shadow is most visible on a white table because white is highly reflective. Light rays come down, bounce off the table and illuminate the shadow side of the ball, leaving a dark band.
So as you can see, we have two types of light. Direct light and reflected light.
That’s why shadows are rarely all black. There are so many things in the environment that light can reflect off of: walls, nearby objects or even dust particles floating around in the air!
Do keep in mind that black surfaces absorb light, so in the example image below, the core shadow is no longer visible:
Looking at the image below, can you tell which areas are lit by reflections and where the core shadows are?
Answer…..
As mentioned earlier, light rays can reflect off of many things in the environment, but they have a difficult time bouncing their way into tight spaces such as the area where the ball touches the table. This is called an occlusion shadow.
And where a form blocks light from reaching another, that’s called a cast shadow. In this case, the ball is blocking light from reaching the table.
The cast shadow can tell you where the light source is coming from. All you have to do is trace the edges against your object, like so:
You can also flip this around…If you’re drawing an entire scene from your imagination, you can specify a light source and create a set of lines resting against the edges of your object to find the cast shadow’s length.
How many cast shadows can you find in the image below?
Answer…..
Let’s take a closer look at the light side of the ball.
On this side, there are only 3 things I need to point out. There’s the core light which is the area facing the light directly. Then there’s the highlight which is actually a reflection of the light source. This is the brightest point on an object. The edges of a highlight can appear soft on matte surfaces like this wooden ball or hard on shiny surfaces such as a polished plastic ball.
And as unintuitive as it seems, the highlight can change position depending on where you’re standing.
The very last thing are mid-tones or half-tones. Mid-tones are the darkest values on the light side of the ball where the edges start curving away from the light source. These areas of the ball receive less and less light the more they angle away.
Can you point out the core light, highlight and mid-tones on the nose?
Answer…..
Shade With Me: Step-by-Step Shading for Beginners!
Let’s shade an apple together without looking at any reference images. With our basic knowledge of how light behaves, we can essentially draw from our imagination! It’s a great way to actively think about how light behaves.
Step 1
First sketch your apple. It doesn’t have to be perfect at all just try to get something down on your sketchbook. Try to keep your outlines as light as possible. My sketch is extra dark so you guys can see it better.
You can use any pencil you want :) To learn more about the different pencil types, click here.
If you look closely, I started out by drawing a very light circle and then used that as a base to draw the apple.
Step 2
We want it to be sitting on a table, so draw the edge of that table behind your apple. Then erase any unneeded lines.
Step 3
The next step is to determine where the light is coming from. Let’s have one shining down from the top left. Draw a little flashlight or sun just to remember where the light source is.
Step 4
Where the apple blocks light from reaching the table, let’s draw a cast shadow. You can use a ruler to find the cast shadow’s length. Just align the ruler to your light source and the edge of the apple. Now we know how long to draw the cast shadow. I’m just going to draw a long oval shape on the table’s surface.
Step 5
Where the dotted lines touch the apple, we have our boundary between the light and shadow side.
Let’s say the apple is sitting on a white table. How do you think the shadow side will look, taking reflected light into consideration? Don’t forget that light can bounce off walls, nearby objects or even dust particles.
Once you’re done visualizing, draw a core shadow. My core shadow is thinner on the left side because there are more reflections on that side (yours might look different depending on the apple’s surroundings).
Make sure the thickest section of the core shadow is darkest.
Step 6
Where the apple touches the table, there is less light. So let’s shade that area darker.
Step 7
Now that I’ve taken care of those two areas, I’m going to fill in the rest of the shadow side by laying down a flat layer of graphite that is much lighter in value.
The 3 areas we just shaded look very separate from each other, so let’s soften the transition between each one to avoid the abrupt changes between light and dark. I like to shade from the darkest area into the lighter one, using medium pressure to start.
Now the apple looks a lot rounder!
If you’re shading an object with a matte surface, an abrupt or immediate transition can indicate a sharp edge while a gradual transition can indicate a round edge.
Step 8
Let’s shade the cast shadow now. The further the cast shadow is from the apple, the more open it is to being hit by reflected light rays, so I’m gonna shade the area directly under the apple darker and then lighter as the shadow stretches away.
Step 9
How bright do you want the light side of your apple to be? It’s totally up to you! Pick a light value and then shade the entire space flatly. Just focus on your pressure control and stroke spacing.
Step 10
The next thing we need to do is blend the two distinct sides of our apple so it all comes together nicely.
Where the form turns away from direct light, add your mid-tones which will immediately make the surface appear rounder.
The more the surface of the apple turns away from direct light, the darker it becomes.
Step 11
When you’re done, use an eraser to indicate the highlight. I’m using a kneaded eraser, which allows me to just dab and lift the graphite away instead of rubbing the paper.
Step 12: Bonus
If you want your drawing to pop out, exaggerate your values to create depth (make dark areas darker, light areas even lighter).
You can only go so dark with graphite pencils. If you wanna achieve a deep black, try adding charcoal to the drawing.
Outlines can make a drawing look cartoony, so if you want your apple to look more realistic, make sure the outlines blend in with your shading or erase them as you go along.
Definitely try to make your initial sketches as light as possible so they don’t show through in the end. If they’re too dark to erase, you can add a dark background until they disappear!
Practice!
Place a few objects on a table under a single light source. These objects can be various fruit, vegetables, eggs, etc.
Observe the patterns of light and shadow on each object as you move the light around to try and understand what you’re looking at. Then draw the scene in a fairly organized manner. For example, start with the core shadow first, then the occlusion shadow etc.
Sometimes it can help to pick an object up and turn it around to study it from different angles.
If you want a bigger challenge, ask a willing friend or family member to be your study subject. Use only one light source on his or her face. It really helps to draw people that you know very well!
Darlene created RFA In 2013 with the goal of sharing simple yet detailed drawing tutorials with other artists on the world wide web. She is a self taught pencil portrait artist and Youtuber.
Here’s a quick and easy method for beginners to draw male and female faces. In this tutorial, I’ll draw 2 basic faces and then I’ll demonstrate how some easy modifications can affect the overall look of the face.
This tutorial was requested by Wendy Nelson. Thanks Wendy!
Try to sketch very lightly so you can easily erase mistakes as you go along. This will also be helpful for the last part of the tutorial where we’ll swap out facial features to play with the way our characters appear. I used a 2B for this tutorial so you can clearly see what I’m doing, however, I recommend using an HB or harder pencil grade.
How to Draw a Male Face Easy
Step 1: Draw a Circle
Draw a circle and then make a line through the center vertically and horizontally. Try to keep your construction lines as light as possible. If you can’t draw a good circle, don’t worry! Trace a round object such as a cup or a roll of duct tape.
Step 2: Draw a Line for the Chin
To find out where to draw the chin, use your ruler or pencil and finger to measure half of the circle’s diameter (from the bottom of the circle to the horizontal line), then transfer your measurement to the bottom of the circle and draw a line for the chin.
Step 3: Draw the Cheeks and Jawline
Draw the cheeks and jawline by connecting chin to the circle. Don’t forget to keep your lines light. We’re going to give the face more definition later. The lighter your lines are, the easier it will be to erase and make changes.
Important: Before we move onto the next step, erase the horizontal line inside of the circle.
Step 4: Draw Facial Construction Lines
Through the center of the head, draw a vertical and horizontal line.
Split the bottom section of the face in half and then in half again.
Do the same thing for the top section of the face.
These lines are for the eyes, nose, lips and hair.
Step 5: Draw the Eyes and Eyebrows
On the line labelled eyes, split the face into 5 equal sections. Make sure you take the entire width of the head into account.
Note: Thanks to Pranab Mahajan for reminding me to add this little detail – If you find it difficult to split the face into 5 equal sections, measure the width of the head using a ruler and divide your number by 5.
Example: If the widest part of the head is 6cm, divide it by 5 to get 1.2cm. Then split the head into sections of 1.2cm each.
Draw your eyes in the appropriate spaces. Click here for a detailed tutorial on drawing eyes.
Step 6: Draw the Nose
Before we draw the nose, we’ll need some boundary lines. Draw a line coming down from the corner of each eye and stopping at the line labelled “nose”.
Let’s draw the nose within these boundaries. For a medium length nose, draw it above the nose line.
We’ll need some boundary lines for the lips as well. Draw a boundary line coming down from the center of each eye and stopping at the line labelled “lips”.
Draw a triangle directly under (touching) the nose and ending on the “lip” line.
Draw the hairline by creating a very angular shape that is well defined.
I like to draw the top hairline between these 2 lines.
Once that’s complete, draw the rest of the hair. To give his hair more volume, draw your outlines further away from the head, but make sure the distance is somewhat consistent or else the head shape may look unrealistic.
Give the cheeks, jawline and chin some more definition. I gave him a sharp jawline with a dimpled chin. To make someone look skinnier, you can draw some subtle lines to shape the cheeks.
Finally, give him a thick neck and add the shoulders as well.
I erased the construction lines to show you his face without obtructions. You can keep these construction lines to aid you at the end of this tutorial when we swap out facial features to transform our characters!
How to Draw a Female Face Easy
Step 1: Draw a Circle
Same thing here – draw a circle with a line going through the center vertically and horizontally.
Step 2: Find Out Where to Draw the Chin
Measure half the circle’s diameter and add it to the bottom to get the chin, except THIS time, draw the chin slightly shorter.
Step 3: Draw the Cheeks, Jaw and Chin
For females, I like to draw a narrow face with a narrow jaw. For the chin, taper your lines inward so the chin is more narrow than compared to the male.
Step 4: Draw Facial Construction Lines
Erase the horizontal line inside of the circle and then draw a line going through the center of the head vertically and horizontally.
Split the bottom section of the face in half and then in half again.
Do the same thing for the top section of the head.
Step 5: Draw the Eyes
One the line labelled eyes, split the head into 5 equal sections while taking the full width of the head into account.
Again, draw a set of boundary lines coming down from the inner corner of each eye. Draw your nose a little higher than the ‘nose line’ for a medium length nose.
For a more feminine face, draw a narrow nose using soft lines that are not too angular/sharp. For the nose-bridge, draw a smooth curve that’s not too dark.
Step 7: Draw the Mouth
Create your boundary lines coming down from the center of each eye.
Draw your triangle directly below the nose and resting on the line labelled “lips”.
For a medium length mouth, draw it well within the boundary lines. Rest the bottom lip on the line labelled “lips”.
Step 8: Draw the Ears
Draw the ears roughly in between the eye and nose line.
Step 9: Draw the Hair
Females tend to have softer, more rounded hairlines compared to males. Draw a smooth line around the forehead without making many sharp angles. Make sure to keep your lines fairly light as well.
Once you finished the hairline, draw the rest of the hair. For a super detailed tutorial on drawing hair, visit this tutorial.
Step 10: Complete Her Face
Draw the cheeks, jawline and chin using smooth lines. A square chin can make your drawing look a lot more masculine (not that there’s anything wrong with that!).
To finish it off, give her a narrow neck compared to his. A thick neck may indicate a muscular individual.
Easily Make Changes to Your Character
This is the most fun part of creating this tutorial! Once you’ve created a face, you can easily change the features to test out different looks: hairstyles, lips, nose lengths, eye shapes, etc… The possibilities are endless and it’s also a great way to learn how each facial feature impacts a character’s emotions.
You can keep your construction lines to aid in the process or erase them and use the faint lines from your erased features to draw a slightly different one.
Move your features around, make them bigger, smaller, longer, shorter or place them further apart. The possibilities are endless!
[GIF]
Don’t be afraid to experiment with drawing dis-proportioned faces. Stretch your imagination and just have fun with it!
Draw Various Male Faces
I noticed that when drawing males with thick outlines around the mouth, they turn out looking more feminine. You can lighten the outlines to make a pair of lips look more masculine.
Drawing narrow eyes can make a face look more chill and relaxed. The more visible the iris is, the more alert, intense, surprised, innocent or even angry the face will look.
Sharper, broader angles can make him look stronger, more masculine
Try different eye shapes too. I tried to make him look southeast asian by turning his eyes up at the ends, making the tip of the nose less pointy and giving him a pair of well defined lips.
Try to turn your character from a man into a boy by simply making his jawline narrower and smoother so his bones look less developed.
See if you can age him by adding different types of facial hair too!
Draw Various Female Faces
The original face looked sad. When I made her eyes wider, her sadness disappeared instantly! I didn’t even need to change the eyebrows.
And then I changed her lips and lowered her nose.
Here are Some More Examples!
I hope you guys enjoyed this tutorial as much as I enjoyed making it :)
Darlene created RFA In 2013 with the goal of sharing simple yet detailed drawing tutorials with other artists on the world wide web. She is a self taught pencil portrait artist and Youtuber.
This is a long tutorial and I tried to keep it short, so if you get stuck anywhere, please watch the video version (linked at the bottom of this tutorial) or let me know and I’ll try to explain it better or add examples :)
Step 1: Determine the Eye Size
Using an HB pencil, draw 2 light ticks spaced well apart. This will determine the size of the first eye.
Use a ruler to draw a horizontal line through the ticks and extend it to the far right side of your sketchbook.
Measure the distance between the 2 ticks and triplicate it across the horizontal line so you end up with 3 equal spaces.
Not sure how to do this? Check out the video to watch me do it.
Step 2: Draw two Circles
In the left and right spaces, draw 2 circles similar in size. Make sure the circles are large enough to fill the space.
Step 3: Decide on an Eye Angle
Eyes are usually a little slanted. Use a ruler or draw a line freehandedly across each circle at an angle.
Erase the horizontal line to keep your drawing space clean.
Step 4: Draw the Eye Shape
Draw the inner corner of each eye where the circles and slanted lines intersect.
Draw the upper eyelid while staying within the circle.
Draw the lower eyelid but avoid drawing a flat line. Put a little curve into it so it looks more realistic.
Let’s draw the upper crease now. Start from the inner corner and work your way out towards the tail of the eye. You can use the shape of the top lid for guidance. If you want a more detailed tutorial on drawing eye shapes, click here to learn how to draw 8 different eye shapes.
Step 5: Shadowline the Eyebrows
Starting above the circle, use the Shadowlining technique to outline the eyebrows. Shadowlining prevents your outlines from showing through in your final work. Want more guidance on drawing eyebrows? Visit this detailed eyebrow tutorial.
Now erase all your guidelines to get ready for the next step!
Step 6: Draw the Irises
Very lightly draw an iris in each eye using an HB pencil. The iris should take up about 2/4’s of the eyeball horizontally like the examples below:
Your measurement should start from the tear duct to the outer corner of the eye.
To draw a perfectly circular iris, draw a full circle and then just erase the parts that fall outside the eyeball instead of drawing bracket shapes. This helps a lot when drawing narrow eyes.
Step 7: Shade the Face
Shade the face, leaving the eyeballs white. If your drawing is too light, darken it just a little before you shade or else the lines could disappear.
I’m using a sharp 0.5mm 4B mechanical pencil for this step. Starting at the bottom portion of the eyebrow, draw upward strokes. The strokes should be thickest at the base and very thin at the ends.
Do the opposite for the top portion of each eyebrow. Angle your strokes downward and use lighter strokes near the end of each eyebrow. Make sure your strokes taper at the ends instead of crossing over each other forming ‘X’ shapes.
Add a row of hairs going down the center to fill in some white space.
Carefully go over your strokes on the bottom to darken them.
Lastly, add a light shadow by shading the area using an HB pencil.
Step 9: Draw Details in the Eye
This is a really long step because I tried to include as much detail as possible haha. Stick with me guys!
Draw a small circle (pupil) in the center of each iris. Draw a rectangle (or any shape you want) in or touching the iris. This is the reflection of light from a bright window. Curve the sides of the rectangle to make it look like the eyeball is spherical.
Use a sharp 6B pencil to shade the pupil. Try to keep your edges as clean as possible.
Around the pupil, draw a squiggly ribbon using an HB pencil.
Around concave areas, use a sharp 4B pencil to darken the ribbon to give the eye more depth.
From the center of the pupil to the ribbon, draw light spokes.
Darken spokes that fall within concave sections of the ribbon.
Very lightly, draw a second ribbon around the first one. Leave a thin space between them.
Use a dark pencil such as a 2B or 4B (up to you) to darken the ring of the iris. Then use an HB pencil to shade the section between the ribbon and ring.
Grab your kneaded eraser, pinch it and dab it onto your drawing. This will create white spokes.
Use a sharp 2B pencil to make the spokes pop! You can do this by outlining them.
Use a sharp 4B pencil to add more details in between those spokes.
Grab a blending stump and carefully blend everything but the rectangle reflection. If you don’t want to use a blending stump, use an H pencil to shade instead of blending.
Step 10: Shade the Rest of the Eyeball
To make the reflection really pop, shade the rest of the eyeball so the only thing that remains white is the reflection.
Start by shading the inner corner of each eye using an HB pencil. This area is bumpy, soft, glossy and darker than the rest.
Once you’re done, soften the edge around each iris using a blending stump or HB pencil.
Shade the rest of the white space using the contouring method. If you want a more detailed tutorial on shading eyeballs, visit this tutorial.
After shading the eyeball as light as I could, I decided to darken the face to give the drawing more contrast.
Step 11: Draw the Eyelashes
Start by drawing 3 lashes per eyelid. Space them well apart. Use very light pressure just in case you need to erase anything.
Create some triangles by tapering the hair ends together.
Once you’re happy with the shape and placement of each lash, use a sharp 4B pencil to darken them.
Not enough lashes? Thicken the base and body of each one or add additional lashes – making sure not to overcrowd. Once you’re done, use a 2B pencil to shade the upper eyelid skin and an HB pencil to shade the lower lid.
The eyelashes should cast a shadow on the eyeball, so use an HB pencil to shade the top of the eyeball a little darker than the rest (Do not shade into the reflection). Try to make your shading very gradual.
Step 12: Add Eyelash Reflections
Finally, use a sharp 4B pencil to draw several eyelash reflections in the white rectangle. Want the eyes to have more depth? Darken your pupils as much as possible, brighten and/or darken some spokes to make them pop even more.
If you got stuck at any point, please check out the video version of this tutorial on my Youtube channel. It’s more detailed and contains extra steps!
Guys, I really hope you enjoyed this tutorial! Let me know if you have any questions and don’t forget to share this with your friends using the share buttons.
Darlene created RFA In 2013 with the goal of sharing simple yet detailed drawing tutorials with other artists on the world wide web. She is a self taught pencil portrait artist and Youtuber.
Here’s a quick and easy way to draw closed eyes for beginners. I came up with this method by combining a few of my other ones, which turned out very well. You guys have been requesting me to draw a pair of opened eyes for a while now. So I’m going to work on that one next!
Canson Sketch Paper (Med Tooth) – Bought this on sale at my local art store (they ran out of Canson bristol paper). Great for sketching but not for blending.
Note: Up until step 6, use only an HB pencil with very light pressure so that your guidelines and mistakes don’t show through in your final artwork. Drawing lightly is also better for erasing. In the examples below, I’m using more pressure so you can clearly see what I’m doing.
Step 1: Determine Eye Size
Determine the size you’ll want for one eye and use 2 ticks to mark the boundaries for that eye.
Use a ruler to draw a horizontal line through the ticks and across the right side of the page.
Then measure the first space and multiply it by 3. You should now end up with 3 equal spaces going across your sketchbook horizontally.
Step 2: Draw Circles
Draw a circle for each eye. Make sure each circle fits within the boundaries.
Step 3: Determine the Angle for Each Eye
Determine the angle you want the eyes to slant and draw a line through each circle, making sure the angles are similar.
Step 4: Draw the Eye Shapes
Draw the inner and outer corners of each eye where the slanted line intersects with the circle. The inner corner of each eye should be deeper and darker than the outer corner or tail of the eye.
When you draw the tail crease, allow your lines to gradually become lighter instead of having a hard edge.
Finally, draw a set of curves to form the eyelids.
Step 5: Draw the Shape for Each Eyebrow
Use my shadow-lining technique to draw a set of eyebrows. I like to draw the eyebrows just above the circles and slightly wider than each eye. In the video, I show you a technique to make the eyebrows match as well as where to draw the arc.
We’ll detail the eyebrows later. Let’s move on to the next step!
Step 6: Shading
Before you shade, make sure the guidelines you drew from step 1-3 are only slightly visible. You can use your kneaded eraser to roll a layer of graphite off those areas.
Let’s start by shading the top eyelids. Use the side of your pencil to shade a shape similar to an almond. The circle around each eye can help you see if your shading on the right eye is similar to the left eye.
Add some light shading for the bridge of the nose.
Once you’re done, erase what remains of each circle.
Step 7: Shade the Rest of the Face
Shade the rest of the face. You can use these two tutorials to learn more about shading:
Here, I switched to my 4B 0.5mm lead. Starting at the lower part of each eyebrow, draw upward strokes. Make sure to lift your pencil up at the end of every stroke to make the hairs look more realistic. For a super detailed tutorial on this, check out this tutorial.
At the upper portion of each eyebrow, draw downward strokes. Add some hairs going down the middle if it still looks bare.
This step is very subtle, but also very important. Use an HB pencil to shade directly underneath each eyebrow. Make sure the transition is gradual. Now the eyebrows look like they belong, instead of just pasted onto the skin.
Step 9: Add Wrinkles to Eyelids
This step is optional… but it’s super fun, so why not do it too?
This one’s more of a crease than a wrinkle. When the eyes open, a crease forms on the eyelid. Use an H pencil and the lightest amount of pressure to draw two creases. The darker you draw them, the deeper they will appear.
Draw a row of curved diagonal lines along the edge of each eyelid. This area of the skin is very thin – wrinkling up when the skin is tugged. You’ll want to use an H pencil for this as well.
Depending on where the light is coming from in your drawing, blend the opposite side of each diagonal line drawn. For example: in this drawing, the light is coming from the top, so the side of each wrinkle that faces the light will be left alone, while the side facing away from the light will need to be blended.
Unless you’re drawing this on a large scale, avoid using a blending stump because the tip will not be thin enough for this job. Instead, use an H and HB pencil to create a nice gradient along each wrinkle.
Using a kneaded eraser, go over areas of each wrinkle that are facing the light and dab it gently with the pinched end of your kneaded eraser to lift a thin line of graphite. The highlights should appear brighter and the wrinkles should become more apparent and shapely.
Step 10: Draw the Eyelashes
To start, draw 3 eyelashes for each eye. One on the far left, far right and another in the middle. The lashes should fan out, angling away from each other.
If you want to be really careful, draw the eyelashes lightly with an H or HB pencil to start. Once you’re okay with the placement, curvature and length, etc… go over it with a darker pencil like a 4B. Here, I used a 0.5mm 4B lead.
Take your time to fill the spaces in between.
It’s okay that some eyelashes touch. It’s actually more natural looking when they form triangle shapes or even cross over each other.
Finally, use an HB or 2B pencil to shade directly under the top eyelid to create a light cast shadow coming from the eyelashes.
Video Tutorial
I created a video to go along with the version you’re reading. You can check it out below! It contains a bunch of extra tips and tricks, which I think you’ll find useful! If you have the time, please leave a comment to let me know what you’d like to see me do differently in a future video, what you liked/disliked or other constructive feedback would also be greatly appreciated. Thank you in advance!
The purpose of the video is not to produce a polished piece, but to show you the steps and techniques in a quick and easy manner. Click here to watch it on YouTube!
This is the first time I’ve done a written tutorial + video tutorial and I want to know what you guys think! Do you like videos in accompaniment to my usual stuff? Does it clear things up for you or would you rather see the video tutorial done another way?
Your feedback is always appreciated and will help me improve upon the tutorials further :)
I’m going to work on creating videos for past tutorials as well. So if you haven’t subscribed to me on YouTube, click here. Youtube won’t notify you when I post new videos unless you hit the bell icon beside the subscribe button as well, so don’t forget to click that too.
Darlene created RFA In 2013 with the goal of sharing simple yet detailed drawing tutorials with other artists on the world wide web. She is a self taught pencil portrait artist and Youtuber.
Struggling to draw female faces from the profile view? This tutorial gives you a great way to practice getting your proportions right and eventually being comfortable enough to draw quick sketches.
Follow my drawing method 2-3 times and then try some quick sketches without the ruler. You’ll astonish yourself with the level of improvement after only a few practice sessions!
Note: Remember to use an HB pencil with the lightest amount of pressure for each of the steps so you can easily erase outlines when you’re done the drawing.
Step 1: Draw an Oval
Draw an oval and a line at the bottom. The line should be distanced away from the oval by a little more than half of the oval’s vertical diameter.
In other words, a little more than the oval’s vertical radius.
Step 2: Face Outline
Connect the oval to the horizontal line to complete the shape of the head. Then, draw a long straight line down the middle of the oval.
Don’t worry about shaping the jaw or chin just yet. These are just rough guidelines!
Step 3: Make a Ruler
Use the length of the head to make a ruler on the side of your drawing. Don’t draw it too close to the face because you want to make room for the nose.
Divide your ruler into 8 equal spaces and use a straight edge to draw lines from each tick through the head. Don’t forget to keep your lines light. It’ll be a pain to erase later on.
Step 4: Brow, Forehead and Top of the Head
Now that we’re done with the guidelines, let’s start drawing the top portion of the head. Where the CENTER LINE meets the face, draw a shallow curve. I’m trying to avoid a deep curve because I don’t want to bring too much attention to the brow area. Just trying to keep it looking soft and subtle.
Once that’s done, draw a slight bump for the brow and then use the oval as a rough guide to draw the forehead and rest of the upper head.
Step 5: Nose
If you haven’t read my nose tutorial, go here first. I prefer to draw the nose without the circles, but you can use that technique if you want.
I like to draw my noses at a medium length, keeping the tip of the nose under Line 1. The angle of the nose depends on the face I’m drawing, but I tend to draw them at a 50 degree angle.
Step 6: Mouth
From the nose’s base, form a natural curve that dips down through Line 2 and wraps back in towards the face, creating a full top lip. The corner of the mouth should not extend too far past the nostril.
Then draw the bottom lip which should be above Line 3.
When you’re done, check to see if there’s enough space for the chin or if there’s way too much space. Adjust the lips accordingly to prepare for the next step.
Step 7: Chin and Jawline
Keep in mind that your chin and jawline does not need to follow the exact guideline of the head/face shape.
Extend the jawline beyond the vertical line that goes down the center of the face. When drawing females, I tend to give the jawline a soft or rounded, less angular appearance.
Step 8: Neck
Draw the front and back of the neck. Avoid drawing the neck using vertical lines. Also try to avoid using straight lines, as this will appear very unnatural.
Step 9: Eye and Eyebrow
To find where to place the eye, draw a vertical line from the corner of the lip to the CENTER LINE. The eye should be drawn where those two lines meet. If you want more details on drawing an eye from the side, visit this tutorial.
Follow the general shape of the eye to form the eyebrow. Keep the eyebrow well below Line C for a relaxed look. For a more surprised expression, draw the eyebrows a little higher and stretch the eye up along with it.
Step 10: Ear
From the jawline, draw an outline for the ear. This outline can be anywhere from roughly the CENTER LINE to Line 2.
Draw the forehead’s hairline starting between Line A and B. When you draw the hair at the sideburns (hair between the ear and cheek), keep your lines extra light because females have very sparse sideburns. Don’t forget to give the hair some volume, for more on that, visit my hair tutorial.
Happy with how your drawing looks? Whip out your eraser and have fun erasing your guidelines! To save time, I like to use an electric eraser followed up by a kneaded eraser to get into those tight spots or overlapping lines.
Experiment by Drawing Many Unique Faces
When you’re comfortable, try drawing some faces without the ruler on the side. The examples below have very rough guidelines. In fact, if you look closely you can see just how sloppy they are. Once you get the hang of it, you should be able to draw realistic and unique female faces on the whim!
My challenge to you is to fill an entire page in your sketchbook with rows and rows of faces. Make them small so you can fit as many as you can (I actually find it more difficult to draw faces on a large scale). It might take 5 or more tries to get the hang of it. If you’ve filled the entire page but your faces don’t turn out quite right, come back and follow this tutorial again.
Like my teaching style and want to make a request? Drop me a comment below and I’ll see what I can do for you :)
In the meantime, happy drawing and I’ll see you again soon with another detailed drawing tutorial!
Darlene created RFA In 2013 with the goal of sharing simple yet detailed drawing tutorials with other artists on the world wide web. She is a self taught pencil portrait artist and Youtuber.
Another highly requested tutorial fresh out of the oven! This one is, again based off my original method, but with a few small changes here and there to create a female face with soft features. I’ll explain the differences in each step as we go along.
Note: Remember to use an HB pencil with light pressure for all steps so you can easily erase your guidelines in the end. I used a lot of pressure in the examples so you can clearly see what I’m doing.
I know there are a lot of measurements in this tutorial, but I think it’s very important, especially if you’re a beginner. Once you understand proportions you can try this tutorial again without the ruler method.
Draw a circle and make a small horizontal line at the bottom for the chin. It’s position should be roughly half of the circle’s diameter vertically. This matters because the circle was drawn freehandedly, so the horizontal diameter could be different.
Females tend to have shorter chins than their male counterparts, so a long chin can display a more masculine look.
When you’re done, draw the jawline to connect the circle to the chin. Females have all sorts of face shapes, but for this example I’m going to stick with a smooth, tapered jawline that’s less angular.
Finally, use a ruler to draw a faint line down the middle of the face vertically.
Step 2: Draw Face Guidelines
Measure the length of the face and draw a ruler to the side of your drawing using a straight edge. Then divide it into 8 equal spaces length-wise.
Label each of the ticks like the image on the left and once you’re done, use a ruler to carefully draw faint lines on the face through the ticks labelled: CENTER LINE, 2, 3, A and C.
If you’ve gone through this tutorial a few times already and want to try it without the ruler, draw your lines in this order: CENTER LINE, 2, 3 , B, A, C, essentially breaking sections of your drawing in half over and over again.
Example:
Click here to see the SIMPLE version of this tutorial. It’s a faster method and it’s also paired with a video!
Step 3: Draw the Eyes
On the CENTER LINE, draw 4 ticks that separate the face into 5 equal spaces horizontally. If you’re like me and you drew a very narrow cheek/jaw line, you’ll want to take the full diameter of the circle into account (The two dotted lines mark the full diameter of the head).
When you draw the eyes, keep in mind that females generally have wider, more open eyes than males. If you want to learn how to draw realistic eye shapes and how to size your irises properly, visit this tutorial.
And click here for a super detailed tutorial + video on how to draw a pair of realistic eyes.
Step 4: Nose
To draw the nose, extend the two lines at the inner corner of each eye all the way to Line 3. This will serve as a guideline for the nose’s width.
If you’ve already read my tutorial on drawing noses, place your circle above Line 2. I’m going to go with a short, narrow nose with a narrow bridge.
Step 5: Eyebrows
The picture on the left shows the top of the brow bone. I added this so you can see how the eyebrows are positioned naturally in regards to the bone structure.
In the image on the right, you can see that the eyebrows are drawn below Line C. For a surprised expression, the eyebrows will be pulled up closer to Line C.
From the center of each iris, draw a vertical line all the way down to Line 3. This will give us a boundary for the mouth.
If you’ve already practiced my tutorial on drawing lips, place your triangle under the nose. The base of the triangle should be drawn inside the square. The top of the triangle should extend to wherever the bottom of the nose is.
After you’ve drawn the lips, you might feel the need to lengthen or shorten the chin so it’s more proportional to the rest of the face. This is completely normal. Happens to me all the time. That’s why it’s important to draw using faint lines so you can easily fix things.
Step 7: Ears
The CENTER LINE and Line 2 are general boundaries for the ears. You can learn how to draw realistic ears here.
Step 8: Hair
When drawing hair on females, keep in mind that females generally have narrower and shorter foreheads compared to males. I drew the hairline for my character well below Line A and drew more hair at the sides of the temple, making sure not to bring the hair in too close to the eyebrow.
Remember to give the hair some volume by leaving lots of space between the head and the hair. For more detailed instructions on how to draw hair, visit this tutorial this tutorial.
I like to do a final check before I erase all my guidelines. Check to see if the facial features need changing. Perhaps you’d like to change the nose length or eye shape.
Once you’re happy with your results, use a hard eraser to clean up all the lines. An electric eraser works very well for this kind of work.
After cleaning those lines, I like to use a kneaded eraser to dab away dark spots from where the lines intersected with my drawing.
This tutorial is focused only on structure and proportions. If you want to learn how to shade a face, visit this page.
Time to Experiment!
After you’ve grasped the drawing method above, try drawing faces without the ruler. Here are a few faces I created using rough measurements. Stretch your imagination and get comfortable with drawing faces quickly. How many faces can you draw in under 20 minutes?
[sscl ID=7162]
If this tutorial was helpful to you and you’d love to see more, share it with your friends. Your support will help me produce more quality, free tutorials!
Darlene created RFA In 2013 with the goal of sharing simple yet detailed drawing tutorials with other artists on the world wide web. She is a self taught pencil portrait artist and Youtuber.
In this tutorial, I’m going to show you how to draw 6 different eye shapes: almond, round, monolid, hooded, upturned and downturned.
You’ll get a chance to look at different types of eyes being drawn at the same time. I don’t encourage you to draw them all at once, so pick only one and follow it throughout the tutorial.
Feel free to mix and match as you get comfortable on your next run-through.
Since I couldn’t fit all 6 eyes in every step, the last 2 have been pushed into a bonus section at the end of the article.
Using an HB pencil, let’s start by drawing a circle. This circle represents the eyeball.
Step 2: Pick an Angle
How slanted do you want the eye to be? Draw a line going through the circle with the angle you prefer. Feel free to deviate from the examples above.
Note: the left side of each circle is the inner side of the eye
This method is awesome if you’re drawing a set of eyes on the same face.
Step 3: Draw the Inner Corner of the Eye
Time to draw the inner corner of the eye. You can use several shapes. Angular, pointy or rounded ones like the examples above and in the bonus section. For small or shallow corners, stay very close to the circle. For deep and large corners, place it well outside the circle.
Step 4: Draw the Top Lid
Draw the upper eyelid while staying within the boundary of the circle. Imagine that the eyelid is wrapping around a sphere. The last example shows the right side of the lid wrapping around the eyeball with a big steep curve.
For almond shaped eyes, you’ll want to stick to a slim football shaped curve and the deepest part of the arc should be located at the middle of the lid.
Step 5: Draw the Bottom Lid
Now draw the lower lid. Make sure to draw a slight bump near the inner corner of the eye and avoid drawing the lid too far away from the line you created in step 2.
For almond shaped eyes, the arc of the top and bottom lids are very closely aligned vertically.
Step 6: Add a Crease
Draw the fold above the eye starting from the inner corner and working your way out. The thicker the space between this line and the eye, the thicker the fold will look. You can loosely mimic the curve of the top lid.
This crease should not go past the line you created in step 2 unless you’re drawing wrinkles.
For the hooded eye, you’ll want to bring the crease as close to the top lid as possible. You can even overlap them or cut through a portion of the top lid.
When drawing the crease, keep your lines fairly light. A dark crease will look really deep.
Step 7: Erase Outlines
Carefully erase your outlines. I used a hard tombow eraser to save time.
Step 8: Add Some Details
At the inner corner of the eye, draw a curve or two to separate the eyeball from the soft pink caruncula.
For Iris sizing, a good rule of thumb is for the iris to take up about 2/4’s of the eyeball (horizontally). Examples below:
If you want to draw a perfectly shaped iris, draw a full circle and then erase parts of the circle that go outside of the eyeball. This step should be done very lightly. Once you have the position and size you want, darken the iris outline.
Step 9: Shade Your Eye
To shade and add more details, you can refer to the tutorials below:
Monolid: You can draw a monolid eye by excluding the crease or giving a small hint of it at the end of the eye.
Downturned: Try not to angle your line too much when drawing downturned eyes. In fact, the one I drew is pretty extreme already. Actually, you know what? Just do what you feel like. Experiment and have fun!
Darlene created RFA In 2013 with the goal of sharing simple yet detailed drawing tutorials with other artists on the world wide web. She is a self taught pencil portrait artist and Youtuber.
RFA uses cookies to offer you a better browsing experience, analyze site traffic, personalize content, and serve targeted ads. By clicking accept, you are helping to support my site and keep drawing tutorials free 🙂. Not a fan of cookies? No worries! Adjust your preferences in the settings! Not consenting may affect some features and functions such as embedded video tutorials.
Functional
Always active
The technical storage or access is strictly necessary for the legitimate purpose of enabling the use of a specific service explicitly requested by the subscriber or user, or for the sole purpose of carrying out the transmission of a communication over an electronic communications network.
Preferences
The technical storage or access is necessary for the legitimate purpose of storing preferences that are not requested by the subscriber or user.
Statistics
The technical storage or access that is used exclusively for statistical purposes.The technical storage or access that is used exclusively for anonymous statistical purposes. Without a subpoena, voluntary compliance on the part of your Internet Service Provider, or additional records from a third party, information stored or retrieved for this purpose alone cannot usually be used to identify you.
Marketing (Activating this supports my website via ads, keeping tutorials free)
The technical storage or access is required to create user profiles to send advertising, or to track the user on a website or across several websites for similar marketing purposes.