Learn how to draw using RFA’s simple, easy to understand and detailed drawing tutorials. These step by step drawing lessons are designed for people of all ages and skill levels.
Don’t be discouraged if you get stuck! I offer FREE one on one support where I provide you with specific drawing techniques, tips and suggestions which are tailored to YOU :)
No more expensive online art classes or programs! Follow my simple drawing lessons, interact with me and let me help you draw better!
Here’s a quick and easy way to draw closed eyes for beginners. I came up with this method by combining a few of my other ones, which turned out very well. You guys have been requesting me to draw a pair of opened eyes for a while now. So I’m going to work on that one next!
Canson Sketch Paper (Med Tooth) – Bought this on sale at my local art store (they ran out of Canson bristol paper). Great for sketching but not for blending.
Note: Up until step 6, use only an HB pencil with very light pressure so that your guidelines and mistakes don’t show through in your final artwork. Drawing lightly is also better for erasing. In the examples below, I’m using more pressure so you can clearly see what I’m doing.
Step 1: Determine Eye Size
Determine the size you’ll want for one eye and use 2 ticks to mark the boundaries for that eye.
Use a ruler to draw a horizontal line through the ticks and across the right side of the page.
Then measure the first space and multiply it by 3. You should now end up with 3 equal spaces going across your sketchbook horizontally.
Step 2: Draw Circles
Draw a circle for each eye. Make sure each circle fits within the boundaries.
Step 3: Determine the Angle for Each Eye
Determine the angle you want the eyes to slant and draw a line through each circle, making sure the angles are similar.
Step 4: Draw the Eye Shapes
Draw the inner and outer corners of each eye where the slanted line intersects with the circle. The inner corner of each eye should be deeper and darker than the outer corner or tail of the eye.
When you draw the tail crease, allow your lines to gradually become lighter instead of having a hard edge.
Finally, draw a set of curves to form the eyelids.
Step 5: Draw the Shape for Each Eyebrow
Use my shadow-lining technique to draw a set of eyebrows. I like to draw the eyebrows just above the circles and slightly wider than each eye. In the video, I show you a technique to make the eyebrows match as well as where to draw the arc.
We’ll detail the eyebrows later. Let’s move on to the next step!
Step 6: Shading
Before you shade, make sure the guidelines you drew from step 1-3 are only slightly visible. You can use your kneaded eraser to roll a layer of graphite off those areas.
Let’s start by shading the top eyelids. Use the side of your pencil to shade a shape similar to an almond. The circle around each eye can help you see if your shading on the right eye is similar to the left eye.
Add some light shading for the bridge of the nose.
Once you’re done, erase what remains of each circle.
Step 7: Shade the Rest of the Face
Shade the rest of the face. You can use these two tutorials to learn more about shading:
Here, I switched to my 4B 0.5mm lead. Starting at the lower part of each eyebrow, draw upward strokes. Make sure to lift your pencil up at the end of every stroke to make the hairs look more realistic. For a super detailed tutorial on this, check out this tutorial.
At the upper portion of each eyebrow, draw downward strokes. Add some hairs going down the middle if it still looks bare.
This step is very subtle, but also very important. Use an HB pencil to shade directly underneath each eyebrow. Make sure the transition is gradual. Now the eyebrows look like they belong, instead of just pasted onto the skin.
Step 9: Add Wrinkles to Eyelids
This step is optional… but it’s super fun, so why not do it too?
This one’s more of a crease than a wrinkle. When the eyes open, a crease forms on the eyelid. Use an H pencil and the lightest amount of pressure to draw two creases. The darker you draw them, the deeper they will appear.
Draw a row of curved diagonal lines along the edge of each eyelid. This area of the skin is very thin – wrinkling up when the skin is tugged. You’ll want to use an H pencil for this as well.
Depending on where the light is coming from in your drawing, blend the opposite side of each diagonal line drawn. For example: in this drawing, the light is coming from the top, so the side of each wrinkle that faces the light will be left alone, while the side facing away from the light will need to be blended.
Unless you’re drawing this on a large scale, avoid using a blending stump because the tip will not be thin enough for this job. Instead, use an H and HB pencil to create a nice gradient along each wrinkle.
Using a kneaded eraser, go over areas of each wrinkle that are facing the light and dab it gently with the pinched end of your kneaded eraser to lift a thin line of graphite. The highlights should appear brighter and the wrinkles should become more apparent and shapely.
Step 10: Draw the Eyelashes
To start, draw 3 eyelashes for each eye. One on the far left, far right and another in the middle. The lashes should fan out, angling away from each other.
If you want to be really careful, draw the eyelashes lightly with an H or HB pencil to start. Once you’re okay with the placement, curvature and length, etc… go over it with a darker pencil like a 4B. Here, I used a 0.5mm 4B lead.
Take your time to fill the spaces in between.
It’s okay that some eyelashes touch. It’s actually more natural looking when they form triangle shapes or even cross over each other.
Finally, use an HB or 2B pencil to shade directly under the top eyelid to create a light cast shadow coming from the eyelashes.
Video Tutorial
I created a video to go along with the version you’re reading. You can check it out below! It contains a bunch of extra tips and tricks, which I think you’ll find useful! If you have the time, please leave a comment to let me know what you’d like to see me do differently in a future video, what you liked/disliked or other constructive feedback would also be greatly appreciated. Thank you in advance!
The purpose of the video is not to produce a polished piece, but to show you the steps and techniques in a quick and easy manner. Click here to watch it on YouTube!
This is the first time I’ve done a written tutorial + video tutorial and I want to know what you guys think! Do you like videos in accompaniment to my usual stuff? Does it clear things up for you or would you rather see the video tutorial done another way?
Your feedback is always appreciated and will help me improve upon the tutorials further :)
I’m going to work on creating videos for past tutorials as well. So if you haven’t subscribed to me on YouTube, click here. Youtube won’t notify you when I post new videos unless you hit the bell icon beside the subscribe button as well, so don’t forget to click that too.
If you need help with understanding light or shading techniques like blending, pressure control, or value scales, start here before applying the full process.
Darlene created RFA In 2013 with the goal of sharing simple yet detailed drawing tutorials with other artists on the world wide web. She is a self taught pencil portrait artist and Youtuber.
Struggling to draw female faces from the profile view? This tutorial gives you a great way to practice getting your proportions right and eventually being comfortable enough to draw quick sketches.
Follow my drawing method 2-3 times and then try some quick sketches without the ruler. You’ll astonish yourself with the level of improvement after only a few practice sessions!
Note: Remember to use an HB pencil with the lightest amount of pressure for each of the steps so you can easily erase outlines when you’re done the drawing.
Step 1: Draw an Oval
Draw an oval and a line at the bottom. The line should be distanced away from the oval by a little more than half of the oval’s vertical diameter.
In other words, a little more than the oval’s vertical radius.
Step 2: Face Outline
Connect the oval to the horizontal line to complete the shape of the head. Then, draw a long straight line down the middle of the oval.
Don’t worry about shaping the jaw or chin just yet. These are just rough guidelines!
Step 3: Make a Ruler
Use the length of the head to make a ruler on the side of your drawing. Don’t draw it too close to the face because you want to make room for the nose.
Divide your ruler into 8 equal spaces and use a straight edge to draw lines from each tick through the head. Don’t forget to keep your lines light. It’ll be a pain to erase later on.
Step 4: Brow, Forehead and Top of the Head
Now that we’re done with the guidelines, let’s start drawing the top portion of the head. Where the CENTER LINE meets the face, draw a shallow curve. I’m trying to avoid a deep curve because I don’t want to bring too much attention to the brow area. Just trying to keep it looking soft and subtle.
Once that’s done, draw a slight bump for the brow and then use the oval as a rough guide to draw the forehead and rest of the upper head.
Step 5: Nose
If you haven’t read my nose tutorial, go here first. I prefer to draw the nose without the circles, but you can use that technique if you want.
I like to draw my noses at a medium length, keeping the tip of the nose under Line 1. The angle of the nose depends on the face I’m drawing, but I tend to draw them at a 50 degree angle.
Step 6: Mouth
From the nose’s base, form a natural curve that dips down through Line 2 and wraps back in towards the face, creating a full top lip. The corner of the mouth should not extend too far past the nostril.
Then draw the bottom lip which should be above Line 3.
When you’re done, check to see if there’s enough space for the chin or if there’s way too much space. Adjust the lips accordingly to prepare for the next step.
Step 7: Chin and Jawline
Keep in mind that your chin and jawline does not need to follow the exact guideline of the head/face shape.
Extend the jawline beyond the vertical line that goes down the center of the face. When drawing females, I tend to give the jawline a soft or rounded, less angular appearance.
Step 8: Neck
Draw the front and back of the neck. Avoid drawing the neck using vertical lines. Also try to avoid using straight lines, as this will appear very unnatural.
Step 9: Eye and Eyebrow
To find where to place the eye, draw a vertical line from the corner of the lip to the CENTER LINE. The eye should be drawn where those two lines meet. If you want more details on drawing an eye from the side, visit this tutorial.
Follow the general shape of the eye to form the eyebrow. Keep the eyebrow well below Line C for a relaxed look. For a more surprised expression, draw the eyebrows a little higher and stretch the eye up along with it.
Step 10: Ear
From the jawline, draw an outline for the ear. This outline can be anywhere from roughly the CENTER LINE to Line 2.
Draw the forehead’s hairline starting between Line A and B. When you draw the hair at the sideburns (hair between the ear and cheek), keep your lines extra light because females have very sparse sideburns. Don’t forget to give the hair some volume, for more on that, visit my hair tutorial.
Happy with how your drawing looks? Whip out your eraser and have fun erasing your guidelines! To save time, I like to use an electric eraser followed up by a kneaded eraser to get into those tight spots or overlapping lines.
Experiment by Drawing Many Unique Faces
When you’re comfortable, try drawing some faces without the ruler on the side. The examples below have very rough guidelines. In fact, if you look closely you can see just how sloppy they are. Once you get the hang of it, you should be able to draw realistic and unique female faces on the whim!
My challenge to you is to fill an entire page in your sketchbook with rows and rows of faces. Make them small so you can fit as many as you can (I actually find it more difficult to draw faces on a large scale). It might take 5 or more tries to get the hang of it. If you’ve filled the entire page but your faces don’t turn out quite right, come back and follow this tutorial again.
Like my teaching style and want to make a request? Drop me a comment below and I’ll see what I can do for you :)
In the meantime, happy drawing and I’ll see you again soon with another detailed drawing tutorial!
Darlene created RFA In 2013 with the goal of sharing simple yet detailed drawing tutorials with other artists on the world wide web. She is a self taught pencil portrait artist and Youtuber.
Another highly requested tutorial fresh out of the oven! This one is, again based off my original method, but with a few small changes here and there to create a female face with soft features. I’ll explain the differences in each step as we go along.
Note: Remember to use an HB pencil with light pressure for all steps so you can easily erase your guidelines in the end. I used a lot of pressure in the examples so you can clearly see what I’m doing.
I know there are a lot of measurements in this tutorial, but I think it’s very important, especially if you’re a beginner. Once you understand proportions you can try this tutorial again without the ruler method.
Draw a circle and make a small horizontal line at the bottom for the chin. It’s position should be roughly half of the circle’s diameter vertically. This matters because the circle was drawn freehandedly, so the horizontal diameter could be different.
Females tend to have shorter chins than their male counterparts, so a long chin can display a more masculine look.
When you’re done, draw the jawline to connect the circle to the chin. Females have all sorts of face shapes, but for this example I’m going to stick with a smooth, tapered jawline that’s less angular.
Finally, use a ruler to draw a faint line down the middle of the face vertically.
Step 2: Draw Face Guidelines
Measure the length of the face and draw a ruler to the side of your drawing using a straight edge. Then divide it into 8 equal spaces length-wise.
Label each of the ticks like the image on the left and once you’re done, use a ruler to carefully draw faint lines on the face through the ticks labelled: CENTER LINE, 2, 3, A and C.
If you’ve gone through this tutorial a few times already and want to try it without the ruler, draw your lines in this order: CENTER LINE, 2, 3 , B, A, C, essentially breaking sections of your drawing in half over and over again.
Example:
Click here to see the SIMPLE version of this tutorial. It’s a faster method and it’s also paired with a video!
Step 3: Draw the Eyes
On the CENTER LINE, draw 4 ticks that separate the face into 5 equal spaces horizontally. If you’re like me and you drew a very narrow cheek/jaw line, you’ll want to take the full diameter of the circle into account (The two dotted lines mark the full diameter of the head).
When you draw the eyes, keep in mind that females generally have wider, more open eyes than males. If you want to learn how to draw realistic eye shapes and how to size your irises properly, visit this tutorial.
And click here for a super detailed tutorial + video on how to draw a pair of realistic eyes.
Step 4: Nose
To draw the nose, extend the two lines at the inner corner of each eye all the way to Line 3. This will serve as a guideline for the nose’s width.
If you’ve already read my tutorial on drawing noses, place your circle above Line 2. I’m going to go with a short, narrow nose with a narrow bridge.
Step 5: Eyebrows
The picture on the left shows the top of the brow bone. I added this so you can see how the eyebrows are positioned naturally in regards to the bone structure.
In the image on the right, you can see that the eyebrows are drawn below Line C. For a surprised expression, the eyebrows will be pulled up closer to Line C.
From the center of each iris, draw a vertical line all the way down to Line 3. This will give us a boundary for the mouth.
If you’ve already practiced my tutorial on drawing lips, place your triangle under the nose. The base of the triangle should be drawn inside the square. The top of the triangle should extend to wherever the bottom of the nose is.
After you’ve drawn the lips, you might feel the need to lengthen or shorten the chin so it’s more proportional to the rest of the face. This is completely normal. Happens to me all the time. That’s why it’s important to draw using faint lines so you can easily fix things.
Step 7: Ears
The CENTER LINE and Line 2 are general boundaries for the ears. You can learn how to draw realistic ears here.
Step 8: Hair
When drawing hair on females, keep in mind that females generally have narrower and shorter foreheads compared to males. I drew the hairline for my character well below Line A and drew more hair at the sides of the temple, making sure not to bring the hair in too close to the eyebrow.
Remember to give the hair some volume by leaving lots of space between the head and the hair. For more detailed instructions on how to draw hair, visit this tutorial this tutorial.
I like to do a final check before I erase all my guidelines. Check to see if the facial features need changing. Perhaps you’d like to change the nose length or eye shape.
Once you’re happy with your results, use a hard eraser to clean up all the lines. An electric eraser works very well for this kind of work.
After cleaning those lines, I like to use a kneaded eraser to dab away dark spots from where the lines intersected with my drawing.
This tutorial is focused only on structure and proportions. If you want to learn how to shade a face, visit this page.
Time to Experiment!
After you’ve grasped the drawing method above, try drawing faces without the ruler. Here are a few faces I created using rough measurements. Stretch your imagination and get comfortable with drawing faces quickly. How many faces can you draw in under 20 minutes?
[sscl ID=7162]
If this tutorial was helpful to you and you’d love to see more, share it with your friends. Your support will help me produce more quality, free tutorials!
Darlene created RFA In 2013 with the goal of sharing simple yet detailed drawing tutorials with other artists on the world wide web. She is a self taught pencil portrait artist and Youtuber.
In this tutorial, I’m going to show you how to draw 6 different eye shapes: almond, round, monolid, hooded, upturned and downturned.
You’ll get a chance to look at different types of eyes being drawn at the same time. I don’t encourage you to draw them all at once, so pick only one and follow it throughout the tutorial.
Feel free to mix and match as you get comfortable on your next run-through.
Since I couldn’t fit all 6 eyes in every step, the last 2 have been pushed into a bonus section at the end of the article.
Using an HB pencil, let’s start by drawing a circle. This circle represents the eyeball.
Step 2: Pick an Angle
How slanted do you want the eye to be? Draw a line going through the circle with the angle you prefer. Feel free to deviate from the examples above.
Note: the left side of each circle is the inner side of the eye
This method is awesome if you’re drawing a set of eyes on the same face.
Step 3: Draw the Inner Corner of the Eye
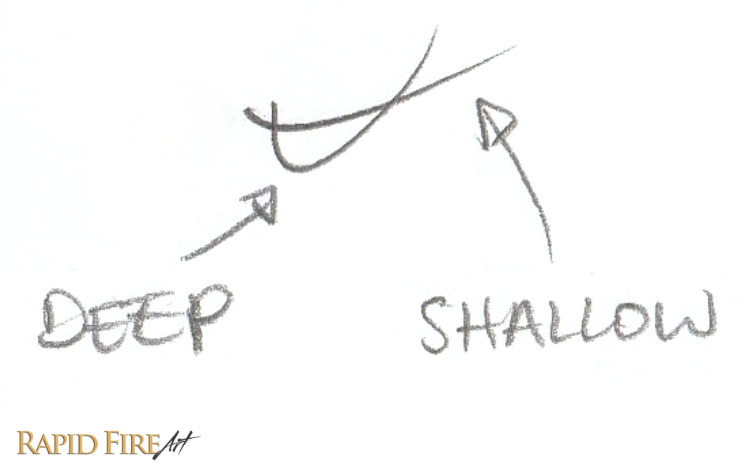
Time to draw the inner corner of the eye. You can use several shapes. Angular, pointy or rounded ones like the examples above and in the bonus section. For small or shallow corners, stay very close to the circle. For deep and large corners, place it well outside the circle.
Step 4: Draw the Top Lid
Draw the upper eyelid while staying within the boundary of the circle. Imagine that the eyelid is wrapping around a sphere. The last example shows the right side of the lid wrapping around the eyeball with a big steep curve.
For almond shaped eyes, you’ll want to stick to a slim football shaped curve and the deepest part of the arc should be located at the middle of the lid.
Step 5: Draw the Bottom Lid
Now draw the lower lid. Make sure to draw a slight bump near the inner corner of the eye and avoid drawing the lid too far away from the line you created in step 2.
For almond shaped eyes, the arc of the top and bottom lids are very closely aligned vertically.
Step 6: Add a Crease
Draw the fold above the eye starting from the inner corner and working your way out. The thicker the space between this line and the eye, the thicker the fold will look. You can loosely mimic the curve of the top lid.
This crease should not go past the line you created in step 2 unless you’re drawing wrinkles.
For the hooded eye, you’ll want to bring the crease as close to the top lid as possible. You can even overlap them or cut through a portion of the top lid.
When drawing the crease, keep your lines fairly light. A dark crease will look really deep.
Step 7: Erase Outlines
Carefully erase your outlines. I used a hard tombow eraser to save time.
Step 8: Add Some Details
At the inner corner of the eye, draw a curve or two to separate the eyeball from the soft pink caruncula.
For Iris sizing, a good rule of thumb is for the iris to take up about 2/4’s of the eyeball (horizontally). Examples below:
If you want to draw a perfectly shaped iris, draw a full circle and then erase parts of the circle that go outside of the eyeball. This step should be done very lightly. Once you have the position and size you want, darken the iris outline.
Step 9: Shade Your Eye
To shade and add more details, you can refer to the tutorials below:
Monolid: You can draw a monolid eye by excluding the crease or giving a small hint of it at the end of the eye.
Downturned: Try not to angle your line too much when drawing downturned eyes. In fact, the one I drew is pretty extreme already. Actually, you know what? Just do what you feel like. Experiment and have fun!
Darlene created RFA In 2013 with the goal of sharing simple yet detailed drawing tutorials with other artists on the world wide web. She is a self taught pencil portrait artist and Youtuber.
Looking for a highly detailed tutorial on how to draw short hair? This is a very extensive one with plenty of examples, a full step by step tutorial and mini tutorial.
It’s an expanded version of the mini tutorial from my first hair article. So if you’ve seen the thumbnail for this article before, I’m not feeding you old content. What you’re getting in this tutorial is new content with more images, more steps, more explanations and over 2000 words of valuable content! Let’s get into it!
I hope I don’t lose you during any step in the application part of this tutorial, so here are a few things I want to cover with you before we start. Let’s talk about:
Grouping Hair
Layering Hair
Hair Flow/Direction
Shading
Detailing Short Hair
Lighting and Consistency
How to Draw a Small Section of Hair (Mini Tutorial)
Grouping Hair
Grouping is a great way to approach drawing a an entire head of hair, especially if the sheer amount intimidates you. This method can help you draw hair faster because you’re simplifying something that looks complex.
When you’re in the grouping phase, you’ll want to draw using very light outlines. These groups will eventually be broken down into smaller, more detailed sections of hair.
In the grouping phase, all you need to think about is the length, overall design and flow of hair.
If you’re drawing from a reference image, you can identify groups of hair by zooming out of the image or standing back to find patterns in the hair. Group hairs that are flowing in the same direction and/or close together.
Layering Hair
This part is self explanatory, but I decided to include it just in case. If you get the idea, move on to the next point.
The order in which you draw each group of hair is important. If you’re drawing a hairstyle where the hair is prominently parted at the side of the head, you’ll want to start your first layer there and work your way out.
The image below is an example of drawing from the part and working your way down the side of the head.
If all the hair is brushed from the back of the head towards the front, start your first layer of hair from the back of the head where the swirl or whorl is located.
If the hair is brushed from front to back, you’ll draw starting from front to back.
Hair Flow and Direction
If you have a reference image, look for patterns in the hair to find out the general direction where the majority of hair is flowing. In the image above, the hairs at the top of the head are all pointing in a similar general direction while hair on the side of the head seems to have a more unique flow. You can use arrows in your reference image to help visualize the flow.
Avoid drawing hairs that follow the exact direction your arrows are pointing. You can make your drawing look a lot more interesting by pointing the hair in several different directions, while still appearing to point in the same general direction.
Dark Spaces
Drawing hair isn’t about creating as many lines as possible. Between some hairs, there should be dark space. These dark spaces are important and can make a head of hair look more interesting to the eye and give the hair more volume or depth.
You can introduce dark shadows in areas like the swirl behind the head, spaces between large groups of hair or even areas where overlapping, curly or unruly hair appear.
Detailing Short Hair
If you’re drawing from a picture and you’ve lost track of which hair you just drew and you don’t know which patch of hair to draw next… there’s really no need to copy the exact picture hair by hair.
If you end up reading through this entire tutorial, you will be more comfortable playing it by ear instead of pouring over the tiny details from your reference image.
Below are just a few ways you can detail hair. You can incorporate a few or all of them in your drawing wherever you see fit. Come up with your own formulas. It’s a lot of fun!
Lighting and Consistency
Overall Lighting:
If you often find it hard to keep track of the overall lighting while you’re drawing, it really helps to plan ahead. You can do this by outlining/shadow lining areas of the hair you want the light to fall on or areas you want to have the most shadow and then shade these areas in. This step should be done before grouping and layering.
Lighting Across Particular Sections:
Once you start drawing the individual hairs, it’s easy to lose track and end up with inconsistent lighting across small groups of hair. Here’s an example:
You can easily change the highlighted section of hair by pinching your kneaded eraser into a long thin shape and swiftly remove graphite from your drawing.
How to Draw a Small Section of Hair – Mini Tutorial
Step 1: Light Planning
Have a good idea of where you want the hair to be lightest and where it should be darkest. Use a soft but sharp pencil to shade the darkest areas of hair. I used a 6B. If you don’t want such dark shadows, use a harder pencil. Make sure to use strokes that follow the hair’s flow.
Step 2: Add Individual Hairs
You can start drawing the individual hairs now. If you’re not comfortable with that just yet, see the mini tutorial from the original hair article. You can do this step with many pencils or you can use one. I usually draw one group of hair at a time. But in order to make this mini tutorial short, I’m working on all 3 groups at the same time.
Using a 4B mechanical pencil, I created strokes that were bold to begin with, but ended lightly as I approached the areas I wanted to highlight. Then I used a sharp HB pencil to fill in some spaces. I applied a variety of pressures to get a mix of different values and line thicknesses.
Some lines are shorter or longer than others. This is great, but make sure the area that you want to highlight has not been shifted.
Step 3: Directional Strokes
Now, you’ll want to draw from the end of the hair towards the highlight. If you draw the hair ends as dark as the root, the hair will have more of a curve to it.
The thing you need to keep in mind here is that the stroke needs to appear as though both ends are faded out or thinned out. The way to do this is to draw each hair using 2 strokes going in opposite directions. You only need to do this if your hair ends are noticeably blunt, making them appear unnatural.
Step 4: Touchups
If you haven’t been mindful of the prearranged lighting and your highlights appear to be off, use your kneaded eraser to redefine them. If you want the highlights to pop more, increase the level of overall darkness and/or use an eraser to brighten up individual strands of hair.
If you’re still reading, you’re one heck of a patient person. I think you’re ready for the full tutorial now!
How to Draw Short Hair From the Side
Step 1: Head Outline
Draw the shape of a head from the side. You can use this tutorial for proportions. Make sure to draw the ear and neck in this step as well. I used a 4B pencil so that you can clearly see my outlines. If you’re afraid of the outlines showing through in the end, use an HB pencil.
Step 2: Hair Length
Decide on the length of hair you’d like to draw. In this example, the hair is shortest around the back and sides, while the hair on top of the head is longest. Once you’ve decided on the length, grab a blunt 4B pencil and use the shadow lining technique to outline the hair.
Make sure the distance between the hair and head is consistent.
Step 3: Separating Top From Side Hair
Erase any outlines that you made for the head and then use an HB pencil to create an outline that separates the hair on the side of the head from the hair on top of the head.
Step 4: Overall Lighting
If you don’t want to lose track of the overall lighting, use an HB pencil to shadow line areas of the hair you want to the light to fall on and then shade around those highlights. You can shade using a single tone or take it a step further and introduce darker tones. I used a blunt 4B pencil for that.
Step 5: Grouping, Layering, Flow and Shading
If you did step 4, use a 4B pencil to layer groups of hair starting from the swirl at the very back of the head. If you didn’t do step 4, use an HB pencil. Make sure you keep the overall direction/flow in mind as you draw.
You can cover the entire side of the head or work section by section. I stopped as soon as I got close to the area I wanted most of the light to fall on.
When you start shading, start by defining the darkest areas before drawing individual hairs (sharp 6B). If you happen to cross into the area you wanted most of the light to fall, do not introduce overly dark tones.
After you’ve defined the major shadows, start drawing individual strands of hair. Naturally, you’ll start breaking large groups into smaller groups and you’ll find ways to incorporate overlapping hairs and other unique and interesting patterns.
For the individual hairs, I used a 0.5mm 4B mechanical pencil.
Step 6: Repeat
Continue working around those highlights. When drawing hair at the nape of the neck, curl the hairs in towards the neck. For areas close to the back of the head that aren’t getting much light (the light source for your drawing may be different), focus more on mid tones and dark tones instead of trying to define highlights/shine. It’s okay if the hair doesn’t stand out.
Step 7: Grouping, Layering, Flow and Shading
Working in small sections at a time, I drew layer upon layer of large to medium groups of hair. Working in layers helps me carefully plan out the hair direction and flow.
In the image above, I shaded around major groups of hair, making certain areas darker than others to show some depth. Since this is the area I wanted the majority of light to fall on, I used an HB 0.5mm mechanical pencil and a 2B pencil to draw the individual hairs.
Step 8: Fixing/Adding Highlights
If you’ve shaded too dark, or simply want your highlights to pop more, roll your kneaded eraser into a ball, pinch one section so it’s flat and sharp and then run the eraser along areas you want to highlight as though you’re drawing white hair.
The image on the left is before erasing and the one on the right is after.
Step 9: Grouping and Layering
In step 2, if you can recall, I wanted the hair on top of the head to be longer than the sides. The longest hairs you will have to draw will be in your first layer. The following layers are overlapped by layer 1, so they’ll appear shorter.
Step 10: Adding Dark Space and Individual Hairs
Use your creativity to define shadows along random areas of hair. These might be areas that you’re not sure what to do with or that would have looked awkward if you did draw hair. You’ll know what I mean if you’re following along and applying this to your drawing.
After you’ve drawn the shadows, use your mechanical pencil to break groups of hair down into smaller groups until they start looking like individual strands of hair. While you’re drawing the strands, improvise and find unique ways to incorporate unruly, overlapping, loose hair, etc.
If you like this tutorial and want to see more in-depth hair tutorials, drop me your suggestions in the comments below!
In the meantime, here are other tutorials you can check out:
Darlene created RFA In 2013 with the goal of sharing simple yet detailed drawing tutorials with other artists on the world wide web. She is a self taught pencil portrait artist and Youtuber.
Using a blunt HB pencil, draw a narrow ear shape. If you want to draw ears that stick out of the head a lot more, draw your ear wider.
Then, measure the length of your drawing and create a ruler beside it. Draw 3 lines through the ruler, breaking it into 4 equal sections. I’m labeling the 3 lines A, B and C so I can refer to them easily.
Step 2: Draw a Large Hook Shape
Draw a hook shape that starts from line B and ends at line A.
Step 3: Add the Tragus
In one continuous stroke starting from line B, draw the tragus (the small flap in front of the ear canal) and end your stroke with a small hook that rests above line C.
Step 4: Create a Large Fold
Add a curve to the far right which starts at the top of the ear and ends below line C. Leave a fair amount of space for the earlobe.
Step 5: Add a Small Hook Shape
Between the 2 lines you just drew, draw a large hook shape that sits on line C. This is the anti-tragus.
Step 6:
Use the shadow lining technique to draw a curve in the center of the ear. Try not to make it parallel to the curve drawn in step 4.
Step 7: Prepare to Shade
Okay, last one before we shade!
Erase the ruler and horizontal lines.
To keep your edges sharp and clean when you shade, use a sharp 4B pencil to re-outline areas of the ear that cast the darkest shadows – Areas such as deep valleys, major folds and overhang.
Your outlines should not be too dark because you don’t want them to show through after you shade.
Step 8: Add the Darkest Shadows
If your pencil is still sharp, use a scrap piece of paper to make it blunt and then draw your shadows.
Step 9: Add a Light Layer of Graphite
Use a blunt HB pencil to shade an even layer of graphite across the entire ear. If you want bright white highlights, don’t shade over them.
Step 10: Add the Midtones
Use a 2B pencil to add your mid-tones. Shade areas such as the opening of the ear, shallow valleys and slight folds.
Step 11: Blend the Graphite
Use a blending stump to smooth out your shading. If your highlights are too dark, roll your kneaded eraser to a fine tip and dab some graphite away. If your edges are blurred, use a sharp pencil to redefine your edges and blend them lightly if needed.
I’ve gotten some requests for the left ear, so here are the steps for those of you struggling with the other side:
Darlene created RFA In 2013 with the goal of sharing simple yet detailed drawing tutorials with other artists on the world wide web. She is a self taught pencil portrait artist and Youtuber.
Every now and then, I get questions about how to shade eyeballs and how to make them look round. It’s a little difficult to explain without pictures, so here’s a short and sweet step by step tutorial to answer that question :) Enjoy!
While you’re drawing the eye, keep the white part of the eyeball as clean as possible. We’re going to shade the entire eyeball later. This will bring your highlights out more because your highlights will be the lightest value in your drawing.
Step 1: Light Shading
Grab a blunt HB pencil and use the side of your lead to create large, blunt strokes on a scrap piece of paper. Use the exact same edge to shade an even layer of graphite across the eyeball without drawing over the iris. Contouring would be a suitable shading technique to use.
Step 2: Blend Carefully
Wrap a small piece of tissue paper around your finger and blend the eyeball in 2 separate sections. Do not touch any areas with dark shading or else you will smudge extra graphite onto the eyeball. Use very little pressure and use a new piece of tissue after every stroke.
Step 3: Shade Around the Iris
Once your shading is smooth, use your HB pencil to shade around the iris. The goal is to eliminate the harsh edge around the iris. Blend the graphite out if you need to.
Step 4: Shade the Eyelid Rims
Soften out your graphite where the skin touches the eyeball. This step is very subtle, but helps pull the skin and eyeball closer together. Compared to the previous image, this one looks like the top and bottom lids are actually touching the eyeball – snug fit.
Step 5: Add Subtle Shadows
Depending on where your light source is coming from (mine’s coming from the top), add subtle shadows using a blunt HB pencil. To make the eyeball look round, shade the far ends of the eyeball. Make sure your value transitions are very gradual.
Scroll up and compare the images from step 4 and 5. Notice how even the most subtle shadows can give the eyeball such a round shape. Just something to keep in mind when you shade.
Also, there’s an area of the eyeball near the tear duct that is slightly bumpy. So make sure to pay extra attention to that. However, you don’t want to bring too much attention to it, so try to keep it subtle.
Thanks to MargaritaM for reminding me to add a slideshow to this tutorial! Use the slideshow below to see all the steps and their subtle differences:
I hope this tutorial was helpful! Which steps helped you the most? I’d love to know :)
Darlene created RFA In 2013 with the goal of sharing simple yet detailed drawing tutorials with other artists on the world wide web. She is a self taught pencil portrait artist and Youtuber.
Hey guys! In this tutorial, I’m going to show you how to draw realistic and subtle eyebrows. Learn how to draw eyebrows that compliment a drawing instead of sticking out like a sore thumb!
The structure of this tutorial will be similar to my previous one on eyelashes: examples with explanations and then application in a step by step format.
Keep your strokes fairly thin. I always try to keep the tip of my pencil as sharp as possible for each stroke. Once your pencil starts to become blunt, individual hairs will blur together and eventually disappear as they blend in with each other.
Stroke Direction and Curve
I see a lot of people draw eyebrows like this:
While that’s great for cartoons and manga, it’s quite unrealistic.
We want to draw hairs that point in 3 main directions: Up, down and from left to right (or right to left if you’re drawing the left eyebrow).
Eyebrow hairs also come in a variety of shapes such as the ones below. Find the right combination/grouping to get your desired look or just go with the flow.
Stroke Length
Eyebrow hairs are usually shorter at the end of the eyebrow and as a rule of thumb, the lighter the hair, the shorter it is.
Root Placement
Slow down and carefully plan the placement of each stroke you make and try to make them as unpredictable as possible. Avoid predictable patterns like the ones below.
Random = natural
Do not make the mistake of drawing a single row of hairs in an attempt to cover the entire eyebrow. More on that later.
Eyebrow Shape, Length and Position
With your fingers, put some pressure along your eyebrow and move the skin up and down. You’ll find that your eyebrows grow along the brow bone. The brow bone is the protruding area directly above your eye socket. When you don’t know where to draw an eyebrow, visualize the eye socket around the eye.
Eyebrow length varies from person to person, but the average length is only slightly longer than the length of the eye itself.
As for the shape, there’s no one correct way. Just play around with different shapes while following along the brow bone.
How to Draw Eyebrows Step by Step
If you want to draw clean, sharp eyebrows, shade the area above the eye and blend it out first before you start. It doesn’t have to be perfect. This step eliminates the amount of shading and blending you’ll have to do later on.
Step 1: Shadowline the eyebrow
With an H pencil, use my shadow-lining technique to outline the shape you want the eyebrow to have. If you use this technique, your outlines will blend in perfectly when you draw the actual hairs later.
Do not outline it like the image below. It will be very obvious in your final drawing and a complete pain to erase!
Step 2: Draw first row of hairs
We’re going to draw hairs going in several different directions. Using a sharp 2B pencil, let’s start by drawing a single row on the bottom and go from left to right. These hairs grow in the upward direction and start pointing downward near the end of the eyebrow.
Step 3: Add a second row
Now, add an additional row or two. Remember to draw hairs at the beginning of the eyebrow longer than ones at the end.
Step 4: Add unique hairs
Make slight changes in the hair direction and amount of curve. Join some hairs together by their ends as well.
I’m not adding any more hairs on the left side of the eyebrow because I don’t know if that will be enough yet. I’ll be able to decide later when I draw the upper portion of the eyebrow.
It’s up to you how you want to design your eyebrow, so you can add more hair if you want.
Step 5: Darken overlapping hairs
In this step, I didn’t add any new hairs. I just looked at which ones were overlapping and used the sharpest edge of my 4B mechanical pencil to darken those areas. This will make the eyebrow look more interesting.
Step 6: Draw a light row of hairs at the top
Time to draw the upper portion of hair. I usually draw the first row really thin/light and then increase the thickness/darkness with the following rows.
Your ultimate goal is to get a smooth transition from upward-pointing to downward-pointing hairs.
Step 7: Merge hairs with bottom rows
Add an additional layer or two. As the ends of the hairs start coming in contact with the upward-pointing hairs, allow your strokes to slowly merge into the same direction.
Step 8: Fill the middle portion
When filling in the middle portion of the eyebrow, focus on drawing hairs that flow in the direction that seems most natural to you.
If you used the shadow lining technique for your outline in step 1, you will notice that it has blended in well and there should be no need to erase it.
Step 9: Touchups
If you see any inconsistencies in value or you think you’d like a darker eyebrow, go over some hairs with a sharp 4B mechanical pencil and darken overlapping hairs or individual hairs that you want to stand out more than others.
Be very careful not to overdo it. It’s hard to erase thin lines. If you do need to erase any hairs or make them appear lighter, pinch your kneaded eraser until it looks as sharp as a knife and then press it directly on the hair to lift a layer of graphite away.
Step 10: Add light shadows on the eyebrow
Can you spot what’s different in the image for this step? I’ve added shadows in the forest of hair. If you shaded the skin as light as mine, use a 2B pencil to shade over your entire eyebrow. Don’t press too hard.
At this point, the eyebrow still looks like it’s sort of pasted onto the face. We’ll fix this in the next step.
Step 11: Add light shadows around the eyebrow
Okay, last step! We just added some shadows inside the boundary of the eyebrow. Now it’s time to draw shadows around the outside. If your light source is coming from the top (like mine), draw your shadows directly below the eyebrow and/or sides only. Subtle shadows will do. Avoid hard edges!
If you think it still looks pasted on, use a sharp H pencil to draw really light hairs around the top and side.
And that’s it!
I just want to send a big thank you out to all of you guys who take the time to leave a comment or connect with me via email or Facebook. Your kind messages remind me that what I do makes a difference and helps give me the motivation to keep going! You guys are awesome! :)
Darlene created RFA In 2013 with the goal of sharing simple yet detailed drawing tutorials with other artists on the world wide web. She is a self taught pencil portrait artist and Youtuber.
Hey guys! In this lesson, I’m going to show you how to draw natural-looking eyelashes from scratch, along with some common mistakes I see many beginners make.
If you’ve ever felt like your lashes look too stiff, too uniform, or just “off” and you can’t figure out why, I hope this guide will help clear things up. We’ll cover natural eyelash direction and shape, how to draw better strokes, how to make eyelashes look more natural, and then apply everything in a full step-by-step eyelash drawing tutorial.
Tools I Used: I’m using a mechanical pencil with 4B lead for dark, clean strokes, along with an H and HB Pencil for lash planning. Canson Bristol Paper (This smooth paper helps keep strokes looking sharp instead of grainy) Kneaded Eraser (To delicately adjust any lashes as needed)
You don’t need these exact tools. Just choose a pencil grade that stays sharp and can produce both light and dark values without getting too blunt too quickly.
Understanding Eyelash Direction and Shape
Before we even touch the pencil, it helps to understand what eyelashes are doing on the face, so we can draw them more accurately.
Eyelashes grow from the eyelid and angle toward the opening of the eye to help protect it from dust and debris. Because of this, they don’t stick straight out like perfect sunrays.
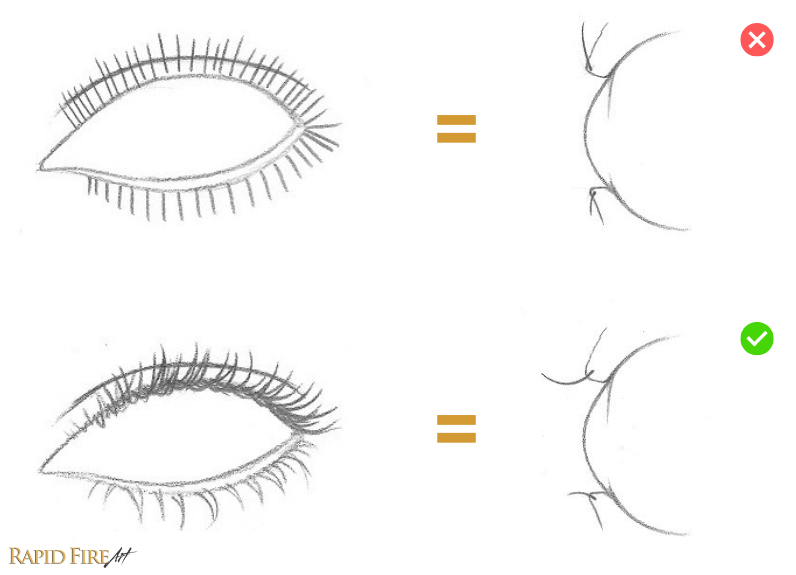
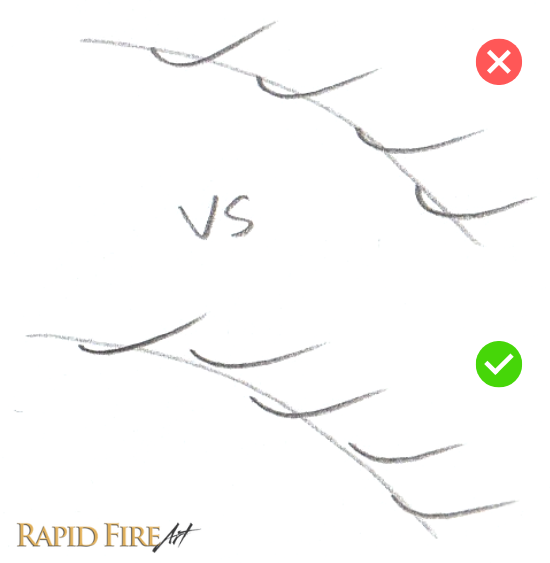
A common mistake I see is drawing lashes that shoot outward in evenly spaced, straight lines. If lashes actually grew like that, they wouldn’t be protecting the eye at all, and it ends up looking very unnatural in a drawing. (Refer to the example above comparing the “sunray” lashes vs a more natural growth direction and their corresponding side-views).
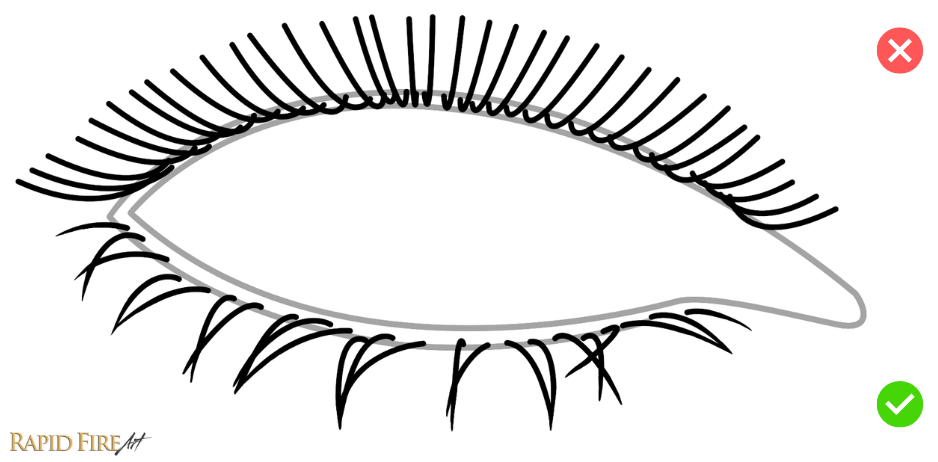
The eyelid also wraps around the eyeball, which means it sits on a curved surface rather than a flat one. This affects how eyelashes appear, depending on where they are along the lid.
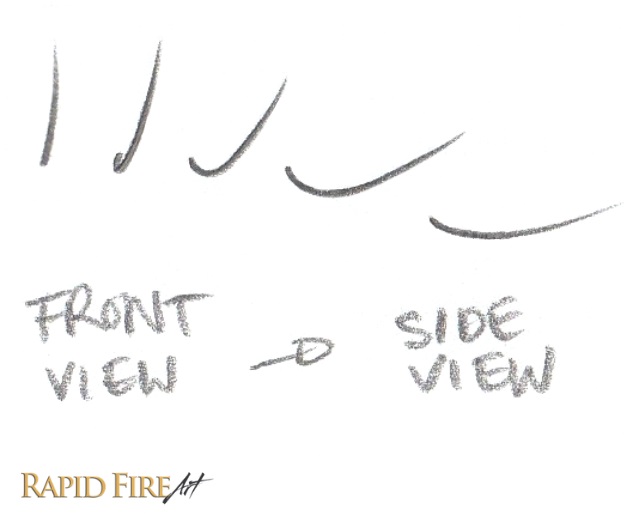
On a front-facing eye, lashes near the center tend to curve more toward you, while lashes toward the sides appear wider and more angled. So instead of thinking of every lash as the same shape, it helps to adjust them based on their position.
To simplify this, I like to think of eyelashes as “J” shapes. Lashes near the center of the eye look like narrower J’s, while lashes toward the sides stretch into wider ones. Practicing these variations (and everything in between) can make a big difference in how natural your lashes look.
If your eyelashes ever feel off, one of the first things to check is whether they’re following the curvature of the eyelid and pointing in a believable direction.
Improve Stroke Quality
Each eyelash should start thicker at the base and taper to a thin, sharp point. To achieve that effect, you want to begin your stroke with a bit of pressure, follow through with a smooth curve (take it slow), and then lift your pencil quickly at the end.
If the end of your stroke keeps coming out blunt, don’t worry too much about it. You can always go back in with the sharp edge of your pencil and add a pointed tip afterward. If the addition ends up too dark, just pinch your kneaded eraser into a fine point and lightly dab some graphite away.
Also, don’t feel like every eyelash needs to be drawn in a single perfect stroke. You can lightly sketch the shape first using an H pencil, then go over it with a darker pencil.
In my experience, drawing random, quick strokes won’t result in natural-looking lashes. It really helps to plan and draw each stroke carefully. One simple trick is to hover your pencil over the page and mimic the motion before touching pencil to paper. This makes it much easier to control the shape and angle you want.
Troubleshooting Stroke Quality
If your eyelashes look like checkmarks, try slowing down at the beginning of your stroke, speeding up only near the end where you need to flick your pencil up to form the tip. If that doesn’t fix it, try locking your finger joints and using your wrist to move instead.
Do your strokes look wobbly? You might be drawing them too slowly. Try gradually increasing your speed to see if that smoothes things out. It also helps to avoid resting your hand heavily on the page, using your elbow as your anchor instead.
If your stroke shape looks good but the texture is grainy, it might be your tools. Softer pencils and textured paper can cause this. Switching to a slightly harder pencil (like 2B instead of 4B) or using smoother paper can help you get cleaner lines.
Tips for How to Draw Natural Eyelashes
One of the fastest ways to ruin realism is to make everything too uniform.
In real life, eyelashes are messy. They overlap, clump together, cross over each other, and sometimes even grow in slightly unexpected directions. That randomness is what makes them look natural. Let’s explore 5 different ways to make our lashes look more natural:
1. Vary the Length
Even though lashes near the inner corner of the eye are usually shorter, we still want variation in length across the entire eyelid. We want to keep things a little uneven, even within the same area, so it doesn’t look too uniform. For a finished drawing, you can easily go back in to adjust lash length by adding to a lash or lightly dabbing it with a kneaded eraser.
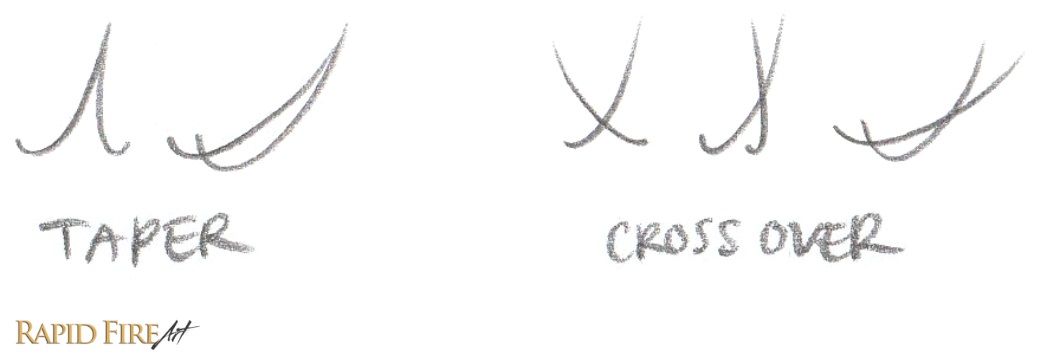
2. Group Lashes
When every lash stands alone, the drawing can start to look like spider legs. Instead, let some lashes taper together or cross over each other in small groups of 2-4. This helps break up that stiff look and makes things look more interesting.
3. Vary The Curvature
Curvature is another thing to play with, and it can be super fun! Some lashes can dip lower, others can be shallow. Mixing that up helps prevent patterns from forming.
4. Vary Line Thickness and Value
You’ll also want to vary the thickness and darkness of your lines. Make some lashes bold and prominent, while others light and barely noticeable, especially near the tear duct.
5. Stagger The Roots
Finally, avoid placing lashes in a perfectly even row along the eyelid. Staggering the roots, even slightly, makes everything feel more organic. If you want to fix a completed drawing, just elongate the beginning of some lashes to shift where they appear to grow from.
Want to practice on the same eye I’m using in the step-by-step tutorial? Grab my free printable worksheets below and experiment freely on the pre-drawn eyes.
How to Draw Eyelashes Step-by-Step Tutorial
Now let’s put everything together.
Before we begin, draw an eye and finish all your shading and blending before you add the lashes. Blending afterward will blur and smear all your hard work.
Step 1: Plan the hair direction (Draw Your First 3 Lashes)
Figure out what direction the eye is facing so you can apply the right amount of curvature to each eyelash.
For a front-facing eye, the middle lashes will face you more directly, so they’ll look like narrow “J” shapes, while the ones toward the sides will stretch into wider “J” shapes.
Using a sharp H pencil, lightly draw about 3 lashes on each lid. Once you’re happy with them, go over them with a darker pencil, like a 4B mechanical pencil, to define your main lashes. These will act as your guide as you start filling in the spaces between.
Keep in mind that lower lashes are usually shorter and thinner than the upper ones.
For the next few steps, we’re just going to build everything around these. This is where it starts to get fun 🙂
Step 2: Fill lashes section by section
I’m going to work from left to right, but you can start anywhere. It helps to work in small sections so things don’t feel overwhelming.
Quick tip: Place a clean sheet of paper under your hand so you don’t smear your drawing. We want to keep these lashes nice and sharp.
Use your H pencil again to draw light lashes that act as guidelines. These should be easy to erase if needed. Think of them as training wheels.
As you get more comfortable, you can skip the light sketch and go straight in with your darker pencil. One thing that helps is hovering your pencil over the page first and mimicking the motion before committing to the stroke. It’s a simple way to plan the shape and angle without making a mark.
As you add more lashes, focus on creating a natural transition between angles instead of forcing a perfect blend. Don’t be afraid to mix things up, like adding a few narrow J’s where wider ones would normally go.
Step 3: Add unique lashes
Now that your eyelashes are starting to build up, begin introducing more variation.
Add lashes that overlap, some that taper together, some with stronger curves, and others that are slightly longer or shorter. At this stage, it might look a bit sparse or even a little weird. That’s completely normal.
If you find yourself falling into a pattern and things start looking too uniform, try jumping back and forth between different areas of the eye instead of working in order. This small reset can help you break out of repetitive strokes.
Step 4: Spread lashes out(focus on the big picture)
If you’re having trouble moving along, it might be because there’s too much space between your initial anchor lashes from step 1. These huge gaps can feel difficult to fill, plus, staying in one section for too long can make you lose sight of the bigger picture. Try spreading your lashes out first, so you have more anchor points to guide you as you fill in the spaces.
These new lashes act like little bridges between your original anchors, helping you plan out the overall shape your eyelashes are forming. For me, I’m shaping my lashes to follow the natural curve of the upper eyelid crease. Once that bigger shape feels right, it becomes much easier to go back in and fill the smaller gaps without constantly shifting between detail and overall structure.
Step 5: Introduce a new layer
Eyelashes don’t just grow in a single, boring row. On the upper eyelid, I’m adding an additional layer of lashes beneath the ones I just drew. This adds depth and makes the drawing feel more natural.
Step 6: Continue Filling the Gaps
Having fun yet? I am 🙂
This part might look complicated, but all I’m really doing is adding more strokes beside existing lashes. You can add less if it feels too crowded.
You can keep the lash variations subtle, like I have, or push it more. It’s up to you. Add lighter lashes, darker ones, straighter ones, curvier ones, and let some cross over or taper together.
Once you’re done, take a step back and look at your drawing as a whole. You might notice some lashes you want to tweak to improve balance or guide the viewer’s focus
Step 7: Add some shading
If you’re happy with your lashes, it’s time to shade.
Although eyelashes are thin, they do cast shadows, and this step helps ground them so they don’t look like they’re just pasted onto the drawing.
I’ve shaded the area behind and below the upper lashes, and just below the lower lashes to help ground them. You can also add subtle circular shading around the base of the lashes to suggest a bumpy texture along the eyelid. If your eyelashes don’t look integrated into the drawing yet, this step usually makes a big difference!
Step 8: Final Details! Add some eyelash reflections
To finish things off, add some subtle eyelash reflections in the eye, and we’re all done!
Final Thoughts
If your eyelashes still don’t look quite right, that’s completely normal. This is one of those things that takes a bit of practice, especially getting used to the flicking motion and figuring out which lash combinations look good together.
Try focusing on improving one thing at a time, whether that’s your stroke quality or how you vary your lashes. You’ll improve much faster that way.
If you’re using my worksheets, don’t be afraid to fill a couple of pages with “bad” lashes first. The more reps you get in, the more natural it will start to feel. Don’t beat yourself up if it’s not clicking right away. You’ll get there!
If you found this tutorial helpful, let me know which part made the biggest difference or where things are still confusing. That kind of feedback really helps me improve future lessons. Thank you!
If you haven’t downloaded the worksheets yet, you can grab them here and use them to practice on the same eyes from this tutorial.
Darlene created RFA In 2013 with the goal of sharing simple yet detailed drawing tutorials with other artists on the world wide web. She is a self taught pencil portrait artist and Youtuber.
This tutorial has 3 examples for you to draw from: Overbite, Normal Bite and Underbite. When going through the tutorial, please pick only 1 example to follow instead of drawing all 3 lips at the same time.
Canson Sketch Paper (I find sketch paper so much harder to work with if I want to blend smoothly. I much prefer working on Canson Bristol. Unfortunately out of bristol paper at the moment.)
How to Draw Lips from the Side:
Step 1: Choose top and bottom lip positioning
This first stroke will determine whether you will draw an overbite, normal bite or underbite.
Step 2: Choose the lip angle
This second stroke will determine the thickness of the top and bottom lip and whether the corner of the mouth with angle up or down.
Step 3: Draw a triangle
Turn your sketch into a triangle. The longer your triangle is, the wider the lips will be.
Step 4: Draw the mouth’s corner
Draw the corner of the mouth. This can be a simple dot, bracket, raindrop shape, triangle etc.
Step 5: Draw the top lip
You can start with the top or bottom lip. For this tutorial, I’m starting with the top.
Draw a curve that starts at the top left corner of the triangle. This curve can roughly follow the shape of the triangle, jut out or be drawn well inside the boundaries. It’s all up to you.
Step 6: Complete the top lip
Connect the curve you just drew to the corner of the mouth. Avoid drawing a straight line across. It’s better to draw a slightly curved line than a completely straight one.
Step 7: Draw the bottom lip
To draw the bottom lip, start your stroke from the bottom left corner of the triangle and wrap it up until it touches the top lip.
Step 8: Draw the upper and lower lip
Draw the upper lip. Be careful not to extend your line too far. The upper lip should be roughly the same thickness as the top lip or more.
When drawing the lower lip/chin for underbites, make sure the curve is less pronounced. The bottom set of teeth push the bottom/lower lip forward, reducing a lot of curvature.
Step 9: Draw the rim of the top and bottom lip
Using your HB pencil with as little pressure as possible, draw the rims around each lip, connecting them to the corner of the mouth. Then erase your guidelines.
Step 10: Add contour lines
Time to shade! If you think your lines are too dark, use your kneaded eraser to pick up 1 layer of graphite from your drawing. Then use a sharp HB pencil to lay down your contour lines.
Step 11: Shade the lips
Start building up more contour lines using your HB, 2B, then 4B pencils.
Around the rim of each lip, soften your edges so they don’t appear too harsh.
Step 12: Shade the skin
For this tutorial, I used circulism to shade the skin around the lips. I used a blunt HB pencil and built up layers and layers of circles. Then used a 2B to shade darker areas.
I shaded areas such as the lower lip, cheek, corner of the mouth, and skin directly under the nose a bit darker. If you still see a lot of white space, use your HB pencil to go over the skin with even more layers. Don’t press too hard or your circles will be very visible!
If you enjoyed this tutorial and would like to support RapidFireArt, please share this with your friends. Thank you!
Darlene created RFA In 2013 with the goal of sharing simple yet detailed drawing tutorials with other artists on the world wide web. She is a self taught pencil portrait artist and Youtuber.
RFA uses cookies to offer you a better browsing experience, analyze site traffic, personalize content, and serve targeted ads. By clicking accept, you are helping to support my site and keep drawing tutorials free 🙂. Not a fan of cookies? No worries! Adjust your preferences in the settings! Not consenting may affect some features and functions such as embedded video tutorials.
Functional
Always active
The technical storage or access is strictly necessary for the legitimate purpose of enabling the use of a specific service explicitly requested by the subscriber or user, or for the sole purpose of carrying out the transmission of a communication over an electronic communications network.
Preferences
The technical storage or access is necessary for the legitimate purpose of storing preferences that are not requested by the subscriber or user.
Statistics
The technical storage or access that is used exclusively for statistical purposes.The technical storage or access that is used exclusively for anonymous statistical purposes. Without a subpoena, voluntary compliance on the part of your Internet Service Provider, or additional records from a third party, information stored or retrieved for this purpose alone cannot usually be used to identify you.
Marketing (Activating this supports my website via ads, keeping tutorials free)
The technical storage or access is required to create user profiles to send advertising, or to track the user on a website or across several websites for similar marketing purposes.