Darlene created RFA In 2013 with the goal of sharing simple yet detailed drawing tutorials with other artists on the world wide web. She is a self taught pencil portrait artist and Youtuber.
Hey guys! This is the first article in a new series I’m starting. The series will be focused on drawing techniques using a variety of different tools.
Today, I’m going to delve into a technique I call Shadow Lining. I came up with this technique a while back, but only recently introduced it in my tutorials. I’m not sure if anyone else uses this technique already or if it already has a name. If it’s an actual thing, let me know in the comments below!
Shadow Lining is basically the process of outlining an area on your portrait such as the boundary of a dark shadow or highlight using pencil strokes that mimic the way you would shade the drawing instead of using a continuous line to do so.
Example: In the image below, I Shadow-Lined the cheeks. This helps me break the face into sections, which makes it easier to shade and it also provides a guideline to follow while I’m shading.
Since my drawing is mainly shaded using the hatching technique (strokes going in a single direction), my Shadow Lines will also be drawn using the same technique. If I shaded the drawing using circulism, my Shadow Lines would be drawn as circles.
Image on the left shows shadow lining on the cheeks. Image on the right shows how well the outlines blend in after the area is shaded.
With Shadow Lining, you can outline areas of your drawing without worrying if the outline will show through in the end.
Even though it’s called “Shadow” Lining, you can use it in many applications such as outlining noses, lips, hair, eyebrows.. the list is endless!
Eyebrows:
Hair (Lighting):
If you usually outline elements of your drawing like the images below, this technique will give your drawings a major improvement and a more professional look.
Have any requests for future articles in this series? Let me know :)
Darlene created RFA In 2013 with the goal of sharing simple yet detailed drawing tutorials with other artists on the world wide web. She is a self taught pencil portrait artist and Youtuber.
Using a blunt HB pencil, draw a narrow ear shape. If you want to draw ears that stick out of the head a lot more, draw your ear wider.
Then, measure the length of your drawing and create a ruler beside it. Draw 3 lines through the ruler, breaking it into 4 equal sections. I’m labeling the 3 lines A, B and C so I can refer to them easily.
Step 2: Draw a Large Hook Shape
Draw a hook shape that starts from line B and ends at line A.
Step 3: Add the Tragus
In one continuous stroke starting from line B, draw the tragus (the small flap in front of the ear canal) and end your stroke with a small hook that rests above line C.
Step 4: Create a Large Fold
Add a curve to the far right which starts at the top of the ear and ends below line C. Leave a fair amount of space for the earlobe.
Step 5: Add a Small Hook Shape
Between the 2 lines you just drew, draw a large hook shape that sits on line C. This is the anti-tragus.
Step 6:
Use the shadow lining technique to draw a curve in the center of the ear. Try not to make it parallel to the curve drawn in step 4.
Step 7: Prepare to Shade
Okay, last one before we shade!
Erase the ruler and horizontal lines.
To keep your edges sharp and clean when you shade, use a sharp 4B pencil to re-outline areas of the ear that cast the darkest shadows – Areas such as deep valleys, major folds and overhang.
Your outlines should not be too dark because you don’t want them to show through after you shade.
Step 8: Add the Darkest Shadows
If your pencil is still sharp, use a scrap piece of paper to make it blunt and then draw your shadows.
Step 9: Add a Light Layer of Graphite
Use a blunt HB pencil to shade an even layer of graphite across the entire ear. If you want bright white highlights, don’t shade over them.
Step 10: Add the Midtones
Use a 2B pencil to add your mid-tones. Shade areas such as the opening of the ear, shallow valleys and slight folds.
Step 11: Blend the Graphite
Use a blending stump to smooth out your shading. If your highlights are too dark, roll your kneaded eraser to a fine tip and dab some graphite away. If your edges are blurred, use a sharp pencil to redefine your edges and blend them lightly if needed.
I’ve gotten some requests for the left ear, so here are the steps for those of you struggling with the other side:
Darlene created RFA In 2013 with the goal of sharing simple yet detailed drawing tutorials with other artists on the world wide web. She is a self taught pencil portrait artist and Youtuber.
Every now and then, I get questions about how to shade eyeballs and how to make them look round. It’s a little difficult to explain without pictures, so here’s a short and sweet step by step tutorial to answer that question :) Enjoy!
While you’re drawing the eye, keep the white part of the eyeball as clean as possible. We’re going to shade the entire eyeball later. This will bring your highlights out more because your highlights will be the lightest value in your drawing.
Step 1: Light Shading
Grab a blunt HB pencil and use the side of your lead to create large, blunt strokes on a scrap piece of paper. Use the exact same edge to shade an even layer of graphite across the eyeball without drawing over the iris. Contouring would be a suitable shading technique to use.
Step 2: Blend Carefully
Wrap a small piece of tissue paper around your finger and blend the eyeball in 2 separate sections. Do not touch any areas with dark shading or else you will smudge extra graphite onto the eyeball. Use very little pressure and use a new piece of tissue after every stroke.
Step 3: Shade Around the Iris
Once your shading is smooth, use your HB pencil to shade around the iris. The goal is to eliminate the harsh edge around the iris. Blend the graphite out if you need to.
Step 4: Shade the Eyelid Rims
Soften out your graphite where the skin touches the eyeball. This step is very subtle, but helps pull the skin and eyeball closer together. Compared to the previous image, this one looks like the top and bottom lids are actually touching the eyeball – snug fit.
Step 5: Add Subtle Shadows
Depending on where your light source is coming from (mine’s coming from the top), add subtle shadows using a blunt HB pencil. To make the eyeball look round, shade the far ends of the eyeball. Make sure your value transitions are very gradual.
Scroll up and compare the images from step 4 and 5. Notice how even the most subtle shadows can give the eyeball such a round shape. Just something to keep in mind when you shade.
Also, there’s an area of the eyeball near the tear duct that is slightly bumpy. So make sure to pay extra attention to that. However, you don’t want to bring too much attention to it, so try to keep it subtle.
Thanks to MargaritaM for reminding me to add a slideshow to this tutorial! Use the slideshow below to see all the steps and their subtle differences:
I hope this tutorial was helpful! Which steps helped you the most? I’d love to know :)
Darlene created RFA In 2013 with the goal of sharing simple yet detailed drawing tutorials with other artists on the world wide web. She is a self taught pencil portrait artist and Youtuber.
Hey guys! In this tutorial, I’m going to show you how to draw realistic and subtle eyebrows. Learn how to draw eyebrows that compliment a drawing instead of sticking out like a sore thumb!
The structure of this tutorial will be similar to my previous one on eyelashes: examples with explanations and then application in a step by step format.
Keep your strokes fairly thin. I always try to keep the tip of my pencil as sharp as possible for each stroke. Once your pencil starts to become blunt, individual hairs will blur together and eventually disappear as they blend in with each other.
Stroke Direction and Curve
I see a lot of people draw eyebrows like this:
While that’s great for cartoons and manga, it’s quite unrealistic.
We want to draw hairs that point in 3 main directions: Up, down and from left to right (or right to left if you’re drawing the left eyebrow).
Eyebrow hairs also come in a variety of shapes such as the ones below. Find the right combination/grouping to get your desired look or just go with the flow.
Stroke Length
Eyebrow hairs are usually shorter at the end of the eyebrow and as a rule of thumb, the lighter the hair, the shorter it is.
Root Placement
Slow down and carefully plan the placement of each stroke you make and try to make them as unpredictable as possible. Avoid predictable patterns like the ones below.
Random = natural
Do not make the mistake of drawing a single row of hairs in an attempt to cover the entire eyebrow. More on that later.
Eyebrow Shape, Length and Position
With your fingers, put some pressure along your eyebrow and move the skin up and down. You’ll find that your eyebrows grow along the brow bone. The brow bone is the protruding area directly above your eye socket. When you don’t know where to draw an eyebrow, visualize the eye socket around the eye.
Eyebrow length varies from person to person, but the average length is only slightly longer than the length of the eye itself.
As for the shape, there’s no one correct way. Just play around with different shapes while following along the brow bone.
How to Draw Eyebrows Step by Step
If you want to draw clean, sharp eyebrows, shade the area above the eye and blend it out first before you start. It doesn’t have to be perfect. This step eliminates the amount of shading and blending you’ll have to do later on.
Step 1: Shadowline the eyebrow
With an H pencil, use my shadow-lining technique to outline the shape you want the eyebrow to have. If you use this technique, your outlines will blend in perfectly when you draw the actual hairs later.
Do not outline it like the image below. It will be very obvious in your final drawing and a complete pain to erase!
Step 2: Draw first row of hairs
We’re going to draw hairs going in several different directions. Using a sharp 2B pencil, let’s start by drawing a single row on the bottom and go from left to right. These hairs grow in the upward direction and start pointing downward near the end of the eyebrow.
Step 3: Add a second row
Now, add an additional row or two. Remember to draw hairs at the beginning of the eyebrow longer than ones at the end.
Step 4: Add unique hairs
Make slight changes in the hair direction and amount of curve. Join some hairs together by their ends as well.
I’m not adding any more hairs on the left side of the eyebrow because I don’t know if that will be enough yet. I’ll be able to decide later when I draw the upper portion of the eyebrow.
It’s up to you how you want to design your eyebrow, so you can add more hair if you want.
Step 5: Darken overlapping hairs
In this step, I didn’t add any new hairs. I just looked at which ones were overlapping and used the sharpest edge of my 4B mechanical pencil to darken those areas. This will make the eyebrow look more interesting.
Step 6: Draw a light row of hairs at the top
Time to draw the upper portion of hair. I usually draw the first row really thin/light and then increase the thickness/darkness with the following rows.
Your ultimate goal is to get a smooth transition from upward-pointing to downward-pointing hairs.
Step 7: Merge hairs with bottom rows
Add an additional layer or two. As the ends of the hairs start coming in contact with the upward-pointing hairs, allow your strokes to slowly merge into the same direction.
Step 8: Fill the middle portion
When filling in the middle portion of the eyebrow, focus on drawing hairs that flow in the direction that seems most natural to you.
If you used the shadow lining technique for your outline in step 1, you will notice that it has blended in well and there should be no need to erase it.
Step 9: Touchups
If you see any inconsistencies in value or you think you’d like a darker eyebrow, go over some hairs with a sharp 4B mechanical pencil and darken overlapping hairs or individual hairs that you want to stand out more than others.
Be very careful not to overdo it. It’s hard to erase thin lines. If you do need to erase any hairs or make them appear lighter, pinch your kneaded eraser until it looks as sharp as a knife and then press it directly on the hair to lift a layer of graphite away.
Step 10: Add light shadows on the eyebrow
Can you spot what’s different in the image for this step? I’ve added shadows in the forest of hair. If you shaded the skin as light as mine, use a 2B pencil to shade over your entire eyebrow. Don’t press too hard.
At this point, the eyebrow still looks like it’s sort of pasted onto the face. We’ll fix this in the next step.
Step 11: Add light shadows around the eyebrow
Okay, last step! We just added some shadows inside the boundary of the eyebrow. Now it’s time to draw shadows around the outside. If your light source is coming from the top (like mine), draw your shadows directly below the eyebrow and/or sides only. Subtle shadows will do. Avoid hard edges!
If you think it still looks pasted on, use a sharp H pencil to draw really light hairs around the top and side.
And that’s it!
I just want to send a big thank you out to all of you guys who take the time to leave a comment or connect with me via email or Facebook. Your kind messages remind me that what I do makes a difference and helps give me the motivation to keep going! You guys are awesome! :)
Darlene created RFA In 2013 with the goal of sharing simple yet detailed drawing tutorials with other artists on the world wide web. She is a self taught pencil portrait artist and Youtuber.
Hey guys! In this lesson, I’m going to show you how to draw natural-looking eyelashes from scratch, along with some common mistakes I see many beginners make.
If you’ve ever felt like your lashes look too stiff, too uniform, or just “off” and you can’t figure out why, I hope this guide will help clear things up. We’ll cover natural eyelash direction and shape, how to draw better strokes, how to make eyelashes look more natural, and then apply everything in a full step-by-step eyelash drawing tutorial.
Tools I Used: I’m using a mechanical pencil with 4B lead for dark, clean strokes, along with an H and HB Pencil for lash planning. Canson Bristol Paper (This smooth paper helps keep strokes looking sharp instead of grainy) Kneaded Eraser (To delicately adjust any lashes as needed)
You don’t need these exact tools. Just choose a pencil grade that stays sharp and can produce both light and dark values without getting too blunt too quickly.
Understanding Eyelash Direction and Shape
Before we even touch the pencil, it helps to understand what eyelashes are doing on the face, so we can draw them more accurately.
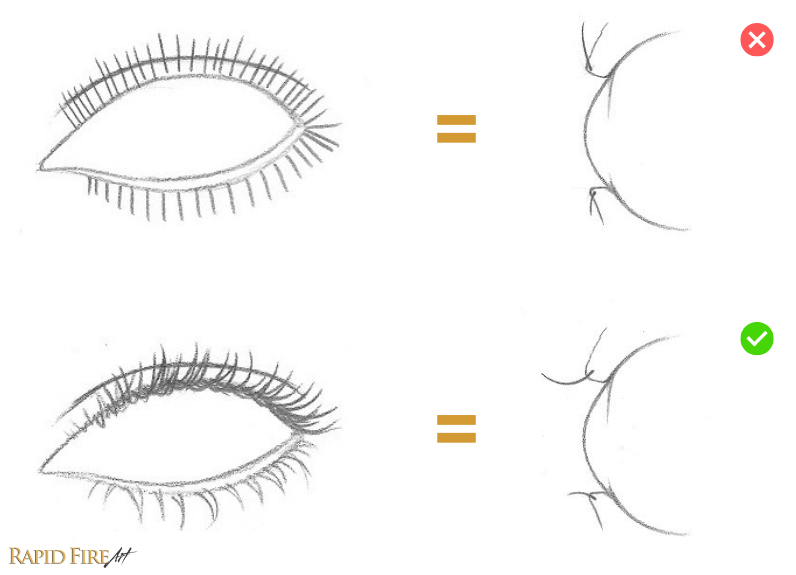
Eyelashes grow from the eyelid and angle toward the opening of the eye to help protect it from dust and debris. Because of this, they don’t stick straight out like perfect sunrays.
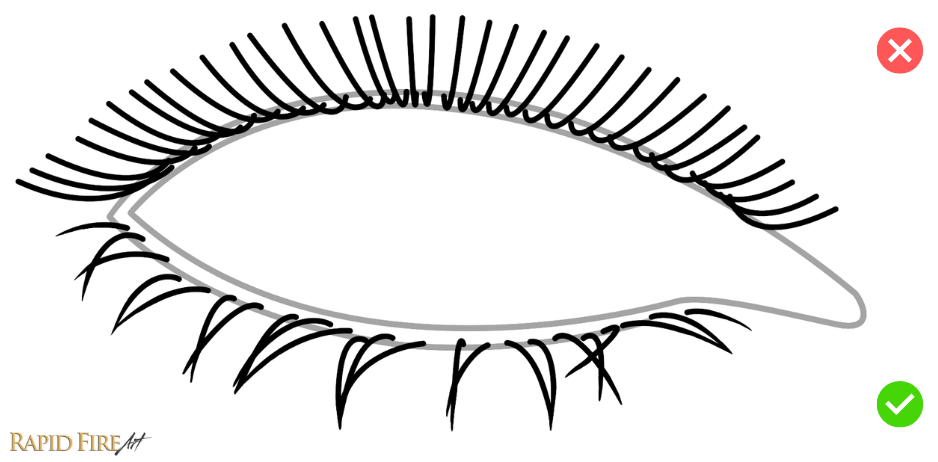
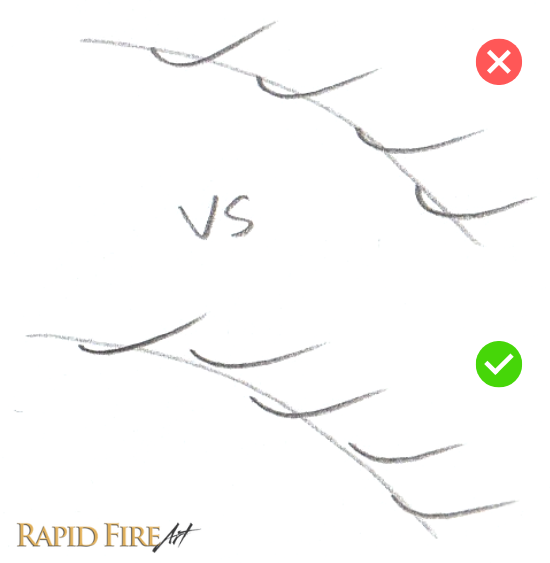
A common mistake I see is drawing lashes that shoot outward in evenly spaced, straight lines. If lashes actually grew like that, they wouldn’t be protecting the eye at all, and it ends up looking very unnatural in a drawing. (Refer to the example above comparing the “sunray” lashes vs a more natural growth direction and their corresponding side-views).
The eyelid also wraps around the eyeball, which means it sits on a curved surface rather than a flat one. This affects how eyelashes appear, depending on where they are along the lid.
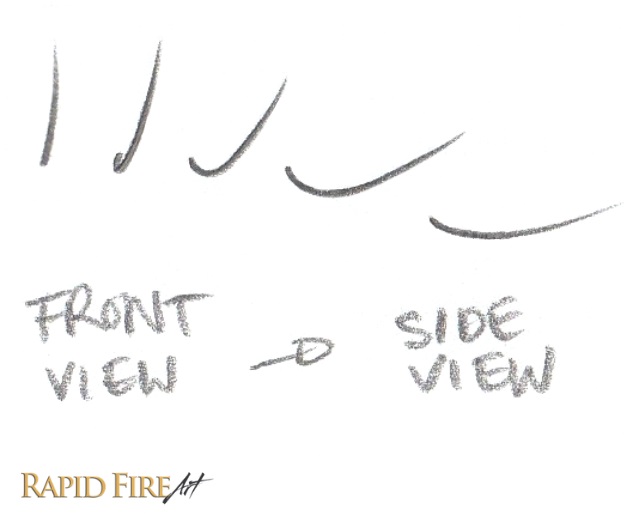
On a front-facing eye, lashes near the center tend to curve more toward you, while lashes toward the sides appear wider and more angled. So instead of thinking of every lash as the same shape, it helps to adjust them based on their position.
To simplify this, I like to think of eyelashes as “J” shapes. Lashes near the center of the eye look like narrower J’s, while lashes toward the sides stretch into wider ones. Practicing these variations (and everything in between) can make a big difference in how natural your lashes look.
If your eyelashes ever feel off, one of the first things to check is whether they’re following the curvature of the eyelid and pointing in a believable direction.
Improve Stroke Quality
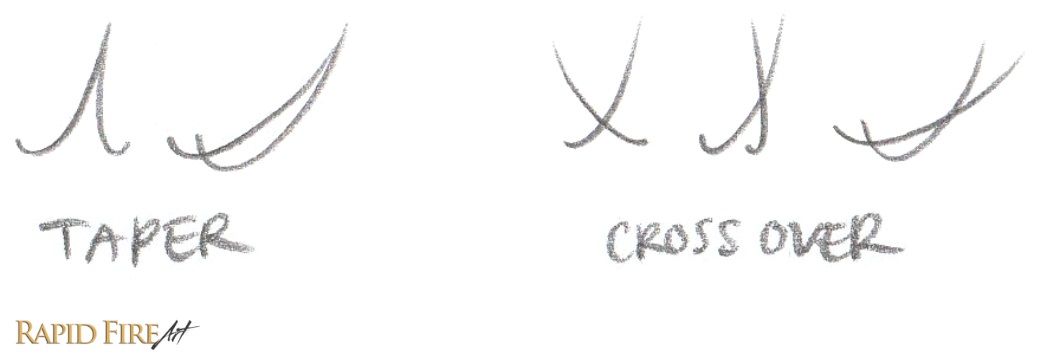
Each eyelash should start thicker at the base and taper to a thin, sharp point. To achieve that effect, you want to begin your stroke with a bit of pressure, follow through with a smooth curve (take it slow), and then lift your pencil quickly at the end.
If the end of your stroke keeps coming out blunt, don’t worry too much about it. You can always go back in with the sharp edge of your pencil and add a pointed tip afterward. If the addition ends up too dark, just pinch your kneaded eraser into a fine point and lightly dab some graphite away.
Also, don’t feel like every eyelash needs to be drawn in a single perfect stroke. You can lightly sketch the shape first using an H pencil, then go over it with a darker pencil.
In my experience, drawing random, quick strokes won’t result in natural-looking lashes. It really helps to plan and draw each stroke carefully. One simple trick is to hover your pencil over the page and mimic the motion before touching pencil to paper. This makes it much easier to control the shape and angle you want.
Troubleshooting Stroke Quality
If your eyelashes look like checkmarks, try slowing down at the beginning of your stroke, speeding up only near the end where you need to flick your pencil up to form the tip. If that doesn’t fix it, try locking your finger joints and using your wrist to move instead.
Do your strokes look wobbly? You might be drawing them too slowly. Try gradually increasing your speed to see if that smoothes things out. It also helps to avoid resting your hand heavily on the page, using your elbow as your anchor instead.
If your stroke shape looks good but the texture is grainy, it might be your tools. Softer pencils and textured paper can cause this. Switching to a slightly harder pencil (like 2B instead of 4B) or using smoother paper can help you get cleaner lines.
Tips for How to Draw Natural Eyelashes
One of the fastest ways to ruin realism is to make everything too uniform.
In real life, eyelashes are messy. They overlap, clump together, cross over each other, and sometimes even grow in slightly unexpected directions. That randomness is what makes them look natural. Let’s explore 5 different ways to make our lashes look more natural:
1. Vary the Length
Even though lashes near the inner corner of the eye are usually shorter, we still want variation in length across the entire eyelid. We want to keep things a little uneven, even within the same area, so it doesn’t look too uniform. For a finished drawing, you can easily go back in to adjust lash length by adding to a lash or lightly dabbing it with a kneaded eraser.
2. Group Lashes
When every lash stands alone, the drawing can start to look like spider legs. Instead, let some lashes taper together or cross over each other in small groups of 2-4. This helps break up that stiff look and makes things look more interesting.
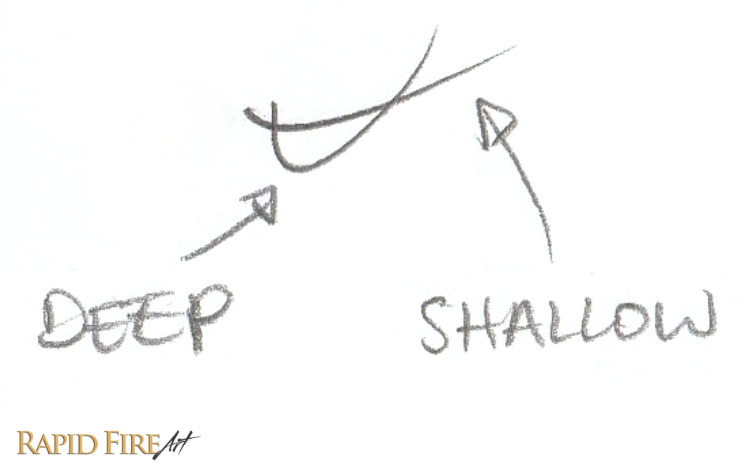
3. Vary The Curvature
Curvature is another thing to play with, and it can be super fun! Some lashes can dip lower, others can be shallow. Mixing that up helps prevent patterns from forming.
4. Vary Line Thickness and Value
You’ll also want to vary the thickness and darkness of your lines. Make some lashes bold and prominent, while others light and barely noticeable, especially near the tear duct.
5. Stagger The Roots
Finally, avoid placing lashes in a perfectly even row along the eyelid. Staggering the roots, even slightly, makes everything feel more organic. If you want to fix a completed drawing, just elongate the beginning of some lashes to shift where they appear to grow from.
Want to practice on the same eye I’m using in the step-by-step tutorial? Grab my free printable worksheets below and experiment freely on the pre-drawn eyes.
How to Draw Eyelashes Step-by-Step Tutorial
Now let’s put everything together.
Before we begin, draw an eye and finish all your shading and blending before you add the lashes. Blending afterward will blur and smear all your hard work.
Step 1: Plan the hair direction (Draw Your First 3 Lashes)
Figure out what direction the eye is facing so you can apply the right amount of curvature to each eyelash.
For a front-facing eye, the middle lashes will face you more directly, so they’ll look like narrow “J” shapes, while the ones toward the sides will stretch into wider “J” shapes.
Using a sharp H pencil, lightly draw about 3 lashes on each lid. Once you’re happy with them, go over them with a darker pencil, like a 4B mechanical pencil, to define your main lashes. These will act as your guide as you start filling in the spaces between.
Keep in mind that lower lashes are usually shorter and thinner than the upper ones.
For the next few steps, we’re just going to build everything around these. This is where it starts to get fun 🙂
Step 2: Fill lashes section by section
I’m going to work from left to right, but you can start anywhere. It helps to work in small sections so things don’t feel overwhelming.
Quick tip: Place a clean sheet of paper under your hand so you don’t smear your drawing. We want to keep these lashes nice and sharp.
Use your H pencil again to draw light lashes that act as guidelines. These should be easy to erase if needed. Think of them as training wheels.
As you get more comfortable, you can skip the light sketch and go straight in with your darker pencil. One thing that helps is hovering your pencil over the page first and mimicking the motion before committing to the stroke. It’s a simple way to plan the shape and angle without making a mark.
As you add more lashes, focus on creating a natural transition between angles instead of forcing a perfect blend. Don’t be afraid to mix things up, like adding a few narrow J’s where wider ones would normally go.
Step 3: Add unique lashes
Now that your eyelashes are starting to build up, begin introducing more variation.
Add lashes that overlap, some that taper together, some with stronger curves, and others that are slightly longer or shorter. At this stage, it might look a bit sparse or even a little weird. That’s completely normal.
If you find yourself falling into a pattern and things start looking too uniform, try jumping back and forth between different areas of the eye instead of working in order. This small reset can help you break out of repetitive strokes.
Step 4: Spread lashes out(focus on the big picture)
If you’re having trouble moving along, it might be because there’s too much space between your initial anchor lashes from step 1. These huge gaps can feel difficult to fill, plus, staying in one section for too long can make you lose sight of the bigger picture. Try spreading your lashes out first, so you have more anchor points to guide you as you fill in the spaces.
These new lashes act like little bridges between your original anchors, helping you plan out the overall shape your eyelashes are forming. For me, I’m shaping my lashes to follow the natural curve of the upper eyelid crease. Once that bigger shape feels right, it becomes much easier to go back in and fill the smaller gaps without constantly shifting between detail and overall structure.
Step 5: Introduce a new layer
Eyelashes don’t just grow in a single, boring row. On the upper eyelid, I’m adding an additional layer of lashes beneath the ones I just drew. This adds depth and makes the drawing feel more natural.
Step 6: Continue Filling the Gaps
Having fun yet? I am 🙂
This part might look complicated, but all I’m really doing is adding more strokes beside existing lashes. You can add less if it feels too crowded.
You can keep the lash variations subtle, like I have, or push it more. It’s up to you. Add lighter lashes, darker ones, straighter ones, curvier ones, and let some cross over or taper together.
Once you’re done, take a step back and look at your drawing as a whole. You might notice some lashes you want to tweak to improve balance or guide the viewer’s focus
Step 7: Add some shading
If you’re happy with your lashes, it’s time to shade.
Although eyelashes are thin, they do cast shadows, and this step helps ground them so they don’t look like they’re just pasted onto the drawing.
I’ve shaded the area behind and below the upper lashes, and just below the lower lashes to help ground them. You can also add subtle circular shading around the base of the lashes to suggest a bumpy texture along the eyelid. If your eyelashes don’t look integrated into the drawing yet, this step usually makes a big difference!
Step 8: Final Details! Add some eyelash reflections
To finish things off, add some subtle eyelash reflections in the eye, and we’re all done!
Final Thoughts
If your eyelashes still don’t look quite right, that’s completely normal. This is one of those things that takes a bit of practice, especially getting used to the flicking motion and figuring out which lash combinations look good together.
Try focusing on improving one thing at a time, whether that’s your stroke quality or how you vary your lashes. You’ll improve much faster that way.
If you’re using my worksheets, don’t be afraid to fill a couple of pages with “bad” lashes first. The more reps you get in, the more natural it will start to feel. Don’t beat yourself up if it’s not clicking right away. You’ll get there!
If you found this tutorial helpful, let me know which part made the biggest difference or where things are still confusing. That kind of feedback really helps me improve future lessons. Thank you!
If you haven’t downloaded the worksheets yet, you can grab them here and use them to practice on the same eyes from this tutorial.
Darlene created RFA In 2013 with the goal of sharing simple yet detailed drawing tutorials with other artists on the world wide web. She is a self taught pencil portrait artist and Youtuber.
Need some art gift ideas for the visual artist in your life? Here’s my top 12 list of affordable, awesome and unique gifts for adult artists. Some of these things I have and love, while others are on my personal wishlist.
1. Wacom Bamboo Spark
Transform any doodle or masterpiece from paper to digital ink like magic. The Bamboo Spark Pen is perfect for any artist that loves drawing on the go or simply loves working with pen and paper. It eliminates the need for a scanner because the artwork can be saved and uploaded to any device with bluetooth capabilities.
2. Monthly Art Subscription Box
Websites like SketchBox, ArtSnacks, Cratejoy and SmartArt offer monthly subscriptions on cool art-themed goody boxes delivered straight to your door every month. A great way to discover new art supplies and get those creative juices flowing!
3. Tracing Light Board
This is seriously one of the coolest things ever! If you know someone who likes drawing comics or manga, this light board is a clear winner! It has multiple brightness settings so you can trace almost anything you want. I don’t draw comics, but I’ve always wanted one!
4. Smudge Guard by Jeannie Lit
For graphic designers and the like, a smudge guardwill help your hand glide smoothly across the the surface of your wacom tablet. Never worry about sweaty hands again!
For traditional artists who work with pencil and paper, it prevents the skin’s natural oils from transferring to your artwork. I use my smudge guard all the time and LOVE it! It reduces smudges significantly!
This one comes with a painting palette and a built in storage box for easy access to drawing or painting tools. It has a convenient handle on the side, so you can easily store it away when not in use or carry it outside for a day of landscape drawing or painting in the park.
6. Nomad FleX Paintbrush Stylus
The Nomad FleX is a flexible and soft stylus for tablets and smart phones designed to feel like a real paintbrush so you can paint without all the mess. Its fine tip prevents it from spreading out and gives you precision with each stroke.
8. Art Mannequins and Models
Adjustable mannequins are great study subjects for new artists to practice drawing different poses, and learn about proportions and shading. Aspiring comic or manga artists can use mannequins to model a wide array of poses for their characters.
Shading is a tricky skill to master and it really helps to study it using a tangible 3D object instead of a flat image on a computer screen. With a realistic model, you can study and practice your shading to perfection by applying various lighting angles and intensity levels.
I hope this list gave you some good present ideas! If you’re an artist and you own any of the items listed above, let us know what you think about it. Also, what’s on your wishlist?
Darlene created RFA In 2013 with the goal of sharing simple yet detailed drawing tutorials with other artists on the world wide web. She is a self taught pencil portrait artist and Youtuber.
This tutorial has 3 examples for you to draw from: Overbite, Normal Bite and Underbite. When going through the tutorial, please pick only 1 example to follow instead of drawing all 3 lips at the same time.
Canson Sketch Paper (I find sketch paper so much harder to work with if I want to blend smoothly. I much prefer working on Canson Bristol. Unfortunately out of bristol paper at the moment.)
How to Draw Lips from the Side:
Step 1: Choose top and bottom lip positioning
This first stroke will determine whether you will draw an overbite, normal bite or underbite.
Step 2: Choose the lip angle
This second stroke will determine the thickness of the top and bottom lip and whether the corner of the mouth with angle up or down.
Step 3: Draw a triangle
Turn your sketch into a triangle. The longer your triangle is, the wider the lips will be.
Step 4: Draw the mouth’s corner
Draw the corner of the mouth. This can be a simple dot, bracket, raindrop shape, triangle etc.
Step 5: Draw the top lip
You can start with the top or bottom lip. For this tutorial, I’m starting with the top.
Draw a curve that starts at the top left corner of the triangle. This curve can roughly follow the shape of the triangle, jut out or be drawn well inside the boundaries. It’s all up to you.
Step 6: Complete the top lip
Connect the curve you just drew to the corner of the mouth. Avoid drawing a straight line across. It’s better to draw a slightly curved line than a completely straight one.
Step 7: Draw the bottom lip
To draw the bottom lip, start your stroke from the bottom left corner of the triangle and wrap it up until it touches the top lip.
Step 8: Draw the upper and lower lip
Draw the upper lip. Be careful not to extend your line too far. The upper lip should be roughly the same thickness as the top lip or more.
When drawing the lower lip/chin for underbites, make sure the curve is less pronounced. The bottom set of teeth push the bottom/lower lip forward, reducing a lot of curvature.
Step 9: Draw the rim of the top and bottom lip
Using your HB pencil with as little pressure as possible, draw the rims around each lip, connecting them to the corner of the mouth. Then erase your guidelines.
Step 10: Add contour lines
Time to shade! If you think your lines are too dark, use your kneaded eraser to pick up 1 layer of graphite from your drawing. Then use a sharp HB pencil to lay down your contour lines.
Step 11: Shade the lips
Start building up more contour lines using your HB, 2B, then 4B pencils.
Around the rim of each lip, soften your edges so they don’t appear too harsh.
Step 12: Shade the skin
For this tutorial, I used circulism to shade the skin around the lips. I used a blunt HB pencil and built up layers and layers of circles. Then used a 2B to shade darker areas.
I shaded areas such as the lower lip, cheek, corner of the mouth, and skin directly under the nose a bit darker. If you still see a lot of white space, use your HB pencil to go over the skin with even more layers. Don’t press too hard or your circles will be very visible!
If you enjoyed this tutorial and would like to support RapidFireArt, please share this with your friends. Thank you!
Darlene created RFA In 2013 with the goal of sharing simple yet detailed drawing tutorials with other artists on the world wide web. She is a self taught pencil portrait artist and Youtuber.
Struggle with drawing lips in the 3/4 view? With this method, you’ll be drawing perfect lips every time!
Since my first lip tutorial was so successful, I decided to base this one off the same idea of drawing lips using a simple triangle. If you liked that one, you’ll enjoy this even more! (If you haven’t tried my first tutorial, I suggest you do that first before attempting this one. Click here).
Using an HB pencil, make a straight vertical line. Add another line going through it that is slightly angled.
Then, draw a triangle.
Step 2: Add a curve at the top
Make a curve close to the top of the triangle. This is the cupid’s bow. The distance of the curve to the base of the triangle will determine how big/thick the lips will be.
Step 3: Draw guidelines for the opening of the mouth
Draw a long shallow curve halfway down the triangle. The length of this line will determine the width of your lips.
Since the triangle is facing towards our left, the left side of the lip should be less visible, so draw your curve shorter on the left side and longer on the right side of the vertical line.
Step 4: Draw the rim around the top lip
Finish the outer rim of the top lip by connecting the cupid’s bow to the predefined corners of the mouth.
Step 5: Finish the top lip
While staying inside the triangle, draw another curve that sits on the outline created in step 4. Depending on how much you bring this part forward (left) or back (right), you can end up with a strong overbite or underbite.
Complete this section by following along the rest of the outline.
Step 6: Draw the bottom lip
Draw the bottom lip by starting at the base of the triangle and then curving your line up on each side.
The curve drawn for the bottom lip does not need to touch the corners of the mouth.
If the bottom lip looks like it’s coming out too much, simply erase and position it more to the right.
When you’re done, erase all the guidelines.
Step 7: Add some contour lines
Shading time!
Use any realistic shading technique of your choice. For this example, I’m going to use the contouring method. It’s great for shading lips because the lines help to create realistic lip wrinkles/texture. The more curved your lines are, the more plump the lips will appear.
Step 8: Shade
With an HB pencil, use my Shadow-Lining technique to do a rough outline of areas you want to highlight or areas of shadow. Then, shade outside the Shadow Lined areas. Use an HB, then 2B and finally a 4B to build up depth in your drawing. It’s okay to shade into the areas you Shadow Lined or even change it up slightly as you go along.
If you want the lips to look very glossy, make your highlights as clean as possible and your shading less gradual.
Step 9: Blend it
Use a blending stump to smooth out your shading. Blend using the same motion your contour lines are flowing. Do not blend from light to dark.
Step 10: Touchups
If your highlights are too dark, pinch your kneaded eraser and mold it into the shape of a curve similar to your contour lines and press it along areas of the lip you want to lighten.
Continue to lighten your highlights or even add softer graphite to darken areas such as the creases, corners of the mouth or shadows under the bottom lip.
Step 11: Optional
This step is completely optional. But I highly encourage it because it may take your artwork to a completely new level.
Depending on your preference, use your left or right hand to navigate your mouse down to the share buttons on this page and click on any social media platform to share this awesome tutorial with your friends!
If you enjoy my teaching style and want to see more tutorials on a regular basis, please share so I can continue to do what I do. Thank you for your support! :)
Wanna share your 3/4 lip drawings with me and other RFA readers? Submit your artwork via my facebook page and I’ll post it in the gallery!
How many tries did it take you to successfully draw lips in the 3/4 view? What steps did you struggle with the most? Let me know in the comments below!
Darlene created RFA In 2013 with the goal of sharing simple yet detailed drawing tutorials with other artists on the world wide web. She is a self taught pencil portrait artist and Youtuber.
This tutorial is a little different than the usual. Each step has 3 options for you to draw from: They are all noses in the 3/4 view, but the first one is level to the eye, the second one is a view from above looking down and the last is from below looking up.
To help you learn faster, please draw only one each time you follow the tutorial, not all three at the same time.
Decide on the angle you want to draw the nose. The slope of your 3D shape determines the height of the nose (how far it comes out of the face) and the width will determine the width of the nose.
Draw your outlines as light as possible using an HB pencil. I’m drawing them quite dark so you can see everything clearly.
Step 2: Add circles to the base
Draw two circles that are touching the far corners of this 3D shape (draw an extra circle for the third example. The circles should stick out of the bottom halfway.
Step 3: Draw the upper nose bridge
Using a softer pencil such as a 2B, draw a curve at the top of the 3D shape to define the nose bridge and beginning of the brow bone. For a strong brow, exaggerate this curve more.
Step 4: Draw the nose’s tip and bridge
Draw the nose’s tip by following the shape of the main circle.
Wrap your line up towards the bridge of the nose and give the tip a unique shape.
Connect that line to the top. It’s boring to follow the 3D shape exactly, so add some bumps and such to make the nose look more interesting.
Step 5: Outline the nostril wing
Draw a curve along the remaining circle(s) to make the nostril wing(s).
Step 6: Draw the nostril
Not sure how big to draw the nostril? Use the circles and the base of the 3D shape as a general boundary.
I didn’t draw a nostril for the second nose because the nostril isn’t visible from this particular angle for this particular nose.
Step 7: Prepare for shading
In preparation for shading, draw a curvy line along the other side of the bridge that mirrors the bridge shape you’ve already defined from step 4.
Lighten or completely erase any unneeded guidelines.
If your shading is very light or you’re afraid of any outlines showing through, use my shadow lining method.
After you’re comfortable with drawing a few noses, try skewing the 3D shape or experimenting with different circle sizes like the examples below:
Darlene created RFA In 2013 with the goal of sharing simple yet detailed drawing tutorials with other artists on the world wide web. She is a self taught pencil portrait artist and Youtuber.
Want to set up an artist website without the headache?
Follow my step by step guide and get your website up and running today!
In this tutorial, I’m going to show you how to sign up to a hosting provider and get your website up and running. I’m going to use tons of pictures for each step so the task is painless. It was a big headache for me when I first started out!
I will take you from zero to having a website that’s ready to work on in no time!
Step #1: Choose your Website Platform
A website platform or content management system (CMS) makes it easy even for non technical people to build a website. It requires little to no coding or design skills.
The most popular platform is WordPress, which is what I use for all my sites and sites I build for other people. It’s very beginner friendly and that’s why I’m recommending it to you. Also, it’s FREE!
You can access thousands of free website designs to create the website you want with just the click of a button. Here are just a few examples of the free designs you can download for your site:
One of my favorite things about WordPress is how easy it is to install new designs and plugins. It’s like playing with lego – you can remove a piece just as easily as you attached it.
Plugins are add-ons to your site like slideshows, galleries, social share buttons and more. Currently, the WordPress plugin directory contains more than 46,000 plugins and the number grows every day. Whenever I look for a specific plugin, I’ll have at least 15 free plugin options to choose from.
For a non-techie person like myself, WordPress makes building websites fun! Plus, there’s a huge community of developers and free how-to guides and videos everywhere on the web.
If you’re not interested in WordPress, here are some other popular platforms you can check out:
This step by step tutorial is specific to WordPress. So you may want to find another tutorial if WordPress isn’t the CMS of your choice :)
Step #2: Choose your Web Host and Domain Name
Selecting a platform is only the beginning, you also need to have a web host and domain name for everything to work. Since this guide is on how to build a professional artist website, I’m suggesting a paid host.
There are free options out there, but I highly discourage using them because your site will have a low bandwidth limit, load slowly especially for portfolio sites, rank lower in search engines, have limited design and customization options and be hosted on a sub-domain which looks unprofessional to prospective clients (Eg: yourname.freeblog.com).
I Recommend BlueHost.com – it’s Cheap and Great for Beginners
Bluehost is a very popular web host for beginners and a great option to start your art website. BlueHost’s prices are very affordable, with their basic hosting package priced at only $3.45/month. When you register, they even give you a FREE domain. I usually purchase my domains from namecheap.com, so this offer saved me $14 right off the bat!
BlueHost’s control panel is friendly for non-techie people, you can create professional business emails with them (eg: yourname@yourdomain.com), their bandwidth is unmetered and they offer one click wordpress installs so you can start designing your website in minutes! (I’m going to take you through the entire process later).
Select a Domain Name for Your Site
This part is fun! Get your pen and paper out and start brainstorming!
If you’re like me and you want to create a brand for your website, choose a name that is easy to remember, easy to spell and is short. Avoid using hyphens and make sure your domain name looks good without spaces. Eg: DrawingMastery.com instead of masterofart.com
If you’re creating an art portfolio or personal website, it’s a good idea to use your name. It looks great on a business card and is easy to remember (unless your name is Eedara Veera Venkata Satyanarayana). In that case, it may be better to stick to your initials.
I always choose a .com address because it’s easy for people (such as clients) to remember, it looks more professional and I strongly believe Google prefers it over .club, .online, .design and even the popular .net.
I can never remember if a domain ends in anything other than .com. If that applies to you too, you can be sure that your clients are the same as well.
You can use the search box below to check if your domain name is already taken:
Step #3: Purchase Hosting and Get Your Free Domain
If you want to host your art website with BlueHost (which I personally suggest and trust), go to www.BlueHost.com and select a package that best fits your needs. If you want to create multiple sites, the second plan offers you the ability to host an unlimited amount of websites (please note that when you sign up, you only get 1 domain for free).
After you select the package you need, you’ll be able to enter your desired domain name:
Next, you’ll need to create an account. At the bottom of the page, you’ll be asked to select a few package add-ons before checking out.
The most important ones to me are Site Backup Pro and SiteLock Domain Security. But you can easily backup your website and protect it from malware using free plugins.
If you want to sell products/services on your website, having a SiteLock certified site will be a good idea. I personally do not check any of the add-ons.
Once you go through the payment system, continue to step #4.
Step #4: Install WordPress
Once you’re signed in, you will land on your BlueHost dashboard. From there, scroll down to the tab labelled ‘Website’ and click ‘Install WordPress’.
You’ll be asked to do the installation yourself or with the help of a pro. To install it yourself, select the domain you want to install WordPress on. I leave the directory field blank (this will install WP in your website’s root folder).
After you hit the ‘next’ button you’ll be prompted to enter the name/title of your site, username and password. Your username cannot be changed easily, so choose a good one.
After you hit the ‘install’ button, your installation will start. It should take less than a minute. Then click the ‘here’ button.
On the next page, you’ll be given your site login link, username and password. Click on the link and enter your login credentials to sign into your art website.
If you click on the link and land on a page that looks something like this. Don’t panic. Refresh the page in 30 or 60 minutes until you get the WordPress login page.
After you login, you’ll be introduced to your WordPress dashboard. When you try to access your site in a new browser (where you’re not logged in), it should display a “Coming Soon” page. You can launch your website by clicking “launch” from the dashboard when you’re ready to publish it to the world!
Before you launch your art site, you’ll want to install a WP theme.
Step #5: Choose and Install a WP Theme for Artists
If you’re creating a portfolio website, here are a few free and premium WP portfolio themes you may like:
Magnetic – Free HTML5 Responsive WP Template
Simple and clean design with easy left sidebar navigation. Responsive template adjusts well to desktop, tablet and smartphones. DemoDownload
Create multiple grid, masonry and even video galleries for your artwork and display as many images as you want in each. Responsive design looks and behaves well on desktop, tablet and smartphone. DemoDownload
Design your own galleries using various grid style layouts. This theme features cool transitions and animations when switching between pages and scrolling. Demo Download
Simple drag-and-drop interface with a minimalistic, sophisticated and slick design. Enjoy smooth scrolling and unique transitions between pages. Arrange your pages into a grid style gallery or break it up with a dynamic flowing layout. Demo Download
Choose from 4 different gallery styles: masonry grid, grid view, expanding grid and pinterest style. Comes with Visual Composer, the #1 most popular drag-and-drop page builder (value of $34). DemoDownload
Do you like the theme I use on RapidFireArt? You can get it here. It’s called Newspaper – my favorite theme of all time because of how customizable it is (I’ve tried more than 20 different free and premium themes and was never satisfied until I got this one). You can check out the different layouts using the preview button on the sales page.
Note: This theme is not a portfolio theme! It’s great for blogging though :)
Newspaper – Responsive Magazine Theme with Visual Composer Drag-and-Drop Builder
Installing Your Theme
After you download your theme, it should show up as a zip file. If you purchased a premium theme through ThemeForest, make sure you select the download option of ‘Installable WordPress File Only’.
Now go back to your WP dashboard and click ‘Appearance‘ and then ‘Themes‘.
On the next page click ‘upload‘.
Then click ‘upload theme‘
Select your theme’s zip file and hit ‘install now‘.
When the upload is complete, you’ll get a screen that looks like this. You can choose to preview the theme or activate it. The preview option is good for when you already have your website fully setup and want to test out other themes without actually changing how your site appears to clients or readers.
Hit ‘activate’ and wait for the next page to load.
Your theme installation is now complete! Depending on the theme you installed, you may be recommended some additional installations (plugins) which compliment your theme.
Once you’ve installed the necessary plugins, it’s time to customize your website. For the newspaper theme in this example, customizations such as site colors, page layouts, fonts, etc can be made in the ‘theme panel’ under the ‘Newspaper’ tab. If you can’t find the tab for your theme, go to ‘appearance’ > ‘customize’.
If your theme has a drag-and-drop builder like visual composer, you can design the layout of a page or post by selecting the backend editor when creating/editing a page or post.
Once your gallery or blog post is up, launch it so you can share your artwork with the world!
Now you’re on your own! That wasn’t so bad, was it?
Before you go, let me leave you with a list of free and premium plugins I use on my websites like the one you’re on right now:
Google XML Sitemaps – Help search engines better index your pages Wp Smush It – Minimize the weight of your images to increase your website’s speed All in One SEO Pack – Optimize your art website for search engines Easy Social Share Buttons – Beautiful share buttons with endless customization options to help increase your web traffic Social Locker – Increase your social media shares by locking things like premium content, guides, etc. Mail Munch – Collect emails and grow your list of subscribers Aweber Autoresponder – Send automated emails to your subscribers so you can keep them engaged with your business
I hope this tutorial on how to make an art website was helpful to you and wish you the best of luck with your brand new site! I’m no tech wiz, but if you need any help or have any questions, let me know! I’ll try my best to help you out :)
Darlene created RFA In 2013 with the goal of sharing simple yet detailed drawing tutorials with other artists on the world wide web. She is a self taught pencil portrait artist and Youtuber.
RFA uses cookies to offer you a better browsing experience, analyze site traffic, personalize content, and serve targeted ads. By clicking accept, you are helping to support my site and keep drawing tutorials free 🙂. Not a fan of cookies? No worries! Adjust your preferences in the settings! Not consenting may affect some features and functions such as embedded video tutorials.
Functional
Always active
The technical storage or access is strictly necessary for the legitimate purpose of enabling the use of a specific service explicitly requested by the subscriber or user, or for the sole purpose of carrying out the transmission of a communication over an electronic communications network.
Preferences
The technical storage or access is necessary for the legitimate purpose of storing preferences that are not requested by the subscriber or user.
Statistics
The technical storage or access that is used exclusively for statistical purposes.The technical storage or access that is used exclusively for anonymous statistical purposes. Without a subpoena, voluntary compliance on the part of your Internet Service Provider, or additional records from a third party, information stored or retrieved for this purpose alone cannot usually be used to identify you.
Marketing (Activating this supports my website via ads, keeping tutorials free)
The technical storage or access is required to create user profiles to send advertising, or to track the user on a website or across several websites for similar marketing purposes.