
5 Common Mistakes When Drawing Eyes
If your eye drawings aren’t quite matching what you see in your head, even after adding tons of detail and shading, you’re definitely not alone. It usually comes down to a few factors that flatten your drawing or push it into a more stylized look without you realizing it. Here are some of the most common mistakes that can make your eyes look less realistic and what to do instead:
Common Mistake #1: Bold Outlines
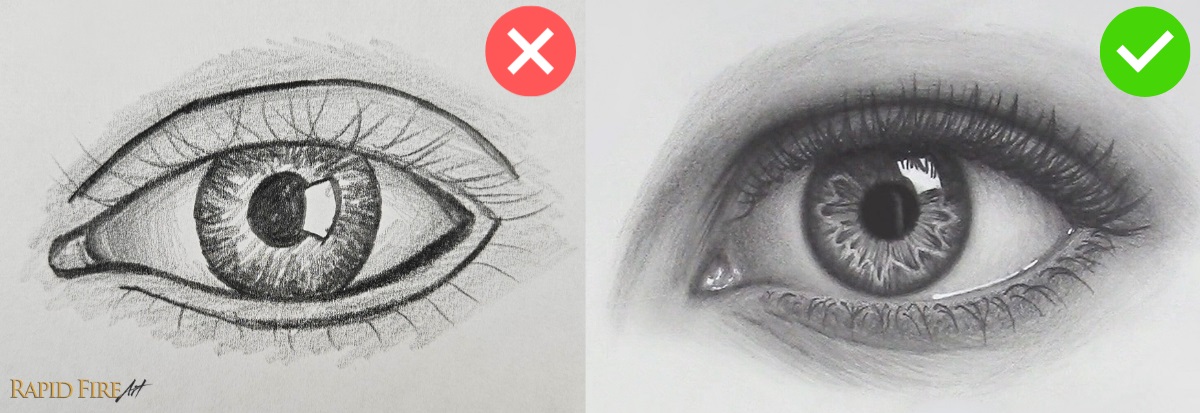
Outlining the entire eye with a thick, dark outline is one of the fastest ways to make it look flat or cartoony. In reality, the eye doesn’t have a consistent outline. Some edges are soft, some are sharp, and some almost disappear completely depending on the lighting situation.
What to do instead:
- Try to make outlines subtle enough that they blend in or disappear as you shade.
- Let your shadows define the form instead of lines.
- Keep your darkest lines only where the form actually turns sharply.
Want to learn how to draw the eye above from complete scratch? Follow this step-by-step eye drawing tutorial.
Common Mistake #2: Incomplete Shading

A lot of beginners only shade the iris or pupil, leaving the rest of the eye almost untouched. This makes the eye feel pasted on instead of integrated into the face.
What to do instead:
- Make sure to shade the entire eye, leaving only your highlights white.
- Add subtle shadows to the whites of the eyes since they’re not actually white.
- Eliminate gaps between your pencil strokes to avoid making it look like a rough sketch or unfinished.
Common Mistake #3: Lack of Value Variety
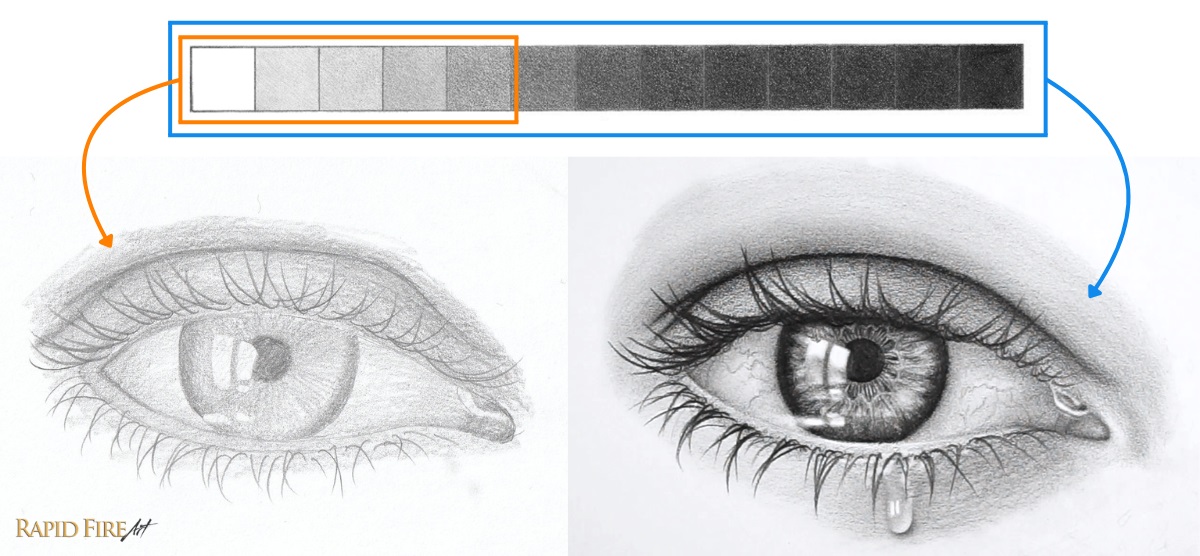
If a drawing is limited to lighter tones, it can look dull and flat. Realistic eye drawings rely heavily on contrast to help push and pull elements of the drawing, giving it the illusion of depth.
What to do instead:
- Intensify your dark values to make the drawing less “washed out” and bring in some depth.
- Use a full range of values from light grays to deep blacks. This contrast is what gives the eye that “alive” look.
- Save pure white for highlights. It’s what makes the eye look wet and reflective.
Common Mistake #4: Unrealistic Lashes
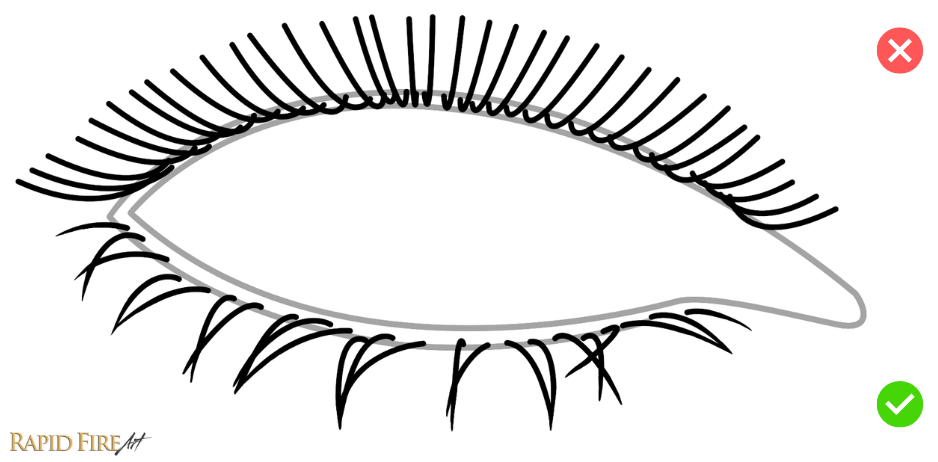
Drawing lashes as stiff, evenly spaced spikes that form a predictable pattern can instantly break realism. In reality, lashes are messy, can overlap each other and sometimes point in an unpredictable direction.
What to do instead:
- Draw lashes in clusters that taper together and crossover each other
- Vary their length, thickness, direction, and curvature to make them look more random.
- Avoid making them too evenly spaced or symmetrical
If you want a deeper breakdown, check out my eyelash tutorial here (New: I’ve added free practice worksheets to help you actually apply it on a fully shaded eye).
Common Mistake #5: Wonky Iris Shape
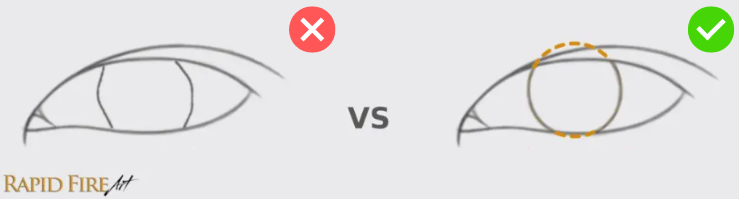
The iris is a circle, but many drawings accidentally squash or distort it. A really common mistake is drawing bracket shapes inside the eye, which usually results in an uneven or oblong shape.
What to do instead:
- Draw the iris as a full circle, even if it’s partially covered by the eyelids. You can erase the unneeded parts afterwards. Drawing a full circle also helps with centering the pupil.
If you want a step-by-step breakdown of how to put all of this together, follow this in-depth eye drawing tutorial where I walk through the entire process from construction to shading. You can view the written guide or watch the full video tutorial if you don’t want to miss a single step.
Related Tutorials

How to shade an eyeball

How to Draw a Hyper-Realistic Eye

How to draw eyebrows on paper

How to draw eyes from the side – 10 steps

Ep 2: How to Fix Asymmetrical Eyes – Fix My Drawing Series
Darlene created RFA In 2013 with the goal of sharing simple yet detailed drawing tutorials with other artists on the world wide web. She is a self taught pencil portrait artist and Youtuber.
5 Common Mistakes When Drawing Eyes Read More »