
How to Draw A Realistic Eye with Detailed Iris
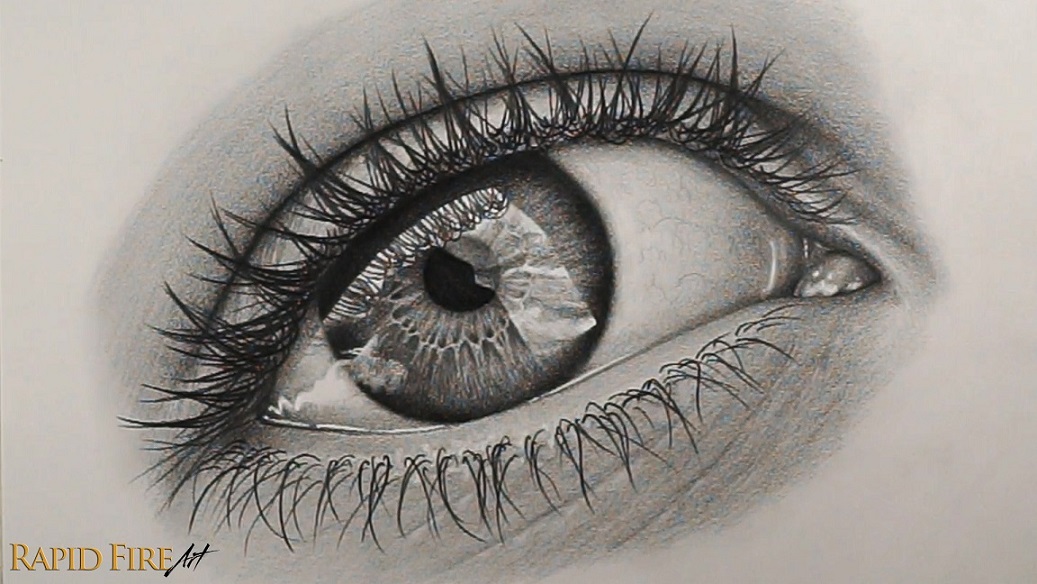
Can you draw a trapezoid? That’s the first step to drawing this realistic eye from scratch!
Follow along with me as I show you how to draw a realistic eye step by step. We’ll start by sketching the basic proportions and shaping the eyelids, then move on to adding depth through shading and layering on fine details.
The highlight of this tutorial is the detailed iris. We’ll draw simple yet intricate patterns to create a stunning eye that really stands out. I’ll also include short video clips throughout the tutorial to help you better understand how to achieve certain effects and bring your eye drawing to life.
Whether you’re learning how to draw eyes or looking to improve your realistic drawing skills, I’ll walk you through the entire process one step at a time!
Tools I Used
📢 You can use just an HB pencil (standard school pencil) for this tutorial if you want. Your drawing will just be a little lighter than mine. For the darkest zones, avoid pressing too hard, otherwise the graphite may look shiny instead of dark.
- Staedtler Pencils HB, 2B, 4B, 6B: https://amzn.to/3Lvmf1t
- White Gel Pen: https://amzn.to/4k3rvXj
- Mono Eraser Pencil: https://link.amazon/B03SJrrzd
- Mono Block Eraser: https://amzn.to/4pzVtmC
- Kneaded Eraser (or you can cut up a solid eraser): https://amzn.to/2IRrYtR
- Facial Tissue: https://amzn.to/2XNOqfw
- Canson Drawing Paper: https://amzn.to/4qoBQiU
- SmudgeGuard Glove: https://amzn.to/3LohfMi
Let’s get started!
Step 1: Draw a Trapezoid to Establish the Eye’s Proportions
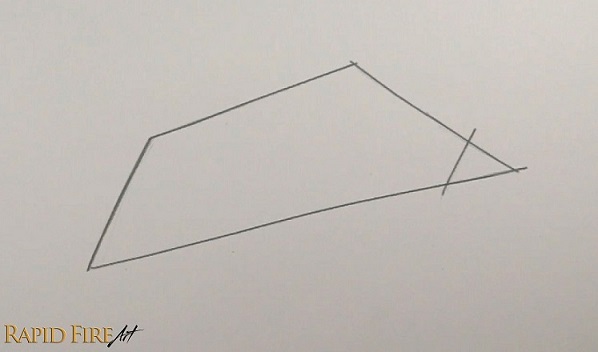
With an HB pencil, start by drawing a faint trapezoid on a slight tilt. Mine is 18cm across, in case you want to draw yours a similar size. Keep in mind that the smaller you draw your eye, the less iris details you will be able to add, and I think that’s the most fun part of this tutorial!
Step 2: Outline the Shape of the Eye
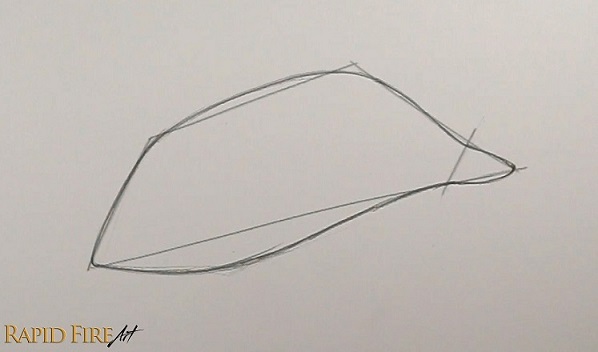
Using the trapezoid as a rough guide, draw a more natural eye shape. You can start by outlining the inner corner of the eye and rounding off the top corners of your trapezoid.
For the bottom eyelid, dip your pencil stroke down below the trapezoid guideline.
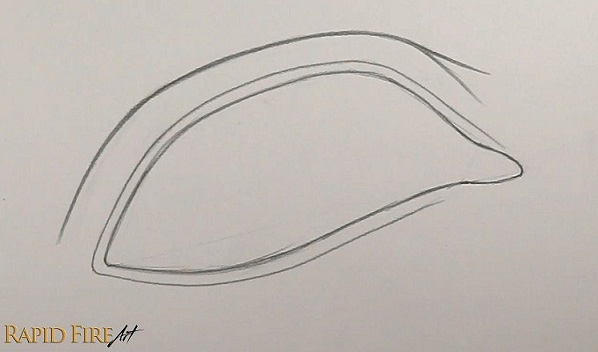
Around the top and bottom eyelid, draw a faint line to mark the eyelid ledges. Then draw the eyelid crease above the top eyelid. You can split the ends if you want.
Step 3: Draw the Iris and Pupil
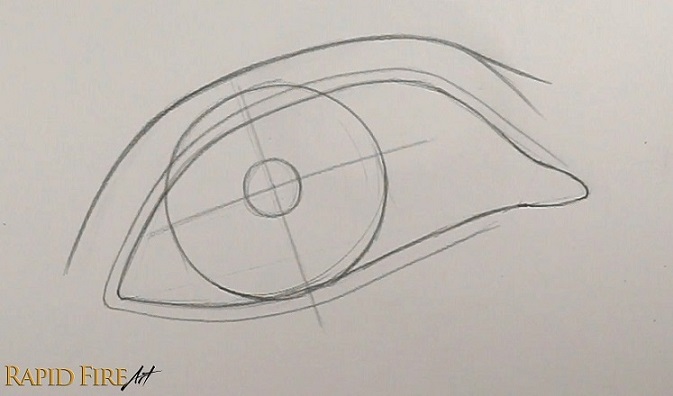
To draw the iris, measure the eyeball and divide that number in half to get the iris’s diameter. You don’t have to be exact! Position your iris so it is resting on the outline of the bottom eyelid. It is important to draw a full circle for the iris so we can make sure the shape isn’t skewed – it also helps us with placing the pupil.
The pupil should sit in the center of the iris. You can find the center by drawing a cross through your iris, making sure all 4 sections look equal. Then draw a small circle where the two lines intersect.
Once done, erase all the guidelines and the excess parts of your iris circle.
Step 4: Outline Highlights and Shade Intricate Iris Details
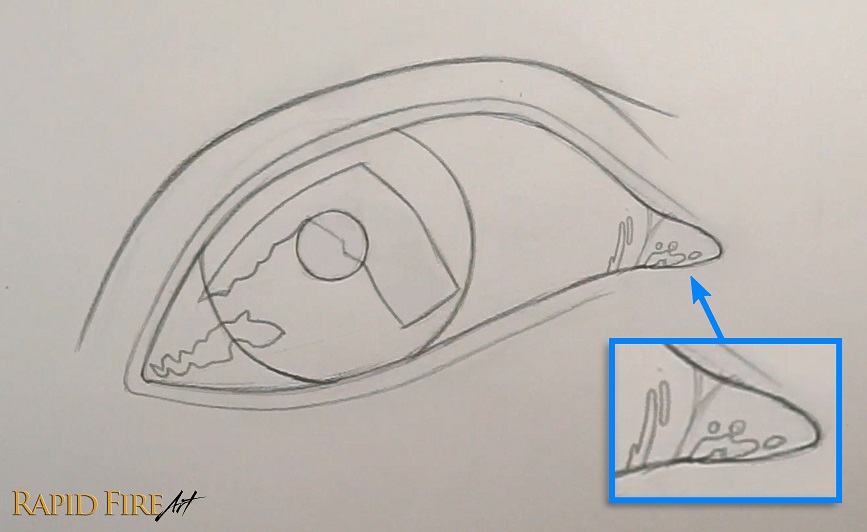
Now let’s outline some highlights within the eye. You can draw some ambiguous shapes or ones that are more recognizable, like a rectangular window or a round light fixture. These will be some of the brightest areas inside our eye, helping to make our drawing pop!
At the inner corner of the eye, I’ve outlined some blob shapes to make the area look wet.
Now let’s shade the intricate details inside the iris!
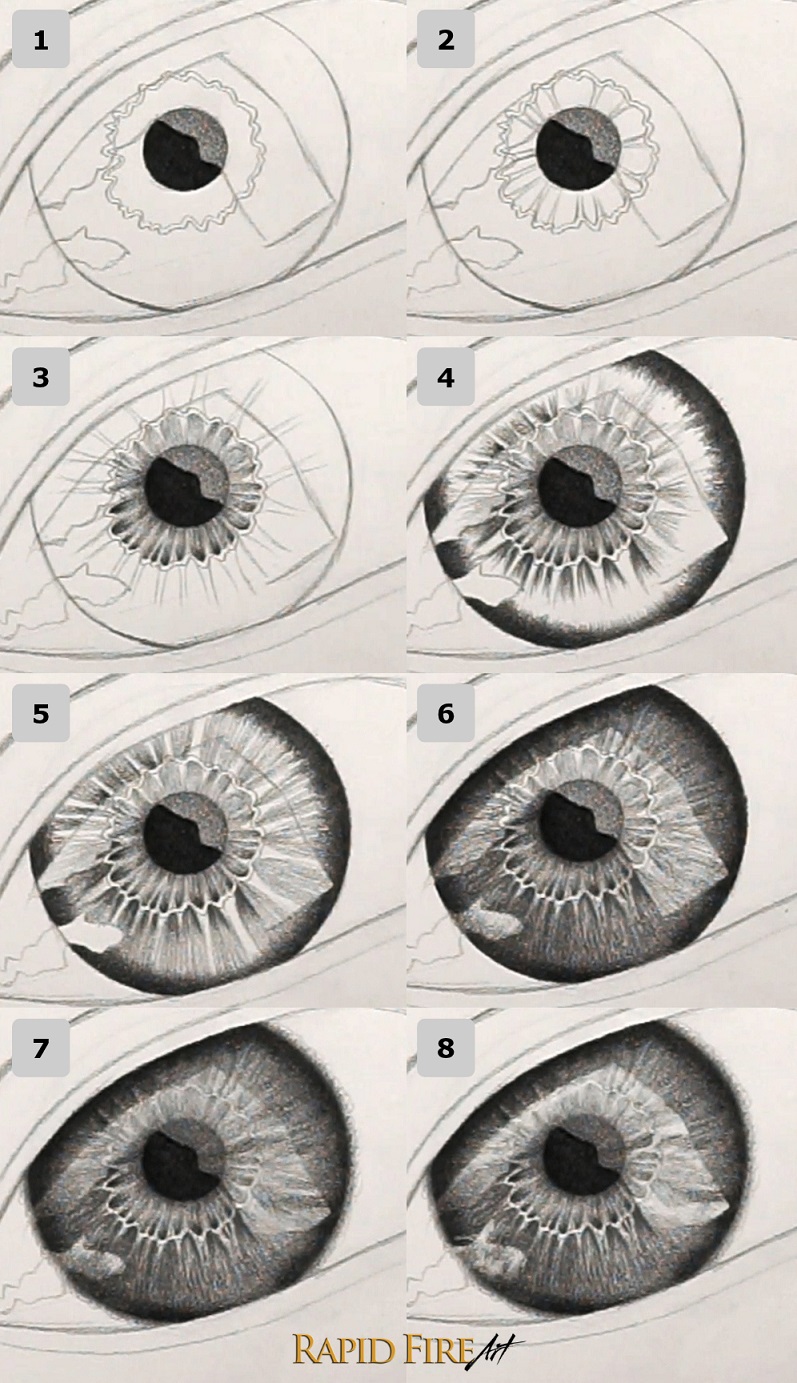
- Pupil: You’ll notice that it has 2 values (the lighter value shaded with an HB, and the darker one using a 6B). I’m going to shade everything lighter inside the highlight boundary. So every time you cross into a highlight, remember to switch to an HB pencil and lighten your details and shading.
- Wavy Ribbon and Main Spokes: Around the pupil, draw a very wavy ribbon. Then follow it up with an identical but smaller ribbon inside. Working inside the ribboned area, identify parts where the ribbon juts in toward the pupil. We will extend these like spokes of a bicycle, aiming them towards the pupil’s center.
- Dense Spokes/Fibers: Between each of these main spokes, draw densely packed lines that are darkest close to the ribbon and lighter as they reach the pupil. Watch the video clip below to see how this detail is drawn. Then darken the area around your pupil, fading out quickly. Now let’s hop outside of the ribboned area. Where the ribbon juts outward, create more bicycle spokes that radiate outward.
- Add dense lines between these main spokes just like we did earlier, fading your strokes out as you flick your pencil toward the edge of the iris. Shade a dark ring around the edge of your iris, aiming your strokes toward the pupil. You can shade it as dark as you like. I used a 6B pencil because I want the drawing to stand out.
- Switching back to the HB, continue to increase your stroke density, drawing radiating lines and blending the iris ring into the rest of the iris.
- Shade your iris as dark as you’d like while continuing to increase your stroke density. I’ve also lightly shaded over the main spokes so the white of my paper is no longer showing through.
- With a blunt pencil tip, shade in a light circular motion all the way around the outside of your iris. This helps create a gentle blurring effect. If you would like to soften the fine lines and details inside your iris, you can gently blur them out with a facial tissue. As an example, I gently blended the largest highlight so you can see what it looks like blended. If there is too much detail loss, you can add back some spokes and darker shading until the iris looks just right to you.
- Using a kneaded eraser, brighten random areas of your highlights. Bringing back some white, helps to make the drawing look more striking due to the high contrast. If the white parts don’t show up well, make sure you’ve shaded the surrounding areas dark enough.
Stuck on a certain step? If you would like to see me draw all the iris details, please watch the short video clip below:
Want to practice drawing realistic irises? My FREE printable worksheet lets you experiment with different patterns, fine lines, and shading techniques without having to redraw the entire eye. Print as many copies as you need and practice until you get the results you want!
Step 5: Shade Eye Whites and Inner Corner of the Eye
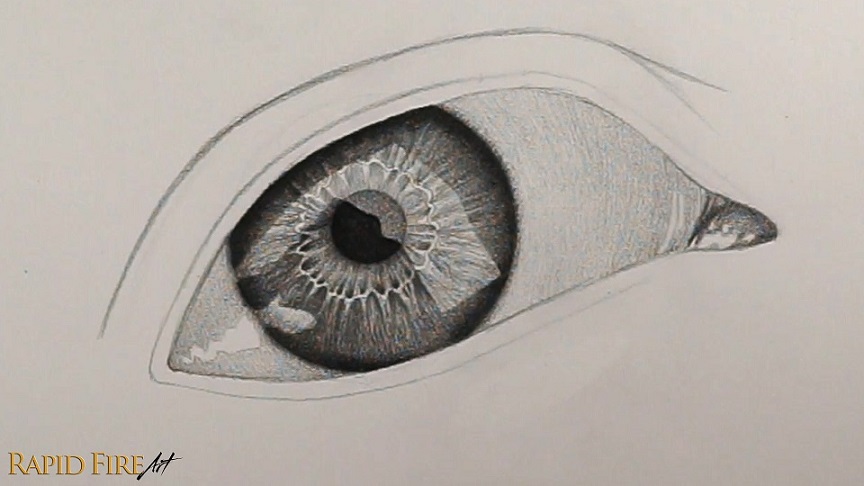
With an HB pencil, shade the inner corner of the eye with a solid, medium layer of graphite first. Shade carefully around your highlights so they remain white. Then add another layer of graphite, but this time shade it darker near the boundary of the skin and eyeball so the flesh looks raised in the center.
Next, shade the rest of the eyeball. Using a dull pencil tip, lay down a light and even layer of graphite to start. We want to make sure the eyeball isn’t white. This will help our highlights stand out more.
Tip: Try to shade with as few gaps as possible. If your strokes have lots of gaps between them, try shading with curved lines to avoid making the eyeball appear flat, and use the side of your lead so your strokes are thicker and more forgiving. Which way to curve your strokes? Use the iris edge as a reference.
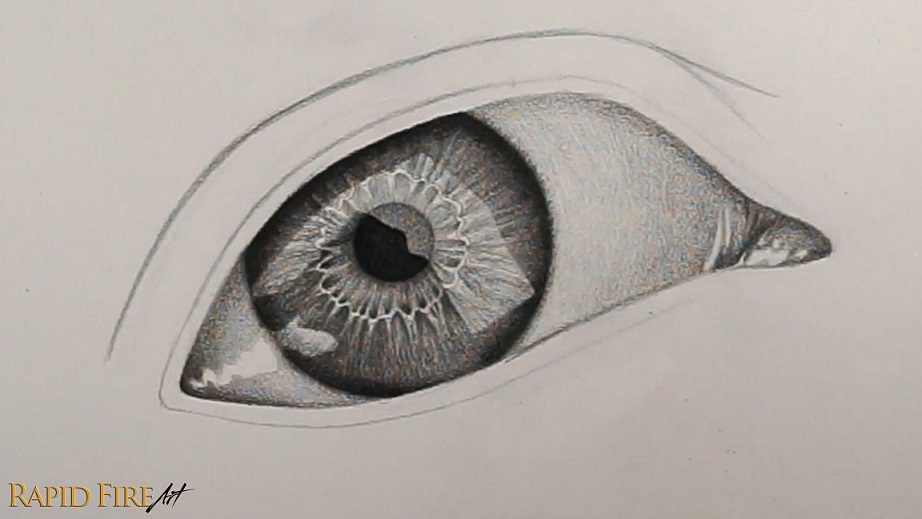
To make the eyeball look spherical, we need to shade darker along shadow zones so it looks like the surface curves away from the light.
Shadow Zones:
- Shade a cast shadow all along the top of the eyeball,
- a gradual shadow along either side of the eyeball,
- and a subtle shadow at the very bottom of the eyeball.
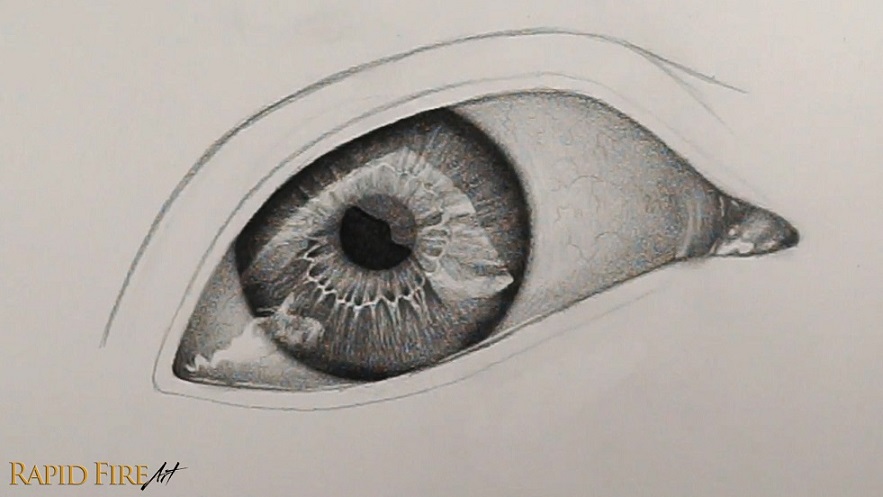
Blend all your shading along the eyeball and inner corner of the eye with a regular facial tissue wrapped around the pad of your finger. Go from a light zone into a darker one to prevent unwanted smudges and use a new spot on your tissue with every swipe or every few swipes, depending on how dirty the tissue gets.
Along the eye whites, you can add blood vessels if you want. Just use an HB pencil with very light pressure to draw squiggly branch-like shapes, then blend with a tissue to soften them. I added some thin highlights where the eyeball meets the bottom eyelid. You can use a flattened kneaded eraser or cut up a solid eraser to get these thin lines.
Step 6: Shade the Skin Surrounding the Eye
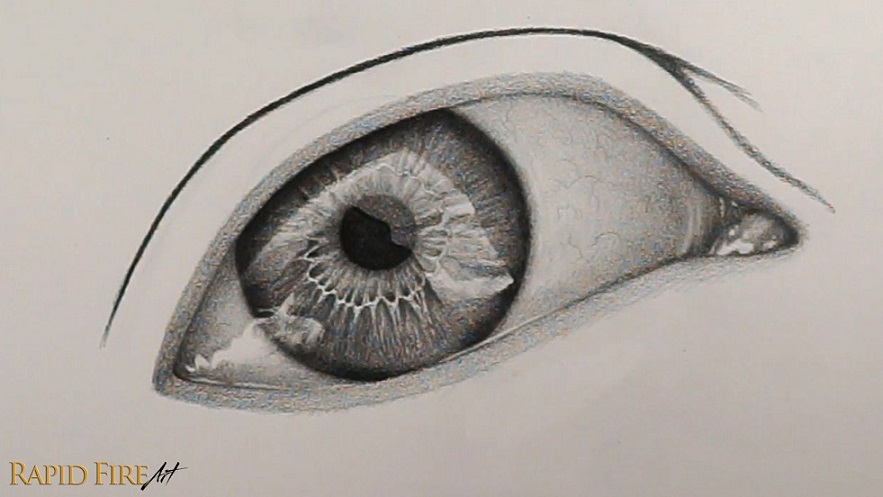
Let’s shade the skin now, starting with the eyelid ledges (HB pencil). Start with a light, even layer of graphite along both top and bottom ledges. Then, along the top ledge, shade the left and right sides darker, making your pencil strokes lighter gradually as you approach the mid-point of the eye. For the bottom ledge, darken the left side only.
With a 2B pencil, darken the eyelid crease significantly but lighten up at the ends.
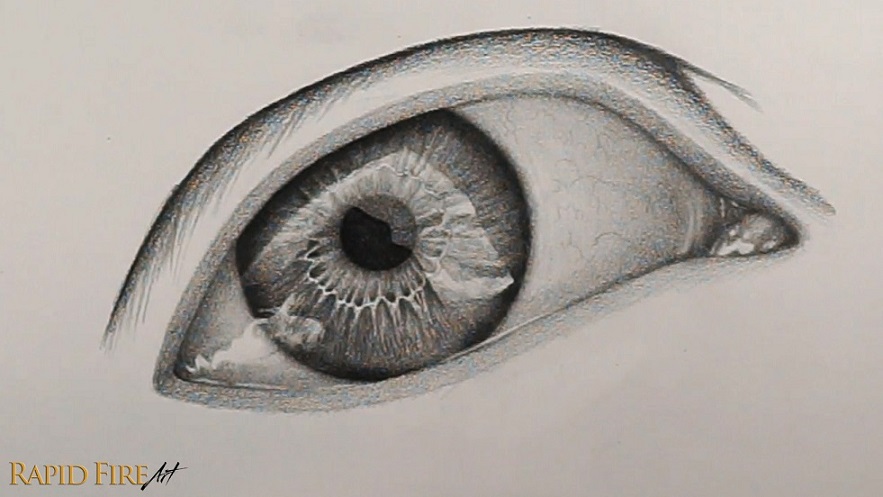
Still using the 2B pencil, shade the top eyelid, starting right below the eyelid crease. We’re going to shade darkest near the crease, matching the dark value, and lighter as we move down toward the eyelid ledge.
Along the left side of the lid, draw some wrinkle lines using the tip of your pencil. If they start blending together and looking less like wrinkles, vary your stroke angle, pressure, length, and spacing.
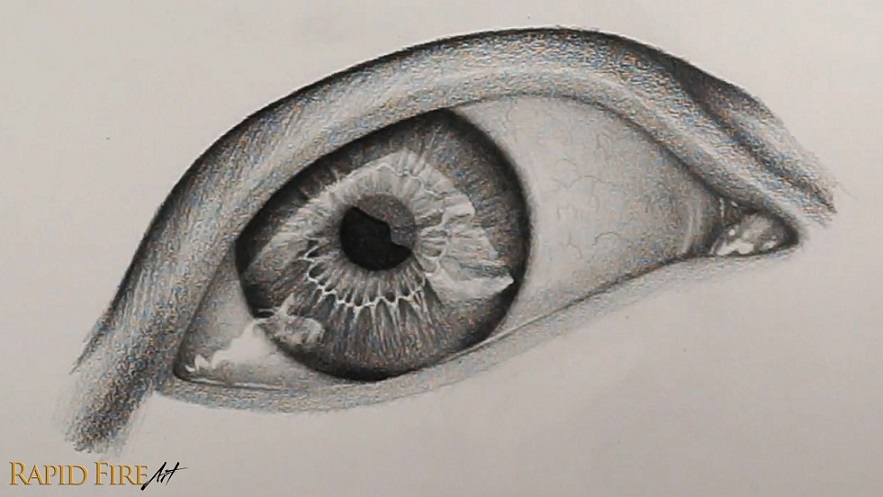
Shade very lightly along the bottom of the top eyelid. This should soften the value transition leading into the eyelid ledge.
To make the eyelid look as though it’s hugging the spherical eyeball, shade the left and right side a little darker, lightening up gradually as you shade towards the mid-point.
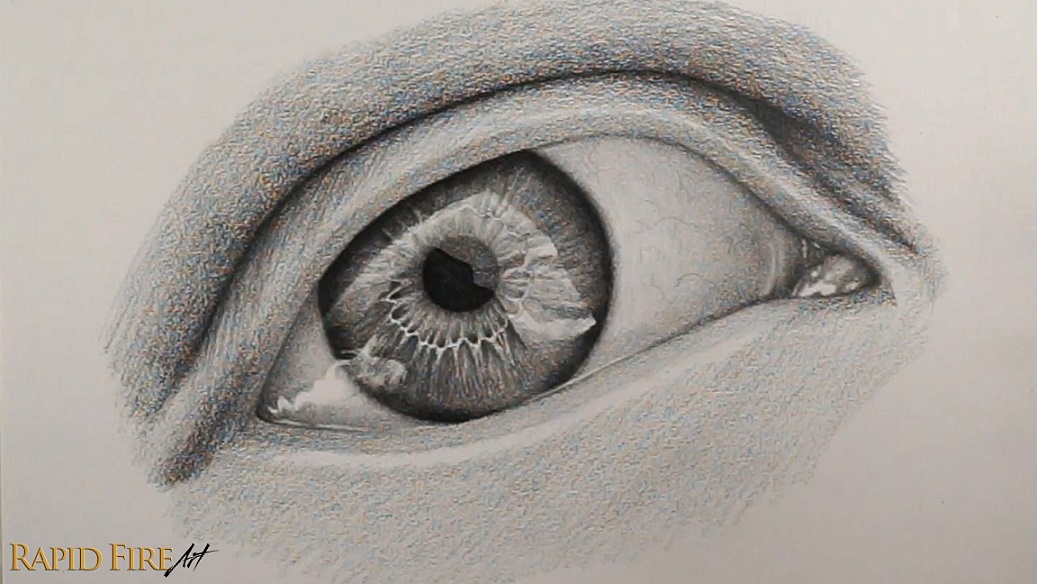
Now let’s shade above the eyelid crease, making sure the value is darker near the crease and lighter as you work your way up.
Where the crease splits into two paths, again shade darkest near the crease and lighter as you move away from it. This will make the skin look raised in the middle.
Along the bottom eyelid, shade a light, even layer of graphite to start. You can use an HB pencil to avoid shading it too dark. Leave a small strip of light directly under the eyelid ledge. Slightly darken the very left side of this strip.
Click here to learn how to shade smoothly and understand where to add shadows.
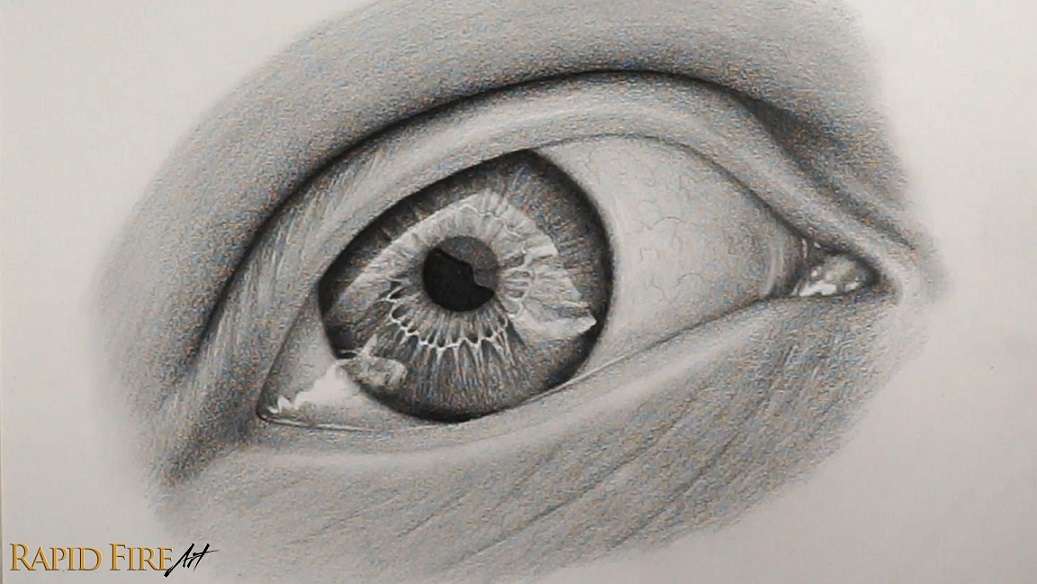
Add some wrinkles along the bottom eyelid. You can draw these by making a series of short, dark strokes instead of solid, continuous wrinkle-lines. Blend them with a tissue to soften the effect. While you’re at it, shade the right side of your bottom eyelid slightly darker to give it shape.
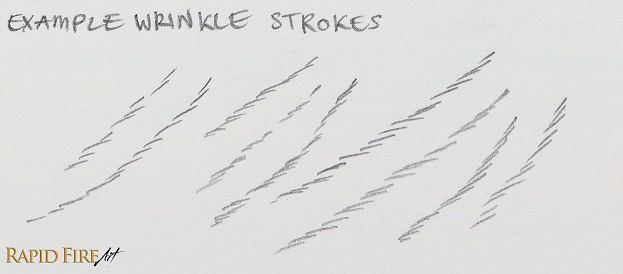
If you want the wrinkles to show up better, go along the bottom of each wrinkle stroke with your flattened kneaded eraser or a cut-up solid eraser and use the sharpest point to introduce some light. You can do the same for the wrinkles along the top eyelid.
Learn how to make a kneaded eraser using a solid eraser and a post-it note!
Step 7: Draw Realistic Eyelashes
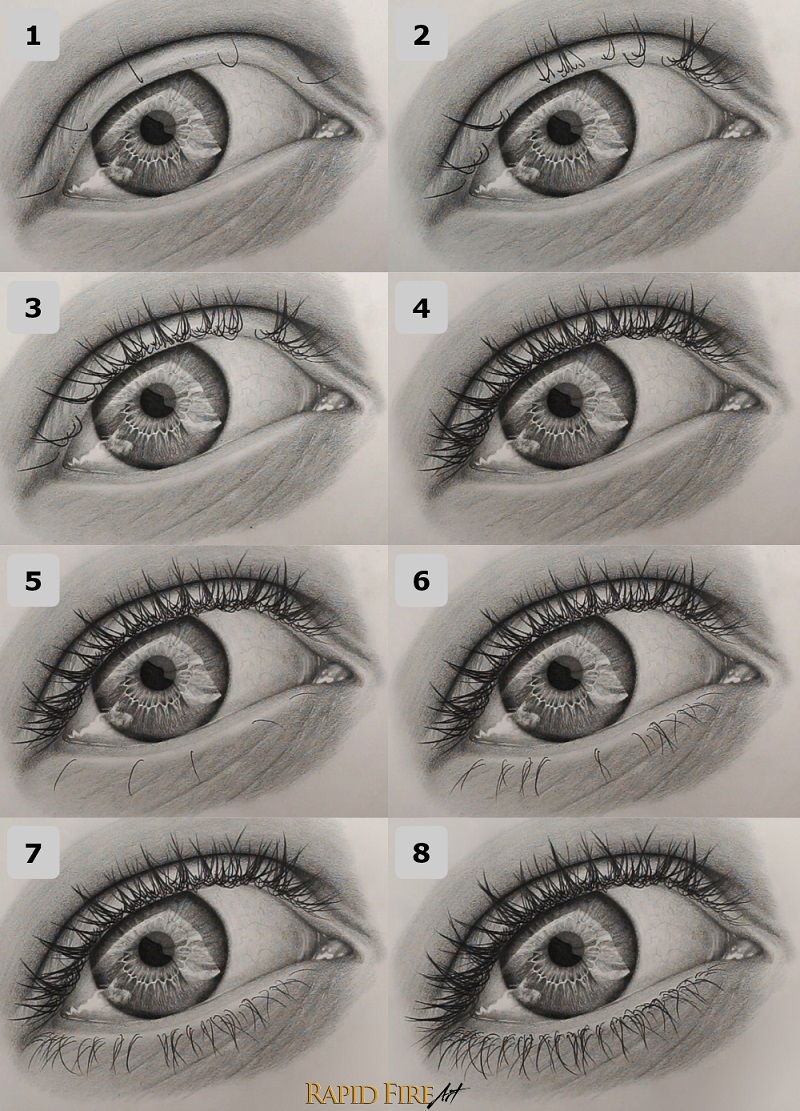
For eyelashes, I’m using a 4B pencil because it creates dark values, without becoming dull too quickly. If you prefer more faint lashes, switch to a harder pencil grade like the 2B or HB.
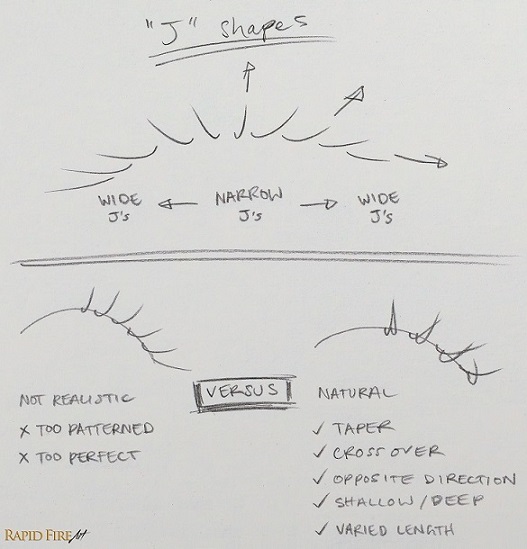
To draw the eyelashes, think of them as “J” shapes of varying widths and angles. Narrow “J”s are front-facing lashes and wide “J”s are side-facing lashes. I like to draw a few of them spread out along the eyelid as anchor lashes, then fill the spaces in between.
To make them look natural, introduce lashes that:
- cross over each other,
- taper together,
- dip down low,
- point in the opposite direction,
- are varied in thickness, value, and length.
To watch me draw the eyelashes on this eye, learn more ways to make them look natural, and watch me troubleshoot, refer to the video clip below:
For the bottom lid, I like to draw my lashes lighter, shorter, and less dense.
After filling in all your lashes, take a step back to see your drawing as a whole. You may find lashes you want to tweak or areas you want to darken due to inconsistencies in hand pressure.
Once you’re done, go along the root of each lash and shade very lightly in a squiggly or circular pattern to give the skin some texture and eyelash shadow. This step can help make your eyelashes look more integrated with the eye instead of just floating there.
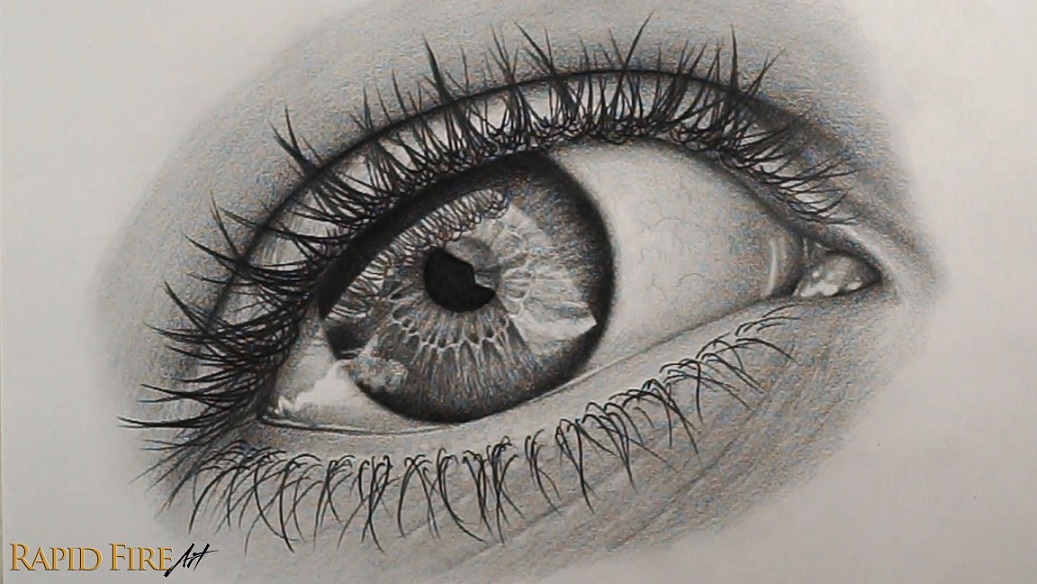
Along the top of the largest highlight that stretches across the iris, draw some eyelash reflections using the same pencil you drew the eyelashes with (I chose the 4B pencil). I’ve drawn a series of overlapping “V” shapes and “U” shapes.
Step 8: Final Touch-ups to Complete Your Realistic Eye Drawing
Take a few steps back from your drawing to view it as a whole, or better yet, take a break and come back to it later. You will see it with new eyes and have better judgment on what adjustments need to be made. I’ve gone along and increased the contrast by darkening select shadows, such as those in the inner corner of the eye, the iris ring, the cast shadow along the entire eyeball, and brightened select areas of each highlight. If you want to make your drawing pop off the page even more, brighten your highlights further by using a white gel pen or correction fluid.
Want to Take Your Eye Drawings Further?
Getting better at drawing realistic eyes takes practice! My 12-page printable eye drawing worksheet pack gives you more opportunities to work on your shading, value matching, eyelashes, and fine details so you can develop greater control over your pencil work.

Print the worksheets as many times as you like and practice at your own pace. You can also try a free sample before getting the full pack!
Happy drawing! ❤️ Darlene

Darlene created RFA In 2013 with the goal of sharing simple yet detailed drawing tutorials with other artists on the world wide web. She is a self taught pencil portrait artist and Youtuber.
How to Draw A Realistic Eye with Detailed Iris Read More »